HP Vectra XU 5/XX HP Vectra XU PC Series - Setting Up Guide - Page 36
Readme, HPutils, ISA Configuration Utility
 |
View all HP Vectra XU 5/XX manuals
Add to My Manuals
Save this manual to your list of manuals |
Page 36 highlights
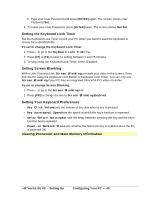
1st hard disk drive (SCSI or IDE) 2nd hard disk drive (SCSI or IDE) Main memory Matrox video memory ISA accessory board Upgrade processor For a SCSI hard disk drive, run SETUP and check the SCSI Integrated Interface and SCSI BIOS fields are enabled. (Refer to "Configuring Your PC".) In Windows, double-click on the relevant Readme icon in the Hputils group, in the Program Manager. Follow the instructions on how to install the software drivers. For an IDE drive, run SETUP and check the IDE Integrated Interface is enabled and the drive is detected. (Refer to "Configuring Your PC".) Format the drive and install an operating system. (Refer to the manuals for your operating system.) Install any applications, referring to their manuals. For a SCSI hard disk drive, run SETUP and check the SCSI Integrated Interface and SCSI BIOS fields are enabled. (Refer to "Configuring Your PC".) In Windows, double-click on the relevant Readme icon in the Hputils group, in the Program Manager. Follow the instructions on how to install the software drivers. For an IDE drive, run SETUP and check the IDE Integrated Interface is enabled and the drive is detected. (Refer to "Configuring Your PC".) Format the drive, referring to the manuals for your operating system. Run SETUP and check that memory is detected. Configure the video resolution using the HP User Tools, in the HPutils Group in Windows. Follow the instructions on the screen. Run SETUP, then run the ISA Configuration Utility in the Plug and Play group, in Windows. Make sure the board's information corresponds with the board you have installed. Run SETUP and check the upgrade processor is detected. If the new accessory does not seem to work properly, refer to the manuals supplied with the accessory. If the PC displays an error message, refer to "Troubleshooting and Error Messages" for details. HP Vectra XU PC - Setting Up Installing Accessories • 36
-
 1
1 -
2
-
3
-
4
-
5
-
6
-
7
-
8
-
9
-
10
-
11
-
12
-
13
-
14
-
15
-
16
-
17
-
18
-
19
-
20
-
21
-
22
-
23
-
24
-
25
-
26
-
27
-
28
-
29
-
30
-
 31
31 -
 32
32 -
 33
33 -
 34
34 -
 35
35 -
 36
36 -
 37
37 -
 38
38 -
 39
39 -
 40
40 -
 41
41 -
42
-
43
-
44
-
45
-
46
-
47
-
48
-
49
-
50
-
51
-
52
-
53
-
54
-
55
-
56
-
57
-
58
-
59
-
60
-
61
-
62
-
63
-
64
-
65
-
66
-
67
-
68
-
69
-
70
-
71
-
72
-
73
-
74
-
75
-
76
-
77
 |
 |
