HP Visualize c3000 hp workstation b1000 and c3000 - pa8700 upgrade instruction - Page 19
Removing the PCI I/O Cards
 |
View all HP Visualize c3000 manuals
Add to My Manuals
Save this manual to your list of manuals |
Page 19 highlights
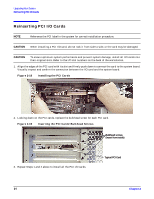
Upgrading Your System Removing the PCI I/O Card(s) Removing the PCI I/O Card(s) CAUTION When removing a PCI I/O card, do not rock it from side to side, or the card may be damaged. After removing each I/O card, locate the label which indicates the PCI installation sequence, and place it on the conductive sheeting until needed for re-assembly. 1. Looking down on the PCI cards, remove the bulkhead screw for each PCI card. Figure 2-13 Removing the PCI Cards' Bulkhead Screws Bulkhead screws (remove from inside) Typical PCI Card 2. Grasp the edges of each PCI card and pull it up and out of the workstation. Figure 2-14 Removing the PCI Cards 3. Repeat Steps 1 and 2 above to remove all the PCI I/O cards. Chapter 2 19
-
 1
1 -
2
-
3
-
4
-
5
-
6
-
7
-
8
-
9
-
10
-
11
-
12
-
13
-
 14
14 -
 15
15 -
 16
16 -
 17
17 -
 18
18 -
 19
19 -
 20
20 -
 21
21 -
 22
22 -
 23
23 -
 24
24 -
25
-
26
-
27
-
28
-
29
-
30
-
31
-
32
 |
 |

Chapter 2
Upgrading Your System
Removing the PCI I/O Card(s)
19
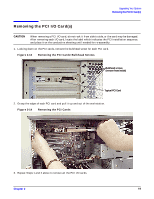
Removing the PCI I/O Card(s)
CAUTION
When removing a PCI I/O card,
do not
rock it from side to side, or the card may be damaged.
After removing each I/O card, locate the label which indicates the PCI installation sequence,
and place it on the conductive sheeting until needed for re-assembly.
1.
Looking down on the PCI cards, remove the bulkhead screw for each PCI card.
Figure 2-13
Removing the PCI Cards’ Bulkhead Screws
2.
Grasp the edges of each PCI card and pull it up and out of the workstation.
Figure 2-14
Removing the PCI Cards
3.
Repeat Steps 1 and 2 above to remove all the PCI I/O cards.
Bulkhead screws
Typical PCI Card
(remove from inside)