HP Visualize c3000 hp workstation b1000 and c3000 - pa8700 upgrade instruction - Page 21
Removing and Replacing the System Board
 |
View all HP Visualize c3000 manuals
Add to My Manuals
Save this manual to your list of manuals |
Page 21 highlights
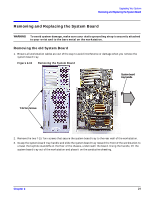
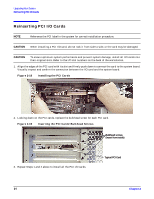
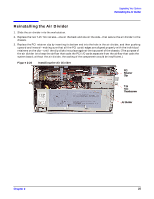
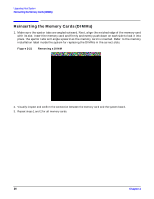
Upgrading Your System Removing and Replacing the System Board Removing and Replacing the System Board WARNING To avoid system damage, make sure your static-grounding strap is securely attached to your wrist and to the bare metal on the workstation. Removing the old System Board 1. Ensure all workstation cables are out of the way to avoid interference or damage when you remove the system board tray. Figure 2-16 Removing the System Board System board tray handle T-15 Torx Screws 2. Remove the two T-15 Torx screws that secure the system board tray to the rear wall of the workstation. 3. Grasp the system-board tray handle and slide the system board tray toward the front of the workstation to unseat the keyhole standoffs on the floor of the chassis, underneath the board. Using the handle, lift the system board tray out of the workstation and place it on the conductive sheeting. Chapter 2 21
-
 1
1 -
2
-
3
-
4
-
5
-
6
-
7
-
8
-
9
-
10
-
11
-
12
-
13
-
14
-
15
-
 16
16 -
 17
17 -
 18
18 -
 19
19 -
 20
20 -
 21
21 -
 22
22 -
 23
23 -
 24
24 -
 25
25 -
 26
26 -
27
-
28
-
29
-
30
-
31
-
32
 |
 |
