HP XM600 hp kayak xm600, installing and replacing hardware parts in your pc wo - Page 27
Replacing the Power Supply Unit, Removing the, Power Supply Unit, Installing the Power, Supply Unit
 |
View all HP XM600 manuals
Add to My Manuals
Save this manual to your list of manuals |
Page 27 highlights
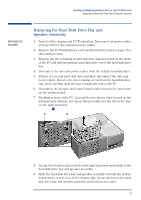
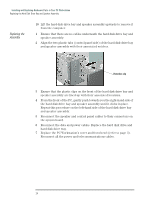
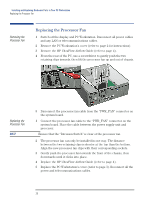
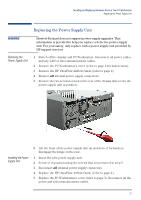
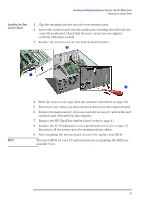
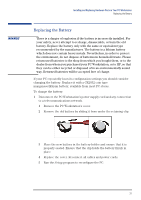
Installing and Replacing Hardware Parts in Your PC Workstation Replacing the Power Supply Unit Replacing the Power Supply Unit WARNING Hewlett-Packard does not support power supply upgrades. This information is provided to help you replace a defective power supply unit. For your safety, only replace with a power supply unit provided by HP support services. Removing the Power Supply Unit 1 Switch off the display and PC Workstation. Disconnect all power cables and any LAN or telecommunications cables. 2 Remove the PC Workstation's cover (refer to page 2 for instructions). 3 Remove the HP UltraFlow Airflow Guide (refer to page 4). 4 Remove all internal power supply connectors. 5 Remove the two screws located on the rear of the chassis that secure the power supply unit in position. Installing the Power Supply Unit 6 Lift the front of the power supply unit up and move it forwards to disengage the hinge on the rear. 1 Insert the new power supply unit. 2 Secure it in position using the screws that you removed in step 5. 3 Reconnect all internal power supply connectors. 4 Replace the HP UltraFlow Airflow Guide (refer to page 4). 5 Replace the PC Workstation's cover (refer to page 3). Reconnect all the power and telecommunications cables. 27
-
 1
1 -
2
-
3
-
4
-
5
-
6
-
7
-
8
-
9
-
10
-
11
-
12
-
13
-
14
-
15
-
16
-
17
-
18
-
19
-
20
-
21
-
 22
22 -
 23
23 -
 24
24 -
 25
25 -
 26
26 -
 27
27 -
 28
28 -
 29
29 -
 30
30 -
 31
31
 |
 |
