HP XM600 hp kayak xm600, installing and replacing hardware parts in your pc wo - Page 7
Removing, Replacing and Upgrading Memory on Models Shipped with SDRAM, Upgrading SDRAM Memory - kayak memory capacity
 |
View all HP XM600 manuals
Add to My Manuals
Save this manual to your list of manuals |
Page 7 highlights
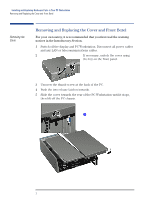
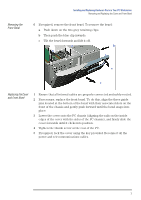
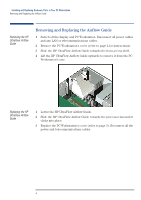
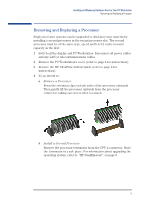
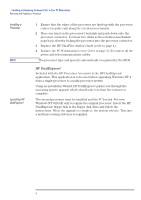
Installing and Replacing Hardware Parts in Your PC Workstation Removing, Replacing and Upgrading Memory on Models Shipped with SDRAM Removing, Replacing and Upgrading Memory on Models Shipped with SDRAM Upgrading SDRAM Memory SDRAM models of the HP Kayak XM600 are supplied with a Memory Expansion Card supporting one or two Synchronized Dynamic RAM (SDRAM) 100 MHz memory modules. NOTE Use only the HP memory modules provided for your PC model. If you want to find out about available accessories for your PC, refer to the HP Accessories Web site at: http://www.hp.com/go/pcaccessories. If two memory modules are installed, and they do not have identical capacities, then the module with the highest capacity must be installed in the memory socket nearest to the system board. If only one memory module is installed, it can be installed in either socket. The unused socket should be left empty; no continuity module or terminator is required. The Memory Expansion Card is installed in a reserved memory socket on the system board (the socket furthest from the processor(s)). The two remaining memory sockets on the system board, RIMM0 and RIMM1 must each contain a continuity module. Removing and Replacing an SDRAM Module NOTE 1 Switch off the display and PC Workstation. Disconnect all power cables and any LAN or telecommunications cables. 2 Remove the PC Workstation's cover (refer to page 2 for instructions). 3 Remove the HP UltraFlow Airflow Guide to obtain access to the SDRAM modules and sockets on the memory expansion card (refer to page 4 for instructions). Install memory modules directly onto the Memory Expansion Card without removing it from the system board. 4 To remove a memory module, open the two retaining clips and remove the module out of the socket. 7
-
 1
1 -
 2
2 -
 3
3 -
 4
4 -
 5
5 -
 6
6 -
 7
7 -
 8
8 -
 9
9 -
 10
10 -
 11
11 -
 12
12 -
13
-
14
-
15
-
16
-
17
-
18
-
19
-
20
-
21
-
22
-
23
-
24
-
25
-
26
-
27
-
28
-
29
-
30
-
31
 |
 |
