HP Z3200ps HP Designjet Z3200 Photo Printer Series - Setup Poster [English] - Page 13
Mac OS - designjet mac
 |
UPC - 884420403401
View all HP Z3200ps manuals
Add to My Manuals
Save this manual to your list of manuals |
Page 13 highlights
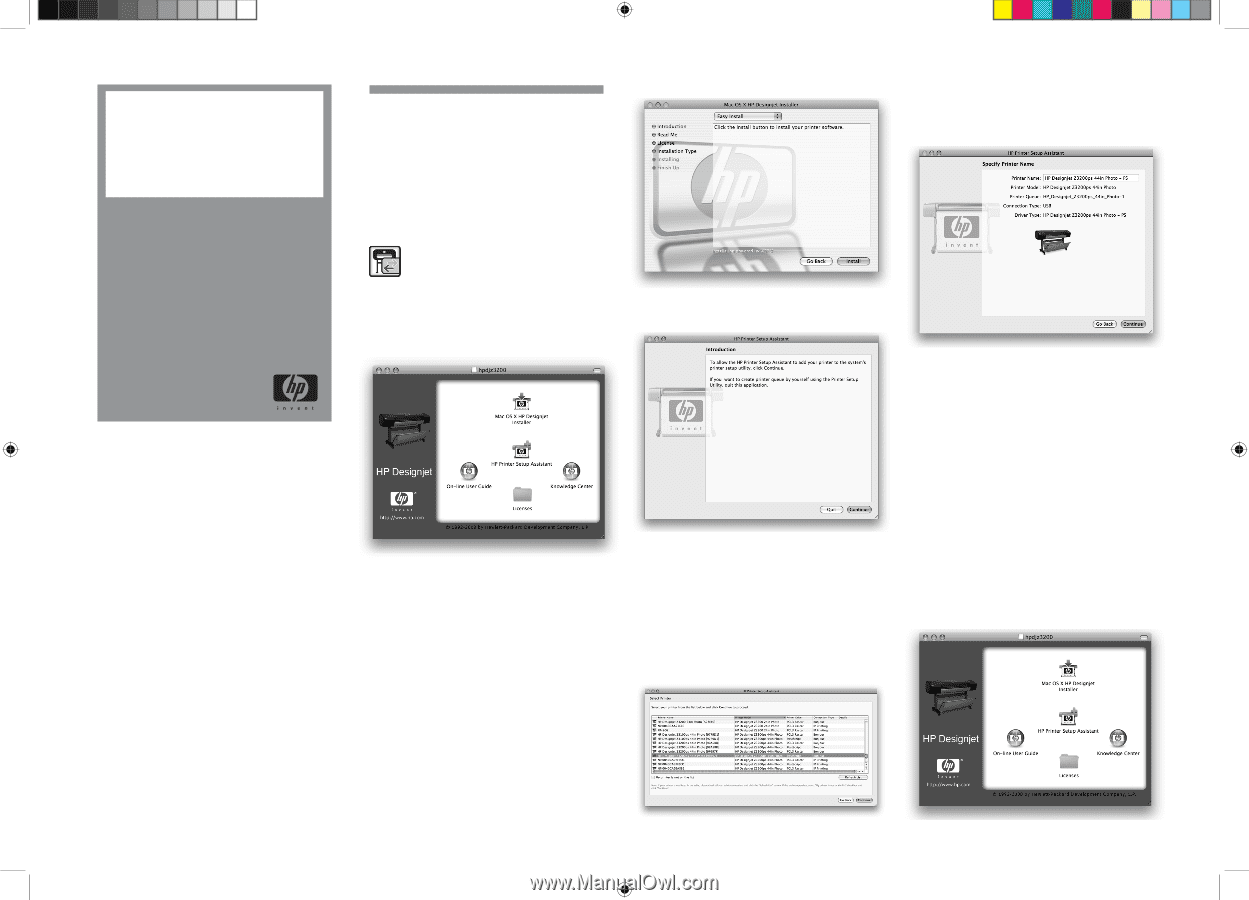
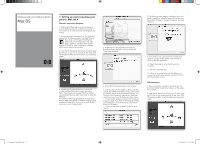
Setting up and connecting your printer Mac OS 1. Setting up and connecting your printer: Mac OS X Network connection (Bonjour) 1. Make sure that the printer is on and connected to a working Ethernet network, and that all computers in the network are on and connected (including hubs and routers). 2. Go to your printer's front panel, use the Menu key if necessary to find the main menu, and select the icon. If you have a Z2100 select 'Fast Ethernet' followed by 'View configuration' and if you have a Z3200 or Z3200ps select 'Gigabit Ethernet' followed by 'View configuration'. Note the mDNS service name of your printer. 3. Insert the HP Start-Up Kit CD into your CD drive, open the CD icon on your screen and look for the 'Mac OS X HP Designjet Installer' icon that matches your operating system. 5. Follow the on-screen instructions that take you through the driver installation until you see the HP Printer Setup Assistant. 4. Double-click the appropriate icon to launch the installer, and then follow the on-screen instructions. Note: if you have an HP Designjet Z2100 or Z3200 we recommend that you select 'Easy Install' to install all elements. If you have an HP Designjet Z3200ps we recommend that you select 'Easy Install' to install the PostScript driver and the HP Printer Utility. If you wish to install the PCL3 raster driver, select 'Custom Install'. 6. In the HP Printer Setup Assistant, click 'Continue'. 7. In the list of printers that appears, select a line that contains the mDNS service name of your printer (which you noted in step 2) in the Printer Name column, and 'Bonjour' in the Connection Type column. Scroll sideways if necessary to see the Connection Type column. • If your printer appears in the list, click 'Continue' and go to step 8. If you have an HP Designjet 3200ps, scroll sideways to see the Printer Driver column (PostScript or PCL3 Raster). • If your printer does not appear in the list, go to step 10. 8. The following screen displays information about your printer's installation, where the name of the printer can be modified. Make your changes if necessary and click 'Continue'. 9. Your printer is now connected. Select 'Create new queue' to connect another printer to the network, or 'Quit' to close the application. 10. Select 'My printer is not on the list' and click 'Continue'. 11. Select the connection type. 12. Follow the on-screen instructions that help you to connect your printer to the network, and select 'Quit' to close the assistant window. USB connection 1. Do not connect the computer to the printer yet. You must first install the printer driver software on the computer, as follows. 2. Insert the HP Start-Up Kit CD into your CD drive, open the CD icon on your screen and look for the 'Mac OS X HP Designjet Installer' icon that matches your operating system. 1.2 set up troja Asia NEW.indd 13 26/06/2008 11:16:12 AM
-
 1
1 -
2
-
3
-
4
-
5
-
6
-
7
-
 8
8 -
 9
9 -
 10
10 -
 11
11 -
 12
12 -
 13
13 -
 14
14 -
 15
15 -
 16
16
 |
 |