HP Z3200ps HP Designjet Z3200 Photo Printer Series - Setup Poster [English] - Page 3
are spare, Make sure you have used 4 screws, in each leg., on the outside, on the inside, Do
 |
UPC - 884420403401
View all HP Z3200ps manuals
Add to My Manuals
Save this manual to your list of manuals |
Page 3 highlights
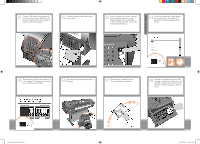
Assemble the stand 11 Remove the cross-brace and the two pieces of packaging material from each end of the stand box. 12 Place the two pieces of packaging material on the floor, spaced 40 cm apart, and place the cross-brace on top of them. 13 A screwdriver and 22 screws are provided in the stand box: 16 screws to assemble the stand, 4 to attach it to the printer, and 2 are spare. Do not try to remove the washers from the screws. Note: All the screws are for the stand. The basket does not need screws. 14 Attach each leg of the stand to the crossbrace, using two screws on the outside of the leg and then two on the inside. First fit all four screws loosely, then tighten up the screws on the outside of the leg, followed by the screws on the inside. x8 15 Make sure you have used 4 screws in each leg. 16 Attach a foot to each leg, using four screws in each foot. First fit all four screws loosely, then tighten them up. 17 Return to the main body of the printer, carefully turn the printer upside down in order to attach the legs. 18 Remove the small flaps from each of the foam end pieces. Do not remove the foam end pieces. Attach the stand 4+4=8 1.2 set up troja Asia NEW.indd 3 26/06/2008 11:16:05 AM
-
 1
1 -
 2
2 -
 3
3 -
 4
4 -
 5
5 -
 6
6 -
 7
7 -
 8
8 -
 9
9 -
10
-
11
-
12
-
13
-
14
-
15
-
16
 |
 |
