HP Z3200ps HP Designjet Z3200 Photo Printer Series - Setup Poster [English] - Page 6
Prepare the printer, Attach the basket
 |
UPC - 884420403401
View all HP Z3200ps manuals
Add to My Manuals
Save this manual to your list of manuals |
Page 6 highlights
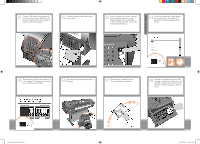
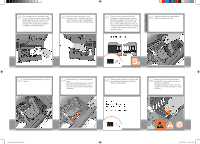
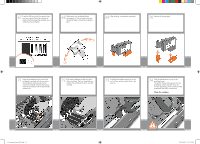
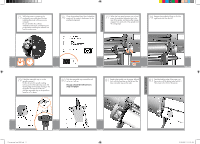
Attach the basket Prepare the printer 35 Lay out the components of the basket. 36 Fit the basket supports to the stand legs, one to each leg. 37 Fit the two short tubes to the printer's feet, one on the front of each foot. Each tube should click into place. 38 Attach the basket's front tube to the two short tubes on each foot. 39 Rest the basket's rear tube on the supports that you have just fitted to each leg of the stand. 40 The basket is now complete. 41 Remove the orange tape from the printer window. 42 Open the window (printer's top cover). 1.2 set up troja Asia NEW.indd 6 26/06/2008 11:16:07 AM
-
 1
1 -
 2
2 -
 3
3 -
 4
4 -
 5
5 -
 6
6 -
 7
7 -
 8
8 -
 9
9 -
 10
10 -
 11
11 -
 12
12 -
13
-
14
-
15
-
16
 |
 |

Rest the basket’s rear tube on the supports
that you have just fitted to each leg of the
stand.
The basket is now complete.
Remove the orange tape from the printer
window.
39
40
41
Attach the basket’s front tube to the two
short tubes on each foot.
38
Fit the two short tubes to the printer’s feet,
one on the front of each foot. Each tube
should click into place.
37
Prepare the printer
Lay out the components of the basket.
35
Fit the basket supports to the stand legs,
one to each leg.
36
Attach the basket
Open the window (printer’s top cover).
42
1.2 set up troja Asia NEW.indd
6
26/06/2008
11:16:07 AM