HP Z3200ps HP Designjet Z3200 Photo Printer Series - Setup Poster [English] - Page 9
Install the printheads - ink
 |
UPC - 884420403401
View all HP Z3200ps manuals
Add to My Manuals
Save this manual to your list of manuals |
Page 9 highlights
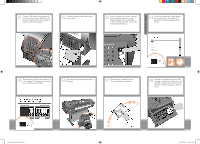
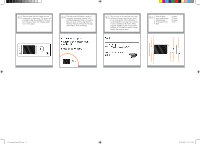
Install the printheads 59 The cartridges must be inserted the right way around: the ink outlet in the cartridge should meet the ink inlet in the slot. Push the cartridge into the slot until it clicks into place. The printer beeps whenever a cartridge is successfully inserted. 60 When you have inserted the correct cartridges into the right-hand side of the printer, open the cover on the left-hand side and insert the other cartridges there. 61 When you have inserted all of the ink cartridges correctly, the printer must prepare the ink system for its first use. It will do this immediately if you press the OK key, or after a 60-second pause if you do not press the OK key. When the ink system is ready, the front panel will prompt you to open the window. 62 Open the window and grasp the blue handle of the printhead cover. 63 Pull the blue handle towards you as far as it will go. 64 Lift the handle up to open the printhead cover. The front panel prompts you for the next step: removing the printheads. Do not press OK until you have removed all the printheads. 65 The front panel prompts you to remove the setup printheads and press the OK key when you have finished. 66 Remove and discard all orange setup printheads.You may need to use force to extract each printhead. The setup printheads contain ink, which could leak out. Avoid touching pins, leads or circuits. 1.2 set up troja Asia NEW.indd 9 26/06/2008 11:16:09 AM
-
 1
1 -
2
-
3
-
 4
4 -
 5
5 -
 6
6 -
 7
7 -
 8
8 -
 9
9 -
 10
10 -
 11
11 -
 12
12 -
 13
13 -
 14
14 -
15
-
16
 |
 |
