HP Z3200ps HP Designjet Z3200 Photo Printer Series - Setup Poster [English] - Page 7
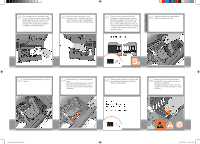
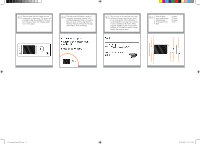
Note: The rear tray may already, be assembled as in step 50. If, so, please remove the orange, tape - 44
 |
UPC - 884420403401
View all HP Z3200ps manuals
Add to My Manuals
Save this manual to your list of manuals |
Page 7 highlights
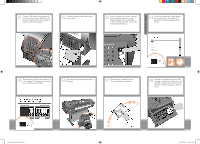
43 Beside the front panel, you will see a cardboard support attached to the printer with tape. Remove the tape. 44 Turn the cardboard support 90° to the right. 45 Lift the cardboard support up and out of the printer. It will not be needed again; you can discard it. 46 Inside the right-hand side of the printer, you will see an orange carriage stopper. Release the stopper by lifting the lever wrapped with light blue paper, then remove the stopper from the printer. 47 Part of the stopper may fall off while you are removing it; in this case, remove both parts. The stopper will not be needed again; you can discard it. 48 Move to the rear of the printer and fit the rear tray to the printer. Note: The rear tray may already be assembled (as in step 50). If so, please remove the orange tape from the rear tray and go to step 51. 49 Slide it in and then down. 50 Push up the back of the tray into its closed position. 1.2 set up troja Asia NEW.indd 7 26/06/2008 11:16:08 AM
-
 1
1 -
 2
2 -
 3
3 -
 4
4 -
 5
5 -
 6
6 -
 7
7 -
 8
8 -
 9
9 -
 10
10 -
 11
11 -
 12
12 -
13
-
14
-
15
-
16
 |
 |
