HP Z620 HP Workstations - CRU Dataport DX115 kit installation - Page 14
HP Z620 Manual
 |
View all HP Z620 manuals
Add to My Manuals
Save this manual to your list of manuals |
Page 14 highlights
3. Install four M3 x 5mm screws (black) in the lower four mounting holes. See Figure 9 Installing the guide screws on page 7. Spare M3 screws are supplied with your workstation and mounted on its chassis near the optical bay. Lift the green release lever for the optical bay and slide the DX115 unit into the bay until it is stopped by the release latch. The following figures show examples of release levers and their locations. Figure 15 Installing the DX115 case in an HP Z210 CMT and HP Z400 workstation mini-tower configuration 4. Figure 16 Installing the DX115 case in an HP Z210 CMT desktop configuration 10 CRU Dataport DX115 kit installation ENWW
-
 1
1 -
2
-
3
-
4
-
5
-
6
-
7
-
8
-
 9
9 -
 10
10 -
 11
11 -
 12
12 -
 13
13 -
 14
14 -
 15
15 -
 16
16 -
 17
17 -
 18
18 -
 19
19 -
20
-
21
-
22
 |
 |
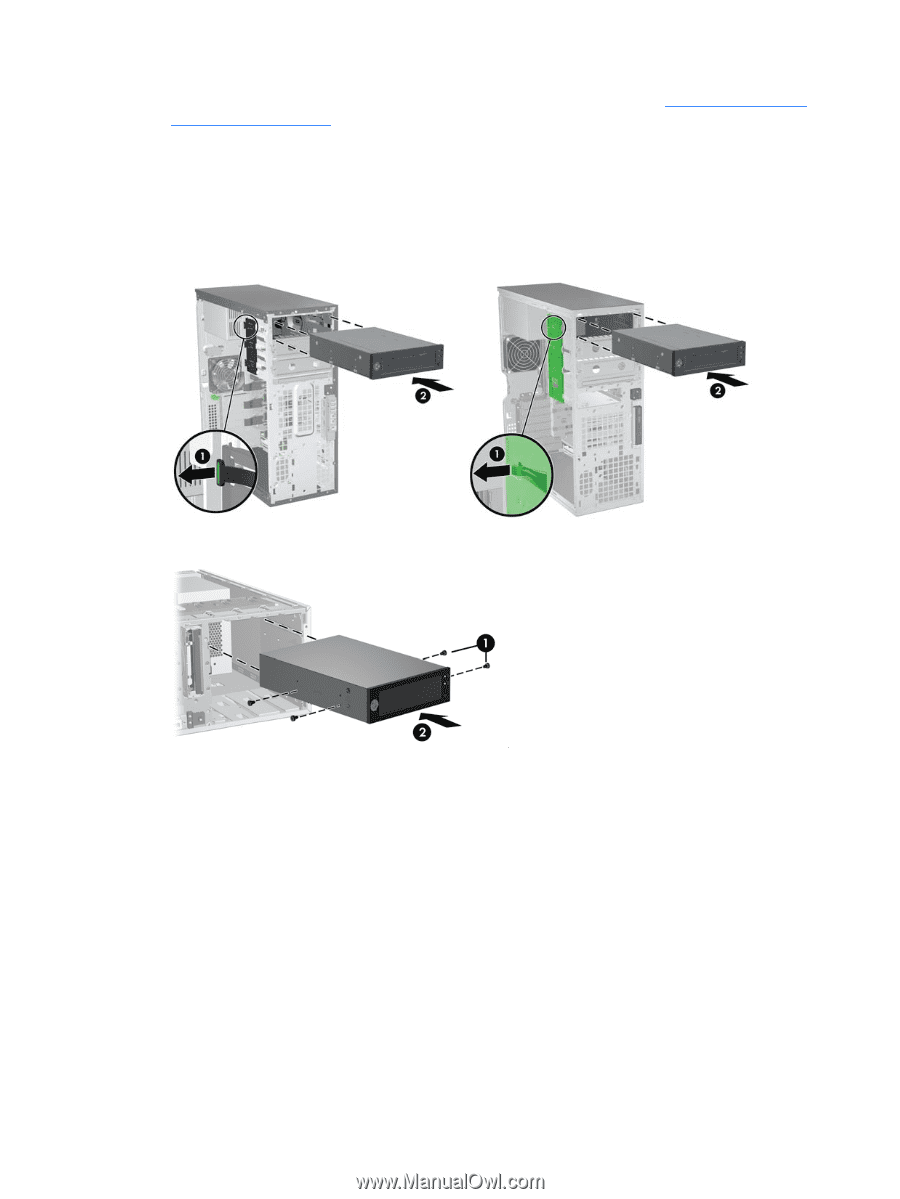
3.
Install four M3 x 5mm screws (black) in the lower four mounting holes. See
Figure
9
Installing the
guide screws
on page
7
. Spare M3 screws are supplied with your workstation and mounted on its
chassis near the optical bay.
4.
Lift the green release lever for the optical bay and slide the DX115 unit into the bay until it is
stopped by the release latch. The following figures show examples of release levers and their
locations.
Figure 15
Installing the DX115 case in an HP Z210 CMT and HP Z400 workstation mini-tower
configuration
Figure 16
Installing the DX115 case in an HP Z210 CMT desktop configuration
10
CRU Dataport DX115 kit installation
ENWW