HP d248 Hardware Reference Guide - HP Compaq Business Desktop d228 and d248 Mi - Page 22
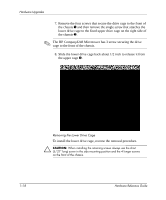
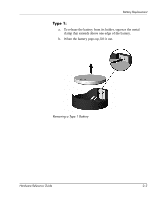
Slide the lower drive cage back about 1/2 inch to release it from, the upper cage
 |
View all HP d248 manuals
Add to My Manuals
Save this manual to your list of manuals |
Page 22 highlights
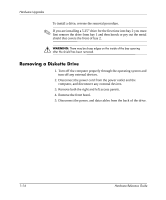
Hardware Upgrades 7. Remove the four screws that secure the drive cage to the front of the chassis 1 and then remove the single screw that attaches the lower drive cage to the fixed upper drive cage on the right side of the chassis 2. ✎ The HP Compaq d248 Microtower has 3 screw securing the drive cage to the front of the chassis. 8. Slide the lower drive cage back about 1/2 inch to release it from the upper cage 3. Removing the Lower Drive Cage To install the lower drive cage, reverse the removal procedure. Ä CAUTION: When installing the retaining screws always use the short (5/32" long) screw in the side mounting position and the 4 longer screws on the front of the chassis. 1-18 Hardware Reference Guide
-
 1
1 -
2
-
3
-
4
-
5
-
6
-
7
-
8
-
9
-
10
-
11
-
12
-
13
-
14
-
15
-
16
-
 17
17 -
 18
18 -
 19
19 -
 20
20 -
 21
21 -
 22
22 -
 23
23 -
 24
24 -
 25
25 -
 26
26 -
 27
27 -
28
-
29
-
30
-
31
-
32
-
33
-
34
-
35
-
36
-
37
-
38
 |
 |

1–18
Hardware Reference Guide
Hardware Upgrades
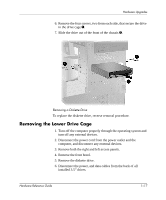
7. Remove the four screws that secure the drive cage to the front of
the chassis
1
and then remove the single screw that attaches the
lower drive cage to the fixed upper drive cage on the right side of
the chassis
2
.
✎
The HP Compaq d248 Microtower has 3 screw securing the drive
cage to the front of the chassis.
8. Slide the lower drive cage back about 1/2 inch to release it from
the upper cage
3
.
Removing the Lower Drive Cage
To install the lower drive cage, reverse the removal procedure.
Ä
CAUTION:
When installing the retaining screws always use the short
(5/32” long) screw in the side mounting position and the 4 longer screws
on the front of the chassis.