HP d248 Hardware Reference Guide - HP Compaq Business Desktop d228 and d248 Mi - Page 8
When replacing the front bezel, ensure that the top of the front bezel
 |
View all HP d248 manuals
Add to My Manuals
Save this manual to your list of manuals |
Page 8 highlights
Hardware Upgrades 5. To remove the front bezel, grasp the bottom of the front panel below the lowest air vent and pull the panel out and up to release it from the chassis. Removing the Front Bezel To install the front bezel, insert the top two latches into their respective holes in the chassis and push the bezel in until it is fully seated. ✎ When replacing the front bezel, ensure that the top of the front bezel is flush with the top of the chassis before pressing it into place. 1-4 Hardware Reference Guide
-
 1
1 -
2
-
 3
3 -
 4
4 -
 5
5 -
 6
6 -
 7
7 -
 8
8 -
 9
9 -
 10
10 -
 11
11 -
 12
12 -
 13
13 -
14
-
15
-
16
-
17
-
18
-
19
-
20
-
21
-
22
-
23
-
24
-
25
-
26
-
27
-
28
-
29
-
30
-
31
-
32
-
33
-
34
-
35
-
36
-
37
-
38
 |
 |
1–4
Hardware Reference Guide
Hardware Upgrades
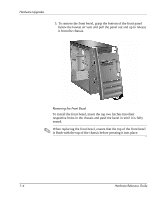
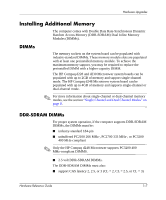
5. To remove the front bezel, grasp the bottom of the front panel
below the lowest air vent and pull the panel out and up to release
it from the chassis.
Removing the Front Bezel
To install the front bezel, insert the top two latches into their
respective holes in the chassis and push the bezel in until it is fully
seated.
✎
When replacing the front bezel, ensure that the top of the front bezel
is flush with the top of the chassis before pressing it into place.