HP t510 Imaging Plugin 1.0 User Manual - Page 8
Update Authentication Keys
 |
View all HP t510 manuals
Add to My Manuals
Save this manual to your list of manuals |
Page 8 highlights
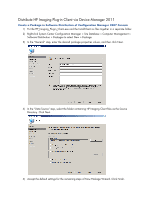
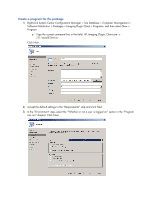
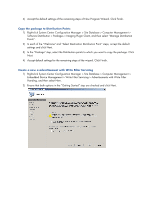
Update Authentication Keys HP Imaging Plug-in uses SSL to encrypt the connection. To prevent a non-authorized server from deploying images to clients, HP Imaging Plug-in uses RSA key pairs to authenticate tasks. The server has an RSA private key and the clients have corresponding RSA public keys. After updating the key pair, the clients can accept Imaging tasks only from a server that has the new private key. Create New Key Pair Open Windows Explorer and go to the \Config folder. In this folder, you should find a file named newkeys.cmd. Double-click newkeys.cmd to create priv.pem and pub.pem. Update Private Key Copy the priv.pem file to the \Service folder to replace the original file. Update Public Key You can copy the pub.pem to "C:\Program Files\Hewlett-Packard\Imaging Plugin\Client\key" folder of the thin clients via USB key or FTP server or other means. The next steps will show how to update public keys with Device Manager 2011. Note: Please refer to Distribute HP Imaging Plug-in Client via Device Manager 2011 about how to distribute software to thin clients. 1) Put pub.pem in a folder, for example: c:\pubkey. 2) Create a package in System Center Configuration Manager > Site Database > Computer Management > Software Distribution, and set the Source Directory to c:\pubkey. 3) Create a program for the package created in the previous step. a. Set the command line: cmd.exe /c "copy /Y pub.pem "C:\Program Files\Hewlett-Packard\Imaging Plugin\Client\key"" b. Environment -> Program can run: Whether or not a user is logged on 4) Copy the package to distribution points. 5) Add a new advertisement in Write Filter Servicing. a. Set the mandatory assignments in Schedule to make the advertisement run automatically, e.g., schedule "As soon as possible". b. Distribution Points: Download content from distribution point and run locally.
-
 1
1 -
2
-
 3
3 -
 4
4 -
 5
5 -
 6
6 -
 7
7 -
 8
8 -
 9
9 -
 10
10 -
 11
11 -
 12
12 -
 13
13 -
14
-
15
-
16
 |
 |
