Honeywell 6271C User Guide
Honeywell 6271C - Ademco TouchCenter Color Keypad Manual
 |
UPC - 781410790247
View all Honeywell 6271C manuals
Add to My Manuals
Save this manual to your list of manuals |
Honeywell 6271C manual content summary:
- Honeywell 6271C | User Guide - Page 1
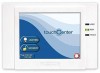
ADEMCO 6271C ADEMCO 6271CV TouchCenter Keypads User Guide K6249V1 6/07 Rev. A - Honeywell 6271C | User Guide - Page 2
Interface 4 Navigating through the TouchCenter 5 About Your Home Screen 5 TouchCenter "Arming" Screen 7 SYSTEM OVERVIEW 9 Introduction to Your System 9 Burglary Protection 9 Partitions 9 Zones 9 Entry/Exit Delays 10 Alarms 10 Memory of Alarm 10 Fire Protection 10 User Codes 11 Extended - Honeywell 6271C | User Guide - Page 3
Message 45 Retrieving and Deleting a Voice Message 46 SUMMARY OF TOUCHCENTER LED OPERATION 47 TouchCenter LED Operation 47 TOUCHCENTER SETUP 48 How to Access TouchCenter Setup Options 48 How to Access Setup 48 How to Adjust the Touch Screen Contrast 50 How to Adjust the Volume 51 How to - Honeywell 6271C | User Guide - Page 4
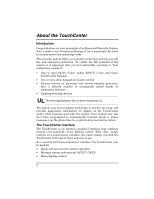
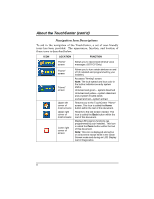
One or more 6271C (Color) and/or 6271CV (Color and Voice) TouchCenter Keypads • One or more other keypads for system control TouchCenter Interface The TouchCenter is an intuitive, graphical interface that combines security and optionally, home lighting control. With clear, simple controls on a touch - Honeywell 6271C | User Guide - Page 5
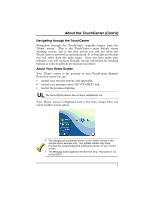
screen option. • The background and buttons shown on the "Home" screen in this manual are for example only. Your system installer may have changed the actual background and buttons shown on your "Home" screen. • The Message button applies to the 6271CV Only. This button is not on the 6271C. 5 - Honeywell 6271C | User Guide - Page 6
by your installer.) Accesses "Arming" screen. Note: The lock symbol and lock color in the button indicates security system status. Unlocked and green - system disarmed Unlocked and yellow - system disarmed and a system trouble exists Locked and red - system armed Returns you to the TouchCenter "Home - Honeywell 6271C | User Guide - Page 7
TouchCenter (Cont'd) TouchCenter "Arming" Screen From the "Home" screen, press SECURITY to access the TouchCenter "Arming" screen. Use this picture and the table that follows to become familiar with the TouchCenter TouchCenter is a 6271CV. This button causes the TouchCenter your User NOTE (6271CV only - Honeywell 6271C | User Guide - Page 8
user is so authorized). When the Arm Multi-Partitions circle does not contain a check mark, each partition must be armed individually. Note: This option may not be shown for some single partition systems. Press this button for more Security, Lighting, and TouchCenter setup features. System Troubles - Honeywell 6271C | User Guide - Page 9
but leave upper-story windows open.) The system also provides a Chime mode (6271C and 6271CV) and Voice mode (6271CV), for alerting users to the opening and closing of doors and windows even while the system is descriptor for that zone (if programmed), when an alarm or trouble condition occurs. 9 - Honeywell 6271C | User Guide - Page 10
delay period. Note: 6271CV Only - On some systems, pressing the Voice Status Icon restarts the exit delay. Refer to your control panel User Guide to see if Ask your installer about the delay times programmed into your system. Alarms When an alarm occurs, the TouchCenter (and any other keypads) and - Honeywell 6271C | User Guide - Page 11
alpha keypad or through the console emulation mode on your TouchCenter touch screen. Refer to your Control Panel User Guide for these features. Safe Mode The TouchCenter contains a Safe Mode of operation. In the rare event that the TouchCenter cannot successfully communicate in its graphic mode - Honeywell 6271C | User Guide - Page 12
non-graphic alpha keypad. • You can depress the "Panic" key and generate Emergency Messages as defined in the panels home partition for this TouchCenter. • The Armed and Ready LEDs on the front of the TouchCenter will indicate the TouchCenter's home partition status. The Message (6271CV) or Trouble - Honeywell 6271C | User Guide - Page 13
(set for Instant or Maximum Mode) Yes (set for Away or Maximum Mode) No (set for Stay or Instant Mode) *Your installer may have configured Night Mode differently; have your installer write the actual zone settings above. How to Arm the System Arming the system in any mode is performed in the - Honeywell 6271C | User Guide - Page 14
Quick Arm is Not enabled in your system, you will receive a message to enter your User Code. o The TouchCenter beeps twice (Away and Night Maximum Modes) or 3 times (Stay and Night Instant "lock" next to the button changes color and to a closed lock. The system is now armed in the selected mode. 14 - Honeywell 6271C | User Guide - Page 15
accepted, the system displays the partitions that the user has access to. Note: A user may have access to some or all of the available partitions! You have two arming options: To arm one or more partitions, highlight the partition(s) to be armed by touching it on the screen, then press ARM SELECTED - Honeywell 6271C | User Guide - Page 16
trouble Zone is faulted Zone has low battery instructions "To Bypass Zones, Enter Code". • Residential systems will not allow you to bypass fire or emergency zones. On commercial systems, a specified user may be allowed to bypass fire and system zones if the user was enabled by your system installer - Honeywell 6271C | User Guide - Page 17
Security System Operation (Cont'd) 4. Enter your 4-digit user code. The "Arming" screen is displayed showing the system status as Ready-Bypass 17 - Honeywell 6271C | User Guide - Page 18
On commercial systems, a specified user may be allowed to bypass fire and system zones if the user was enabled by your system installer. • To bypass zones, the SHOW ZONES button on the "More Choices" screen. While the TouchCenter is requesting and receiving the zone data from the control panel, the - Honeywell 6271C | User Guide - Page 19
(Cont'd) SCREEN ACTION 4. Highlight the zone(s) to be bypassed by touching it on the screen when the zones are displayed. 5. Press the BYPASS SELECTED button. The "User Authorization" screen is displayed with the instructions "To Bypass Zones, Enter Code". Note: If zones have already been - Honeywell 6271C | User Guide - Page 20
Security System Operation (cont'd) SCREEN ACTION 7. Press the BACK button to return to the "Arming" screen. 20 - Honeywell 6271C | User Guide - Page 21
If a zone is bypassed, you can remove the bypass as follows: SCREEN ACTION 1. View bypassed zones by pressing the SHOW ZONES button. While the TouchCenter is requesting and receiving the zone data from the control panel, the screen displays "Please Wait!". Then the zones, along with their current - Honeywell 6271C | User Guide - Page 22
System Operation (cont'd) SCREEN ACTION 3. The "User Authorization" screen is displayed with the instructions To Clear Bypasses, Enter Code. Note: If the system is armed and you unbypass a zone, it will disarm the system. Enter your 4-digit user code. The "More Choices" screen is displayed - Honeywell 6271C | User Guide - Page 23
but call the police from a nearby safe location. If you return after an alarm has occurred and the main sounder has shut itself off, the TouchCenter will beep rapidly upon entering, indicating that an alarm has occurred during your absence. LEAVE IMMEDIATELY and CONTACT THE POLICE from a nearby safe - Honeywell 6271C | User Guide - Page 24
the DISARM button on the "Armed" screen. The "User Authorization" screen is displayed with the instructions "To Disarm, Enter Code". 2. Enter your 4-digit user code. If the Arm Multi-Partitions button on the "Armed" screen is not checked, the TouchCenter beeps once, the system will disarm, and the - Honeywell 6271C | User Guide - Page 25
Security System Operation (Cont'd) SCREEN ACTION Note: Once the system is disarmed, the TouchCenter will return to the "Home" screen after the selected "To Home Page After" time has expired. This time is selected on the "Setup" screen. 25 - Honeywell 6271C | User Guide - Page 26
he/she can control the entire system. If a user is so authorized, a TouchCenter or other keypad in one partition can be used to perform system functions in another partition. (Note that only those partitions authorized and programmed by the installer can be accessed in this manner.) To check the - Honeywell 6271C | User Guide - Page 27
partition(s). If the code is accepted, the system displays the partitions that user has access to. Note: A code may have access to some or a residential panel, the selected partition in the TouchCenter will automatically revert back to the TouchCenter's home partition after two minutes. When using - Honeywell 6271C | User Guide - Page 28
Operation (cont'd) How to Send Emergency Messages • Emergency messages are optional and may not be available on your system. Ask your system installer if emergency messages are available on your system. • The Emergency screen cannot be accessed while running a screen diagnostic test or while in - Honeywell 6271C | User Guide - Page 29
. The control panel must be programmed to record various system events in installer programming mode. To view the Event Log, perform the following: 1. Choices" screen. The "Event Log" screen is displayed. Note: While TouchCenter is requesting and receiving the event log data from the control panel, - Honeywell 6271C | User Guide - Page 30
Security System Operation (cont'd) SCREEN ACTION The first six events will be displayed. To view all items, press the Show More button and press the up/down arrows to scroll through the event log. Notes: • When All Partitions or All Events button is pressed, and more than 100 events exist, the - Honeywell 6271C | User Guide - Page 31
the problem, go to your nearest keypad and manually initiate an alarm by pressing the panic key assigned as FIRE emergency (if programmed by the installer) and , acknowledge, and clear the alarm by: Residential systems - a. Press "Touch here to Silence" on the display to silence the alarm. b. Press - Honeywell 6271C | User Guide - Page 32
If the keypad does not indicate problem has been corrected, clear the display by entering the DISPLAY FAULTS button on the Arming screen, selecting the fire zone, pressing the CLEAR button and then entering you user code. Note: Contact your Security Company for servicing if you have further problems - Honeywell 6271C | User Guide - Page 33
find if you are reading your alarm system manuals. The authority levels that can be assigned through the TouchCenter are as follows: TouchCenter Authority Level Master Normal Functions Can perform all security functions, add/delete users in assigned partition, program scheduled events, and change - Honeywell 6271C | User Guide - Page 34
level if Quick Arm is enabled in your system. Used to restrict access from a partition. Guest N/A Level 4 Operator B N/A How to Access User Setup Access User Setup as follows: 1. From the "Home" screen, press the SECURITY button. The "Arming" screen is displayed. SCREEN ACTION 2. Press the MORE - Honeywell 6271C | User Guide - Page 35
screen is displayed. How to Add a User Add a user as follows: SCREEN ACTION Note: Three selections are available: add a user, edit a user, or delete a user. 1. To add a user, press the ADD USER button. The "User Authorization" screen is displayed with the instructions "Enter Authorized Code". 35 - Honeywell 6271C | User Guide - Page 36
BS (Backspace) button to make corrections. • The @#$ button is not available for use at this time. These characters cannot be saved to the control panel. 5. Touch the box next to Enter User Code... The "User Authorization" screen is displayed with the instructions Enter 4 Digits. 36 - Honeywell 6271C | User Guide - Page 37
to be able to Arm and Disarm from other partitions in commercial panels, touch this box. 8. Touch the box below the User Number. The "User Number" screen is displayed with the instructions to Enter 3 Digits. Note:When assigning User Numbers for residential panels, enter 0 as the first of the three - Honeywell 6271C | User Guide - Page 38
Code Setup (cont'd) SCREEN ACTION 10. If this user is assigned an RF button zone, touch the box below the RF Button Zone. The "RF Button Zone " screen is displayed with the instructions to enter 3 digits. If interfacing to a residential panel, enter 0 as the first digit. Enter the RF Button Zone - Honeywell 6271C | User Guide - Page 39
How to Delete a User Delete a User as follows: SCREEN User Code Setup (Cont'd) ACTION 1. From the User Setup screen, touch the circle next to the user to be deleted and press the DELETE USER button. The "User Authorization" screen is displayed with the instructions "Enter Authorized Code:". 2. - Honeywell 6271C | User Guide - Page 40
edit a User's name. To modify a User name, you must delete the User and re-enter User. SCREEN ACTION 1. From the User Setup screen, touch the circle next to the user to be edited and press the EDIT USER button. The "User Authorization" screen is displayed with the instructions "Enter Authorized - Honeywell 6271C | User Guide - Page 41
SCREEN User Code Setup (Cont'd) ACTION 3. Select the options needed for this user and press the SAVE button. The configuration changes are saved and you are returned to the User Setup screen. 41 - Honeywell 6271C | User Guide - Page 42
the TouchCenter or a standard alpha keypad. To use features not supported by the TouchCenter, refer to your Control Panel User Guide. if programmed as panic keys. Check with your system installer for details. • Commercial systems with Alpha keypads have a feature where if you depress a key for - Honeywell 6271C | User Guide - Page 43
displayed. SCREEN ACTION 2. Press the MORE CHOICES button. The "More Choices" screen is displayed. 3. Press the CONSOLE MODE button on the "More Choices" screen. The "Keypad" screen is displayed. 4. Perform functions as you would from a regular alpha - Honeywell 6271C | User Guide - Page 44
time of all messages added together cannot exceed 262 seconds. Note: The voice messages are stored in the memory of the 6271CV. All messages will be lost if the 6271CV loses power or if it is reset. Voice messages are recorded and retrieved using the "Message Center" screen. The below illustration - Honeywell 6271C | User Guide - Page 45
Center" screen is displayed. SCREEN ACTION 2. Press the Record button and record your message while staying within approximately one foot of the TouchCenter and speaking at a normal voice volume. As you are recording your message, the remaining time counter counts down to indicate the total - Honeywell 6271C | User Guide - Page 46
the "Home" screen, press the MESSAGE button. Center" screen is displayed. The "Message SCREEN ACTION 2. Select the message you wish to listen to by touching it in the message list and then pressing the Play Message button. As the message is being played, a "Play (x): Voice Memo..." message is - Honeywell 6271C | User Guide - Page 47
The TouchCenter has three LEDs labeled - ARMED, READY and TROUBLE (6271C) or MESSAGE (6271CV). The ARMED LED is red, READY LED is green and TROUBLE or MESSAGE LED is yellow. Each LED's on and off state has different meanings as described below. LED ARMED READY MESSAGE (6271CV) TROUBLE (6271C - Honeywell 6271C | User Guide - Page 48
must pass prior to the TouchCenter turning off the touch screen backlight • Change the time interval that must pass prior to the TouchCenter returning to the "Home" screen Additionally, you may enter the User Setup screen, Advanced Setup screen (if enabled by your system installer), or Clean Screen - Honeywell 6271C | User Guide - Page 49
SCREEN TouchCenter Setup (Cont'd) ACTION 3. Press the SETUP button on the "More Choices" screen. The "Setup" screen is displayed. 49 - Honeywell 6271C | User Guide - Page 50
TouchCenter Setup (Cont'd) How to Adjust the Touch Screen Contrast You may adjust the touch screen contrast as follows: If... Then... you want to increase contrast move the pop-up asking if you want to remember the new settings. CONTRAST SLIDEBAR INDICATOR Touch Screen Contrast Control 50 - Honeywell 6271C | User Guide - Page 51
Setup (Cont'd) How to Adjust the Volume You may adjust the TouchCenter sounder volume by pressing your finger on the TouchCenter slide bar associated with the "Volume" scale and doing the following: If... you want to increase volume you want to decrease volume Then... move the - Honeywell 6271C | User Guide - Page 52
Setup (Cont'd) How to Select Screen Backlight Off Activation Time When the TouchCenter is not active, it will automatically turn the backlight off after the selected backlight off time has expired (unless "Never" option is selected). To select - Honeywell 6271C | User Guide - Page 53
window is displayed asking "Remember New Settings?" Select Yes to save the change or No to discard the change. When the Update is complete the TouchCenter goes to the "Home" screen or "More Choices" screen depending on whether you pressed the "Home" or "Back" button, respectively. 53 - Honeywell 6271C | User Guide - Page 54
Setup (Cont'd) How to Select Homepage After Time When the TouchCenter is not active, it will automatically return to the "Home" screen after the selected to To Homepage After time has expired (unless "Never" option is - Honeywell 6271C | User Guide - Page 55
window is displayed asking "Remember New Settings?" Select Yes to save the change or No to discard the change. When the Update is complete the TouchCenter goes to the "Home" screen or "More Choices" screen depending on whether you pressed the "Home" or "Back" button, respectively. 55 - Honeywell 6271C | User Guide - Page 56
panel and exit the Set Time & Date screen. Note: This button appears with residential panels only. • If DST On (Daylight Savings Time) is selected, the TouchCenter will adjust for Daylight Savings time at the month, week and time chosen. To set the time and date, press the Time and Date button - Honeywell 6271C | User Guide - Page 57
SCREEN TouchCenter Setup (Cont'd) ACTION 3. Select if you want a 12-hour or 24-hour format for your time display by touching the circle to the . 5. Select if you want Daylight Savings Time to affect your system clock by touching the circle to the left of the DST On display. A check mark in the - Honeywell 6271C | User Guide - Page 58
TouchCenter Setup (Cont'd) SCREEN ACTION 12. On the "Daylight Savings" screen, press the Weekend "arrow" button in the "End DST" area of 19. On the "Time and Date" screen, press the Year that is being displayed. A Year screen is displayed with the instructions to Enter 4 digits for the year. 58 - Honeywell 6271C | User Guide - Page 59
TouchCenter the AM/PM display. 22. Select the day of the month by touching the proper day in the display. The selected date will be highlighted on press the Hour that is being displayed. An hour screen is displayed with the instructions to Enter 2 digits for the hour. 24. Enter the two digits for - Honeywell 6271C | User Guide - Page 60
TouchCenter Setup (Cont'd) SCREEN ACTION 25. On the "Time and Date" screen, press the Minutes that is being displayed. An minute screen is displayed with the instructions to Enter 2 digits for the minutes. 26. Enter the two digits for the current minute. The window closes automatically and the - Honeywell 6271C | User Guide - Page 61
Operating Modes Operating Modes (Chime, Voice, and Voice Chime) Operating modes allows you to turn the TouchCenter chime mode on or off. Additionally, when using the 6271CV you may also turn the voice mode on or off. The operating modes provide the following features: • Chime Mode - When - Honeywell 6271C | User Guide - Page 62
TouchCenter Operating Modes (cont'd) SCREEN ACTION 3. Press the OPERATING MODES button on the "More Choices" screen. The "User Authorization" screen is displayed with the instructions "Enter Authorized Code". 4. Enter your "Master" code. The "Operating Modes" screen is displayed. 5. Touch the - Honeywell 6271C | User Guide - Page 63
may occur. The Emergency screen cannot be accessed while running in the clean screen mode. Clean the TouchCenter as follows: 1. From the "Home" screen, press the SECURITY button. The "Arming" screen is displayed. SCREEN ACTION 2. Press the MORE CHOICES button. The "More Choices" - Honeywell 6271C | User Guide - Page 64
touchscreen. When the Continue button is pressed the "Touch Screen Disabled for => 30 Seconds" message is displayed. During these 30 seconds the touch from accumulating on the keypad and all protective sensors, particularly on motion sensors and smoke detectors. The keypad case and sensors should - Honeywell 6271C | User Guide - Page 65
delay times that have been set for your system during installation and record them on the separate sheet provided in this guide. Home Screen: The screen that is normally displayed on the TouchCenter when entries are not being made. The TouchCenter will return to this screen with the "Home" button is - Honeywell 6271C | User Guide - Page 66
's functions, including the ability to program other users in the system. See also "User Code. Message Button: A button on the Home screen that allows you to record and retrieve voice messages. (6271CV Only) Night: An arming mode for the system. Your system installer set the type of arming and the - Honeywell 6271C | User Guide - Page 67
NOTES - Honeywell 6271C | User Guide - Page 68
NOTES - Honeywell 6271C | User Guide - Page 69
NOTES - Honeywell 6271C | User Guide - Page 70
NOTES - Honeywell 6271C | User Guide - Page 71
NOTES - Honeywell 6271C | User Guide - Page 72
serviced by anyone other than the Seller. In case of defect, contact the security professional who installed and MAXIMUM LIABILITY SHALL NOT IN ANY CASE EXCEED THE PURCHASE PRICE OF THE PRODUCT, WHICH SHALL BE THE COMPLETE AND Copyright © 2007 Honeywell International Inc. www.honeywell.com/security
-
 1
1 -
 2
2 -
 3
3 -
 4
4 -
 5
5 -
 6
6 -
 7
7 -
8
-
9
-
10
-
11
-
12
-
13
-
14
-
15
-
16
-
17
-
18
-
19
-
20
-
21
-
22
-
23
-
24
-
25
-
26
-
27
-
28
-
29
-
30
-
31
-
32
-
33
-
34
-
35
-
36
-
37
-
38
-
39
-
40
-
41
-
42
-
43
-
44
-
45
-
46
-
47
-
48
-
49
-
50
-
51
-
52
-
53
-
54
-
55
-
56
-
57
-
58
-
59
-
60
-
61
-
62
-
63
-
64
-
65
-
66
-
67
-
68
-
69
-
70
-
71
-
72
 |
 |

ADEMCO 6271C
ADEMCO 6271CV
TouchCenter Keypads
User Guide
K6249V1
6/07
Rev. A