Honeywell 6271C User Guide - Page 58
SCREEN, ACTION, Weekend, APPLY, Month, Enter 4 digits for the year
 |
UPC - 781410790247
View all Honeywell 6271C manuals
Add to My Manuals
Save this manual to your list of manuals |
Page 58 highlights
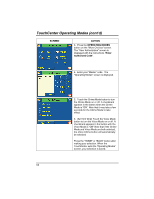
TouchCenter Setup (Cont'd) SCREEN ACTION 12. On the "Daylight Savings" screen, press the Weekend "arrow" button in the "End DST" area of the screen. A dropdown list displaying the weeks is displayed. 13. Select the week you want by pressing it. The drop-down list closes automatically and the selection is displayed. 14. On the "Daylight Savings" screen, press the "arrow" button to the right of the time (1 AM or 2 AM) on the screen. A drop-down list displaying 1 AM and 2AM is displayed. 15. Select the time you want by pressing it. The drop-down list closes automatically and the selection is displayed. 16. Press the APPLY button to save your Daylight Savings Time setup. The "Time and Date screen is displayed. 17. On the "Time and Date" screen, press the Month "arrow" button. A drop-down list displaying the months is displayed. 18. Select the current month by pressing it. The drop-down list closes automatically and the selection is displayed. 19. On the "Time and Date" screen, press the Year that is being displayed. A Year screen is displayed with the instructions to Enter 4 digits for the year. 58
-
 1
1 -
2
-
3
-
4
-
5
-
6
-
7
-
8
-
9
-
10
-
11
-
12
-
13
-
14
-
15
-
16
-
17
-
18
-
19
-
20
-
21
-
22
-
23
-
24
-
25
-
26
-
27
-
28
-
29
-
30
-
31
-
32
-
33
-
34
-
35
-
36
-
37
-
38
-
39
-
40
-
41
-
42
-
43
-
44
-
45
-
46
-
47
-
48
-
49
-
50
-
51
-
52
-
 53
53 -
 54
54 -
 55
55 -
 56
56 -
 57
57 -
 58
58 -
 59
59 -
 60
60 -
 61
61 -
 62
62 -
 63
63 -
64
-
65
-
66
-
67
-
68
-
69
-
70
-
71
-
72
 |
 |
