Hoover FH40010B Manual - Page 9
Filters, Dirty Water Tank - motor
 |
UPC - 073502032183
View all Hoover FH40010B manuals
Add to My Manuals
Save this manual to your list of manuals |
Page 9 highlights
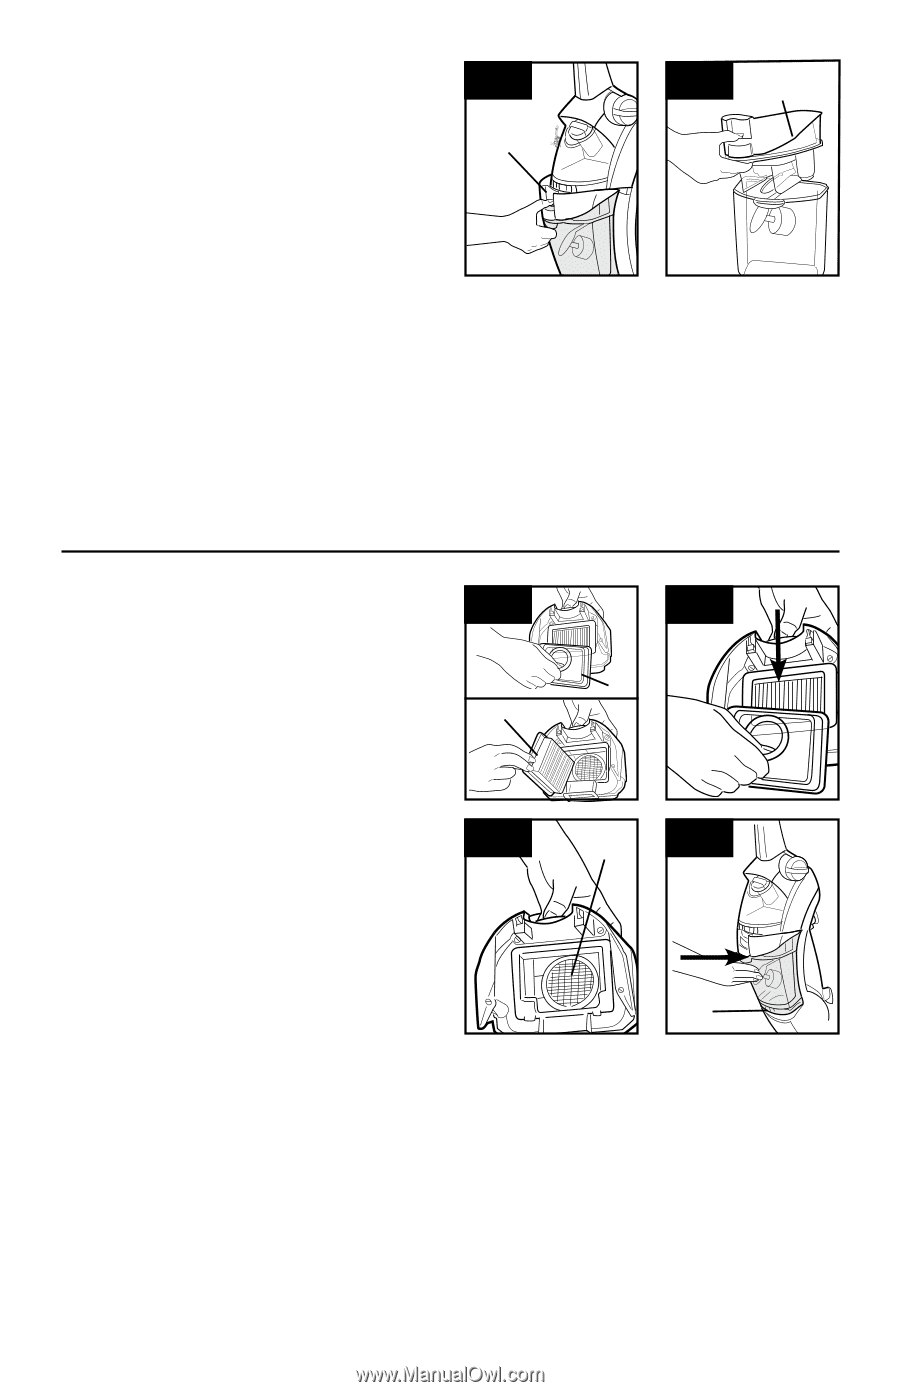
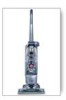
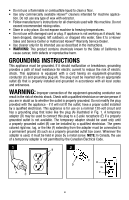
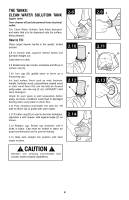
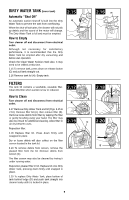
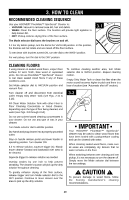
Dirty Water Tank (lower tank) Automatic "Shut Off" An automatic suction shut-off is built into the Dirty Water Tank to prevent the tank from overflowing. When the shut-off activates, the cleaner will not pick up debris and the sound of the motor will change. The Dirty Water Tank is full and must be emptied. How to Empty Turn cleaner off and disconnect from electrical outlet. Although not necessary for satisfactory performance, it is recommended that the Dirty Water Tank be emptied after dry vacuuming and before wet operation. Check the Clean Water Solution Tank also. It may need to be refilled at this time. 2.15 To remove tank, press down on release button (G) and pull tank straight out. 2.16 Remove tank lid (H). Empty tank. 2.15 G filters The tank lid contains a washable, reusable filter. Clean this filter when suction is low or reduced. 2.17 How to Clean Turn cleaner off and disconnect from electrical outlet. 2.17 Remove Dirty Water Tank and lid (Figs. 2.15 & 2.16). Remove filter lid (A), then remove filter (B). Remove loose debris from filter by tapping the filter or gently brushing using your hand. The filter may also be rinsed for additional cleaning. Allow filter to air dry between uses. Reposition filter. 2.18 Replace filter lid. Press down firmly until snapped in place. Dry or loose debris will also collect on the filter screen located in the tank lid. 2.19 To remove debris from screen, remove the pleated filter from the lid. Remove debris from screen (C). The filter screen may also be cleaned by rinsing it under running water. Reposition pleated filter in lid. Replace lid onto Dirty Water Tank, pressing down firmly until snapped in place. 2.20 To replace Dirty Water Tank, place bottom of tank behind ledge (D) and push tank straight into cleaner body until it is locked in place. B 2.19 9 2.16 H 2.18 A C 2.20 E
-
 1
1 -
2
-
3
-
 4
4 -
 5
5 -
 6
6 -
 7
7 -
 8
8 -
 9
9 -
 10
10 -
 11
11 -
 12
12 -
 13
13 -
 14
14 -
15
-
16
-
17
-
18
-
19
-
20
-
21
-
22
-
23
-
24
-
25
-
26
-
27
-
28
-
29
-
30
-
31
-
32
-
33
-
34
-
35
-
36
-
37
-
38
-
39
-
40
-
41
-
42
-
43
-
44
-
45
-
46
-
47
-
48
 |
 |