Hoover S3612 Manual
Hoover S3612 - Household Vacuum Cleaners Manual
 |
View all Hoover S3612 manuals
Add to My Manuals
Save this manual to your list of manuals |
Hoover S3612 manual content summary:
- Hoover S3612 | Manual - Page 1
9 Replacing Filter Bag 6-7 Replacing Belt 8 Replacing Headlight 9 Service 9 Storage 6 Warranty 10 © 2002 The Hoover Company www.hoover.com PLEASE DO NOT RETURN THIS PRODUCT TO THE STORE. Fill in and retain The model and serial number are located on the bottom of the cleaner. For your - Hoover S3612 | Manual - Page 2
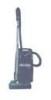
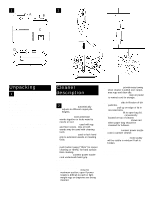
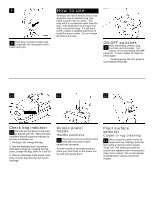
12 2 1 24 Unpacking 1 Unpack cleaner from carton and identify the parts shown. Remove and dispose of cardboard packing. A. Canister cleaner B. Power nozzle C. Extra filter paper bag (one bag is installed in cleaner) D. Extension wands and hose Operate cleaner only at voltage specified - Hoover S3612 | Manual - Page 3
in the Hoover Consumer Response Center. PLEASE DO NOT RETURN THIS PRODUCT TO THE STORE OR SEND IT TO NORTH CANTON FOR SERVICE. 3 How to assemble Connect hose With hose toward front of cleaner, 3 push hose connector into opening in bag lid. When hose is attached properly, hose cord plug - Hoover S3612 | Manual - Page 4
cleaner, plug 9 cord into electrical outlet. Turn cleaner on by depressing ON-OFF pedal (A). To turn cleaner the bag pores; change the bag, even if it is not full. 3. There is a blockage in the nozzle, hose, tools, or at the bag opening rug cleaning, push the floor surface selector button toward " - Hoover S3612 | Manual - Page 5
floor brush to clean bare floors. You will find it particularly convenient when cleaning lightweight area rugs to set the floor surface selector button on "BARE" and continue cleaning the surrounding floor damage to the belt. 1 7 How to connect 1 7 To use the cleaner with tools, disconnect - Hoover S3612 | Manual - Page 6
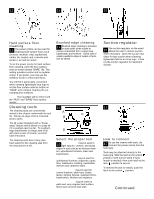
full of dirt. When the cleaner is used to remove material of this nature, change the bag often. Where to buy Filter bags may be purchased from Authorized Hoover Dealers (Depots), Leading Retailers, Hoover Factor y Service Centers, or through The Hoover Company online at www.hoover.com. What to buy - Hoover S3612 | Manual - Page 7
attached by aligning the hinges with the appropriate slots in the cleaner, as shown. Filterssecondary and micro How to clean Disconnect cleaner from electrical outlet. 2 8 The secondary filter, located behind the grill in the bag compart- ment, protects the motor from dirt parti- cles. If - Hoover S3612 | Manual - Page 8
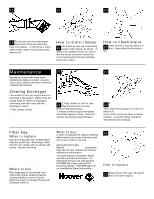
HOOVER Belt No. 38528-011 when a belt replacement is necessary. When to replace For some models, the belt is visible through the belt check window on top of the nozzle. If the belt Replace the belt if it is stretched, cut, or broken. 3 1 3 2 3 3 How to replace Disconnect cleaner from electrical - Hoover S3612 | Manual - Page 9
Service Center or an authorized Hoover Warranty Service Dealer (Depot). Service To obtain approved HOOVER service and genuine HOOVER parts, locate the nearest Hoover Factory Service Center or Authorized Hoover Warranty Service Dealer (Depot) by: • checking the Yellow Pages under "Vacuum Cleaners - Hoover S3612 | Manual - Page 10
Problem: Agitator won't run Possible cause Possible solution • Hose power cord not firmly plugged in. • Plug firmly into receptacle on cleaner base. • Broken or worn belt. • Replace belt. • Floor surface set to "BARE". • Set floor surface to "RUG". Full Two Year Warranty (Domestic Use) Your HOOVER - Hoover S3612 | Manual - Page 11
. Anote y guarde El modelo y número de serie se encuentran en la parte inferior de la aspiradora. Para sus registros personales, por favor anote los números manual del propietario. Puede requerirse la verificación de la fecha de compra para obtener el servicio de garantía de su producto Hoover. - Hoover S3612 | Manual - Page 12
figuras paso-a-paso provistas en el manual inglés. Desempaque 1 Desempaque la el cordón. 16. Microfiltro: ayuda a filtrar las partículas de suciedad. 17. Tapa de accesorios: tire del un representante en el Centro de Respuesta al Cliente de Hoover. POR FAVOR NO DEVUELVA ESTE PRODUCTO A LA TIENDA - Hoover S3612 | Manual - Page 13
suelte rápidamente si se abre demasiado. Para volver a colocarla, alinee las perillas pequeñas en el área de la bisagra con las ranuras en la parte trasera de la aspiradora; empuje la tapa de vuelta a su lugar. Los accesorios de limpieza tienen muchos usos. El más apropiado para las tareas de - Hoover S3612 | Manual - Page 14
rejilla en la cavidad de la bolsa, sirve para proteger el motor contra las partículas de polvo. Cuando el filtro se ensucia, extraiga la rejilla y saque cambiar la correa, use solamente la correa No. 38528-011 original de HOOVER. Cuándo reemplazar Para algunos modelos, a correa puede verse a través - Hoover S3612 | Manual - Page 15
Hoover. Dos hileras de escobillas Pieza No. 48414-049 Hoover Hoover, HOOVER y piezas originales HOOVER, localice el Centro de Servicio de Fábrica Hoover o el Concesionario Autorizado de Servicio de Garantía de Hoover (Depósito) más cercano: • buscando en las Páginas Amarillas bajo "Vacuum Cleaners - Hoover S3612 | Manual - Page 16
del agitador están desgastadas. • Cambie las escobillas. 16 Garantía completa por dos años (Uso doméstico) Su artefacto HOOVER® está garantizado, en caso de uso doméstico normal según el manual del propietario, contra defectos en el material y la fabricación por un período de dos años a contar de - Hoover S3612 | Manual - Page 17
buse motorisée TurboPOWERMC Manual de l'utilisateur Français p. 17-21 Nous vous remercions d'avoir choisi un produit HOOVER. Cet aspirateur a de la date d'achat peut être nécessaire pour obtenir le service de garantie Hoover. Conseils de sécurité ! En utilisant un appareil électrique, - Hoover S3612 | Manual - Page 18
du manuel d'instruction en anglais. bouton vers RUG (tapis) pour le nettoyage des moquettes, et vers BARE FLOOR (nu) pour le nettoyage des sols durs. 8. Prise: permet de brancher domestiques" pour le dépôt de service de garantie Hoover autorisé le plus proche ou appeler : Hoover Canada - 1 - 800- - Hoover S3612 | Manual - Page 19
-vous avec ces quelques habitudes d'entretien. Si vous utilisez et entretenez bien cet appareil, il vous procurera de longues années de service fiable. Dégagement des e n g o rg e m e n t s Une aspiration ou un ramassage faible des débris peut être provoqué par un blocage dans l'appareil. Recherchez - Hoover S3612 | Manual - Page 20
votre concessionnaire local Hoover autorisé (dépôt), chez tous les bons détaillants ou auprès de tous les Centres de service en usine Hoover. Type de sac soigneusement le sac plein. 25 Glisser le collet du sac bien en place sur le support. 26 Placer les côtés du sac dans la cav- ité sous le joint d'é - Hoover S3612 | Manual - Page 21
ne couvre pas le ramassage, la livraison, ni la visite à domicile. Cependant, si vous envoyez votre appareil à un centre de réparations en usine Hoover pour un service de garantie, le prix du transport sera payé sur un aller. Bien que la présente garantie vous donne des droits spécifiques légaux - Hoover S3612 | Manual - Page 22
22 - Hoover S3612 | Manual - Page 23
23 - Hoover S3612 | Manual - Page 24
HOOVER y son marcas registradas HOOVER et sont des marques déposées HOOVER and are registered trademarks 7-02 S3612--- Litho USA 56513-361
-
 1
1 -
 2
2 -
 3
3 -
 4
4 -
 5
5 -
 6
6 -
 7
7 -
8
-
9
-
10
-
11
-
12
-
13
-
14
-
15
-
16
-
17
-
18
-
19
-
20
-
21
-
22
-
23
-
24
 |
 |

Hoover
®
TurboPOWER
™
Canister Cleaner with
Power Nozzle
Owner’s Manual
English
pp. 1-10
Spanish
pp.11-16
French
pp. 17-21
Thank you for selecting a HOOVER
®
product.
This cleaner was inspected and packaged carefully before being shipped from the
factory.
If you should happen to need assistance during assembly or operation:
Visit our website at
www.hoover.com.
Click on the “Service” button to find
the service outlet nearest you
OR
Call
1-800-944-9200
for automated referral of authorized service
outlet locations (U.S. only)
OR
Call 1-330-499-9499 to speak with a representative in our Consumer
Response Center.
PLEASE DO NOT RETURN THIS PRODUCT TO THE STORE.
Fill in and retain
The model and serial number are located on the bottom of the cleaner.
For your personal records, please enter the COMPLETE model and serial number in
the spaces provided and retain this information.
Your cleaner is model________________________________________________________
and has serial number
______________________________________________________
It is suggested that you attach your sales receipt to this owner’s manual. Verification of
date of purchase may be required for warranty service of your Hoover product.
Index
Assembling Cleaner
............................
3-4
Cleaner Description
................................
2
How To Use
Canister Cleaner
..............................
4-5
Check Bag Indicator
..........................
4
Cleaning Tools
....................................
5
Power Nozzle
......................................
4
To Clean Stairs
....................................
6
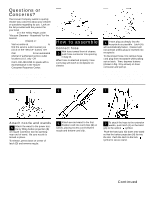
If You Have a Problem
..........................
10
Important Safeguards
............................
1
Lubrication
..............................................
9
Maintenance
Cleaning Filters
................................
7-8
Clearing Blockages
............................
6
Replacing Agitator
............................
9
Replacing Filter Bag
........................
6-7
Replacing Belt
....................................
8
Replacing Headlight
..........................
9
Service
....................................................
9
Storage
..................................................
6
Warranty
................................................
10
Important Safeguards!
When using an electrical appliance, always follow
basic precautions, including the following:
READ
ALL
INSTRUCTIONS BEFORE USING THIS
APPLIANCE
Warning:
•
Do not use outdoors or on wet surfaces.
•
Close supervision is necessary when any appliance is used by or near children.
Do not allow vacuum cleaner to be used as a toy or to run unattended at any
time.
•
Keep hair, loose clothing, fingers, feet and all parts of body away from openings,
rotating agitator and other moving parts.
Do not operate cleaner in bare feet or
when wearing open toe shoes or sandals.
•
Do not pick up anything that is burning or smoking, such as cigarettes, matches,
or hot ashes.
•
Do not use to pick up flammable or combustible liquids such as gasoline or fine
wood sandings or use in areas where they may be present.
•
The hose contains electrical wires. Do not use if damaged, cut or punctured.
•
Avoid picking up hard, sharp objects with the cleaner. They may damage the
cleaner and the bag.
•
Always turn off this appliance before connecting or disconnecting hose or
motorized nozzle.
•
Do not use without dust bag or filters in place. Change bag frequently when pick-
ing up very fine materials such as powder.
•
Use extra care when cleaning on stairs.
•
Do not put any object into openings.
Do not use with any opening blocked; keep
free of dust, lint, hair, or anything that may reduce air flow.
•
Do not pull or carry by cord, use cord as a handle, close door on cord or pull
cord around sharp edges or corners. Do not run appliance over cord. Keep cord
away from heated surfaces.
•
Always disconnect cord from electrical outlet before servicing the cleaner.
•
Unplug cleaner when not in use. Turn off all controls before unplugging.
•
Do not unplug by pulling on cord.
To unplug, grasp the plug, not the cord.
Never handle plug or appliance with wet hands.
•
If cleaner has a cord reel, hold on to the plug while cord is being rewound to pre-
vent cord from whipping.
•
The use of an extension cord is not recommended.
•
Do not use with damaged cord or plug. If appliance is not working as it should,
has been dropped, damaged, left outdoors, or dropped into water, take it to a
Hoover Factory Service Center or Authorized Hoover Warranty Service Dealer
(Depot).
•
Use vacuum cleaner only for its intended use as described in the instructions.
Use only attachments recommended by The Hoover Company; others may cause
hazards.
Save these instructions!
To reduce the risk of fire, electric shock or injury:
Review this manual
before operating
cleaner
© 2002 The Hoover Company
www.hoover.com