Hotpoint RVM5160MPSA Installation Instructions - Page 21
Use Top Cabinet Template, Preparation Of Top, Cabinet, Adapting Blower For, Outside Back Exhaust
 |
View all Hotpoint RVM5160MPSA manuals
Add to My Manuals
Save this manual to your list of manuals |
Page 21 highlights
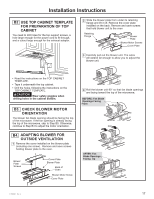
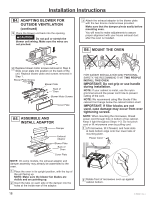
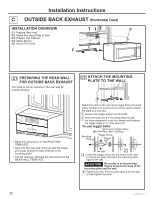
Installation Instructions C3. USE TOP CABINET TEMPLATE FOR PREPARATION OF TOP CABINET You need to drill holes for the top support screws and a hole large enough for the power cord to fit through. C4. ADAPTING BLOWER FOR OUTSIDE BACK EXHAUST 1 Remove and save the two screws that hold the blower plate in place. Slide blower plate from under its retaining flange. Remove the cover plate installed on the back. Remove and save screws that hold blower unit to the oven Retaining Flange Blower Plate B D C A • Read the instructions on the TOP CABINET TEMPLATE. • Tape it underneath the top cabinet. • Drill the holes, following the instructions on the TOP CABINET TEMPLATE. CAUTION Wear safety goggles when drilling holes in the cabinet bottom. 2 Carefully pull out the blower unit. The wires will extend far enough to allow you to adjust the blower unit. BEFORE: Fan Blade Openings Facing Up Back of Oven 3 Rotate blower unit counterclockwise 180°. Before Rotation After Rotation 31-7000091 Rev. 2 Back of Oven Back of Oven 4 Roll the blower unit 90° so that fan blade openings are facing out the back of the oven. Before Rolling After Rolling Back of Oven Back of Oven 21
-
 1
1 -
2
-
3
-
4
-
5
-
6
-
7
-
8
-
9
-
10
-
11
-
12
-
13
-
14
-
15
-
 16
16 -
 17
17 -
 18
18 -
 19
19 -
 20
20 -
 21
21 -
 22
22 -
 23
23 -
 24
24 -
 25
25 -
 26
26 -
27
-
28
-
29
-
30
-
31
-
32
-
33
-
34
-
35
-
36
-
37
-
38
-
39
-
40
-
41
-
42
-
43
-
44
-
45
-
46
-
47
-
48
 |
 |
