Huawei HG532 User Manual - Page 11
Getting Started - hg532s
 |
View all Huawei HG532 manuals
Add to My Manuals
Save this manual to your list of manuals |
Page 11 highlights
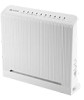
1 POWER USB LAN4 LAN3 LAN2 LAN1 ADSL RESET 3 #### LINE 2 ## ## #### MODEM PHONE 4 5 5 7 6 7 1. Telephone jack 2. Splitter on the wall 5. Telephone 6. Fax machine 8 3. Power adapter 7. Microfilter 1 4. Computer 8. T connector 2.4 Getting Started Press down the ON/OFF button on the side of the HG532 to power on the HG532. After you power on the HG532, the POWER indicators turns on and the ADSL indicator blinks (for less than three minutes), which indicates that the HG532 is being activated. After the ADSL indicator blinking, the POWER and ADSL indicators keep solid on, which indicates that the HG532 is working properly. 6
-
 1
1 -
2
-
3
-
4
-
5
-
 6
6 -
 7
7 -
 8
8 -
 9
9 -
 10
10 -
 11
11 -
 12
12 -
 13
13 -
 14
14 -
 15
15 -
 16
16 -
17
-
18
-
19
-
20
-
21
-
22
-
23
-
24
-
25
-
26
-
27
-
28
-
29
 |
 |

####
####
####
1
3
4
5
PHONE
LINE
MODEM
2
POWER
LAN4
LAN3
LAN2
LAN1
USB
RESET
ADSL
1
7
6
5
7
8
1. Telephone jack
on the wall
2. Splitter
3. Power adapter
4. Computer
5. Telephone
6. Fax machine
7. Microfilter
8. T connector
2.4
Getting Started
Press down the ON/OFF button on the side of the HG532 to power on the HG532.
After you power on the HG532, the POWER indicators turns on and the ADSL
indicator blinks (for less than three minutes), which indicates that the HG532 is being
activated. After the ADSL indicator blinking, the POWER and ADSL indicators keep
solid on, which indicates that the HG532 is working properly.
6