Huawei HG532 User Manual - Page 16
Setting Up a Wireless Connection Manually, Step 1 - hg532s manual
 |
View all Huawei HG532 manuals
Add to My Manuals
Save this manual to your list of manuals |
Page 16 highlights
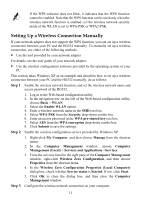
If the WPS indicator does not blink, it indicates that the WPS function cannot be enabled. Note that the WPS function can be used only when the wireless network function is enabled and the wireless network security mode of the WLAN is set to WPA-PSK or WPA2-PSK. Setting Up a Wireless Connection Manually If your network adapter does not support the WPS function, you can set up a wireless connection between your PC and the HG532 manually. To manually set up a wireless connection, use either of the following methods: z Use the tool provided by your network adapter For details, see the user guide of your network adapter. z Use the wireless configuration software provided by the operating system of your PC This section takes Windows XP as an example and describes how to set up a wireless connection between your PC and the HG532 manually, do as follows: Step 1 Enable the wireless network function, and set the wireless network name and access password of the HG532. 1. Log in to the Web-based configuration utility. 2. In the navigation tree on the left of the Web-based configuration utility, choose Basic > WLAN. 3. Select the Enable WLAN option. 4. Enter a wireless network name in the SSID text box. 5. Select WPA-PSK from the Security drop-down combo box. 6. Enter an access password in the WPA pre-shared key text box. 7. Select AES from the WPA encryption drop-down combo box. 8. Click Submit to save the settings. Step 2 Enable the wireless configuration service provided by Windows XP. 1. Right-click My Computer, and then choose Manage from the shortcut menu. 2. In the Computer Management window, choose Computer Management (Local) > Services and Applications >Services. 3. From the services listed in the right pane of the Computer Management window, right-click Wireless Zero Configuration, and then choose Properties from the shortcut menu. 4. In the Wireless Zero Configuration Properties (Local Computer) dialog box, check whether Service status is Started. If not, click Start. 5. Click OK to close the dialog box, and then close the Computer Management window. Step 3 Configure the wireless network connection on your computer. 11
-
 1
1 -
2
-
3
-
4
-
5
-
6
-
7
-
8
-
9
-
10
-
 11
11 -
 12
12 -
 13
13 -
 14
14 -
 15
15 -
 16
16 -
 17
17 -
 18
18 -
 19
19 -
 20
20 -
 21
21 -
22
-
23
-
24
-
25
-
26
-
27
-
28
-
29
 |
 |
