Hunter 18860 Owners Manual - Page 11
Hanging, Ceiling, CAUTION
 |
View all Hunter 18860 manuals
Add to My Manuals
Save this manual to your list of manuals |
Page 11 highlights
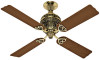
Step 4A: Hanging the Fan on an 8-foot Ceiling CAUTION: Your fan may weigh up to 50 pounds. All of the following steps must be followed in . order to ensure a secure mounting. Perform steps A through D with motor resting in liner for protection. A. Take short (23A " long) black hanger pipe from carton. Back out set,screw with alien wrench supplied with fan. Slide pipe over wires, putting the end with the small hole orr first. Grasp the switch housing firmly and thread hanger pipe onto motorshaft. Be certain pipe is all the way down to the step on the shaft. Use pliers to, be certain pipe is tight. YOU MUST BE CERTAIN. TO TIGHTEN THE SET SCREW HOLDING THIS PIPE ONTO THE FAN. Use the set screw wrench provided. See Fig. 7. B, Start a 6-32 screw (provided) in the lower hole of the canopy. Use the canopy with the Hunter nameplate on it. The other canopy is not used on 8 foot installations. Slide the canopy over the wires, then over the hanger pipe. Slide the canopy down as far' as it will go on the motor. Do not tighten the canopy screw at this time. See Fig. 7. C Loosen the set screw in the hanger bracket. Screw the bracket onto the hanger• pipe. Use pliers to tighten securely. YOU MUST BE CERTAIN TO TIGHTEN THE SET SCREW IN THE HANGER BRACKET VERY SECURELY. See Fig. 7. D. Be sure the pin is centered in the rubber bushing. See Fig: 8. E. Lift the fan by the motor housing, hook the hanger bracket onto the pin in the rubber bushing. MAKE SURE BOTH ENDS OF THE PIN ARE OUTSIDE THE HANGER BRACKET. See' Fig. 8. CAUTION: Failure to perforin these steps completely and in correct order may result in the fan falling. 1 I I I I I I CANOPY SETSCREWS PIPE FIGURE 7 PIN BRACkET FIGURE 8
-
 1
1 -
2
-
3
-
4
-
5
-
 6
6 -
 7
7 -
 8
8 -
 9
9 -
 10
10 -
 11
11 -
 12
12 -
 13
13 -
 14
14 -
 15
15 -
 16
16 -
17
-
18
-
19
-
20
 |
 |
