Hunter 18860 Owners Manual - Page 14
Blade, Installation, Operation, Hunter
 |
View all Hunter 18860 manuals
Add to My Manuals
Save this manual to your list of manuals |
Page 14 highlights
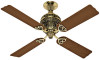
Step 6: Fan Blade Installation 11 Hunter Blades are packaged in sets, precisely matched and balanced. A. Attach wood blades to blade brackets using three screws for each blade. See Fig. 1.2A. If your blades have large holes, you must first insert the rubber grommets into the holes; See Fig. 1213. NOTE:. Grommets are usually assembled by hand. If you use a tool, make certain you do not damage the grommet or blade when inserting the grommets. Next assemble the blade to the blade bracket. Make sure all screws are tight to prevent vibration or wobbling. BLADE FIGURE 12B QFtomMET B. To isntall the blades to the motor, insert blade iron screw through hole in the blade iron. Use screw driver to: hold in place. Fasten screw into motor, but do not tighten. See. Fig. 12C. C. Line up other hole on motor and fasten the second screw. Before tightening screws, make sure they are not cross-threaded in the mounting holes. Tighten both screws securely. Repeat for remaining blades. CAUTION: Do not attempt to run fan until all screws have been tightened securely. I, FIGURE 12A FIGURE 1.2C Step 7: Operation of your Hunter Fan A. The operation of your fan is controlled with a pull-chain switch which has 4 positions: off - high - medium - low. Pull the chain gently to obtain the speed you desire. B. Tile Break-A-Way Connector is designed to spearate from the chain at a predetermined force. If this separation occurs, simply reinsert connector. It can be reused again and again. See Fig. 13. C. Reversing your fan is controlled by a small switch located on the switch housing. See Fig. 13. Ceiling fans are usually adjusted once in the fall and again in the spring to blow upward in the winter and downWard in the summer. You may run them in either direction at any time, however, as you prefer. Experiment as you like to obtain maximum comfort from your fan. REVERSING SWITCH BREAK-AWAY CONNECTER 'FIGURE 13 D. A fan blade balancing kit has been provided with your fart, should the fan wobble in operation, you may use this kit to correct the balance per the instructions supplied with the kit, • 14
-
 1
1 -
2
-
3
-
4
-
5
-
6
-
7
-
8
-
 9
9 -
 10
10 -
 11
11 -
 12
12 -
 13
13 -
 14
14 -
 15
15 -
 16
16 -
 17
17 -
 18
18 -
 19
19 -
20
 |
 |
