Hunter 42177 Owner's Manual - Page 12
Wiring Labeling - d seal
 |
View all Hunter 42177 manuals
Add to My Manuals
Save this manual to your list of manuals |
Page 12 highlights
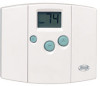
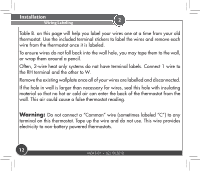
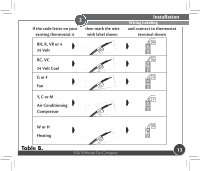
Installation Wiring Labeling 2 Table B. on this page will help you label your wires one at a time from your old thermostat. Use the included terminal stickers to label the wires and remove each wire from the thermostat once it is labeled. To ensure wires do not fall back into the wall hole, you may tape them to the wall, or wrap them around a pencil. Often, 2-wire heat only systems do not have terminal labels. Connect 1 wire to the RH terminal and the other to W. Remove the existing wallplate once all of your wires are labelled and disconnected. If the hole in wall is larger than necessary for wires, seal this hole with insulating material so that no hot or cold air can enter the back of the thermostat from the wall. This air could cause a false thermostat reading. Warning: Do not connect a "Common" wire (sometimes labeled "C") to any terminal on this thermostat. Tape up the wire and do not use. This wire provides electricity to non-battery powered thermostats. 12 44043-01 • 02/19/2010
-
 1
1 -
2
-
3
-
4
-
5
-
6
-
 7
7 -
 8
8 -
 9
9 -
 10
10 -
 11
11 -
 12
12 -
 13
13 -
 14
14 -
 15
15 -
 16
16 -
 17
17 -
18
-
19
-
20
-
21
-
22
-
23
-
24
-
25
-
26
-
27
-
28
-
29
-
30
-
31
-
32
-
33
-
34
-
35
 |
 |
