Husqvarna ST 427 Owner Manual - Page 11
To install the remote control for the, discharge chute deflector, To install the speed control cable
 |
View all Husqvarna ST 427 manuals
Add to My Manuals
Save this manual to your list of manuals |
Page 11 highlights
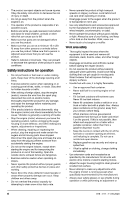
7. Adjust the left and right discharge chute cables. See To adjust the left and right discharge chute cables on page 24. To install the remote control for the discharge chute deflector 1. Attach the cable bracket (A) to the discharge chute with a carriage bolt (B) and a 5/16-18 locknut (D). Tighten the bolt. 2. Install the cable eyelet (E) to the discharge chute deflector (F). Use a shoulder bolt (G), a nylon washer (C), and tighten with a ¼-20 locknut (K). The cable eyelet will be loose on the shoulder bolt. 3. Attach the spring (L) between the hex nut (M) on the rotator head and the hole on the discharge chute deflector. G F C E L M B K A B C D A To install the speed control cable 1. Put the drive speed lever in the neutral position. 2. Attach the speed control cable (B) to the drive speed lever with a retaining pin. 3. Attach the speed control cable to the bracket (C) with 2 ½ in wrenches. Make sure that the drive speed lever stays in the neutral position. 4. Remove the screw and wing nut (A) on the bellcrank to let the bellcrank move. To attach replacement shear pins • Attach the replacement shear pins on the cover of the remote control or on the battery box. 876 - 011 - 11.05.2020 11
-
 1
1 -
2
-
3
-
4
-
5
-
 6
6 -
 7
7 -
 8
8 -
 9
9 -
 10
10 -
 11
11 -
 12
12 -
 13
13 -
 14
14 -
 15
15 -
 16
16 -
17
-
18
-
19
-
20
-
21
-
22
-
23
-
24
-
25
-
26
-
27
-
28
-
29
-
30
-
31
-
32
-
33
-
34
-
35
-
36
-
37
-
38
-
39
-
40
-
41
-
42
-
43
-
44
-
45
-
46
-
47
-
48
-
49
-
50
-
51
-
52
-
53
-
54
-
55
-
56
-
57
-
58
-
59
-
60
-
61
-
62
-
63
-
64
-
65
-
66
-
67
-
68
-
69
-
70
-
71
-
72
-
73
-
74
-
75
-
76
-
77
-
78
-
79
-
80
-
81
-
82
-
83
-
84
-
85
-
86
-
87
-
88
-
89
-
90
-
91
-
92
-
93
-
94
-
95
-
96
 |
 |
