IBM 17351GX User Guide
IBM 17351GX Manual
 |
View all IBM 17351GX manuals
Add to My Manuals
Save this manual to your list of manuals |
IBM 17351GX manual content summary:
- IBM 17351GX | User Guide - Page 1
Local 2x8 Console Manager Installation and User's Guide For 1735-1GX - IBM 17351GX | User Guide - Page 2
- IBM 17351GX | User Guide - Page 3
Local 2x8 Console Manager Installation and User's Guide - IBM 17351GX | User Guide - Page 4
- IBM 17351GX | User Guide - Page 5
- IBM 17351GX | User Guide - Page 6
with a number 1, translations for that caution statement appear in the IBM Safety Information book under statement 1. Be sure to read all caution and danger statements in this documentation before performing the instructions. Read any additional safety information that comes with the server or - IBM 17351GX | User Guide - Page 7
- IBM 17351GX | User Guide - Page 8
- IBM 17351GX | User Guide - Page 9
9 Installing the appliance horizontally in the 1-U rack mounting space 9 Installing the LCM2 appliance ...10 Connecting a CO cable to each target device 11 Connecting local peripheral devices 12 Tiering LCM2 appliances ...12 Adding earlier-model appliances...15 Chaining target devices with CO - IBM 17351GX | User Guide - Page 10
and User's Guide Connecting local virtual media...22 interface 31 Displaying version information 32 Upgrading the firmware ...32 Viewing the display configuration 33 Viewing Virtual media ...48 Appendix C: UTP cabling...50 Appendix D: Technical specifications 52 Appendix E: Getting help and - IBM 17351GX | User Guide - Page 11
ix LIST OF FIGURES List of Figures Figure 1.1: LCM2 appliance ...1 Figure 1.2: Examples of CO cables 2 Figure 1.3: Example of an LCM2 appliance configuration 4 Figure 2.1: Appliance vertical installation 9 Figure 2.2: Appliance horizontal installation 10 Figure 2.3: Basic LCM2 appliance - IBM 17351GX | User Guide - Page 12
x Local Console Manager Installation and User's Guide - IBM 17351GX | User Guide - Page 13
23 Table 3.4: OSCAR interface status flags 28 Table 3.5: Commands to manage routine tasks for the target device 31 Table 3.6: Diagnostic test details ...37 Table D.1: Product specifications 52 - IBM 17351GX | User Guide - Page 14
xii Local Console Manager Installation and User's Guide - IBM 17351GX | User Guide - Page 15
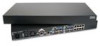
overview The IBM® Local 2x8 Console Manager (LCM2) appliance integrates analog keyboard, video, and mouse (KVM) switching technology with advanced cable management, access for two simultaneous users, and a user interface. The LCM2 appliance has USB and PS/2® ports on the rear panel that support all - IBM 17351GX | User Guide - Page 16
2 Local Console Manager Installation and User's Guide Intelligent cables You can use the following Conversion Option (CO) cables with the appliance. • IBM 250 mm KVM Conversion Option (KCO) - PS/2 and VGA connectors • IBM 1.5 M KVM Conversion Option (KCO) - PS/2 and VGA connectors • IBM Virtual - IBM 17351GX | User Guide - Page 17
provides optimal resolution for analog VGA, SVGA, and XGA video. You can achieve resolutions of up to 1280 x 1024 depending upon the length of cable that is separating the appliance and target devices. Flash upgradability Upgrade the LCM2 appliance at any time through the network port to ensure the - IBM 17351GX | User Guide - Page 18
4 Local Console Manager Installation and User's Guide CO cable Earlier-model appliance (tiered) LCM2 appliance (tiered) Rack of target devices Critical target device Local user LCM2 appliance (main) Local user Figure 1.3: Example of an LCM2 appliance configuration - IBM 17351GX | User Guide - Page 19
-mounting brackets • Documentation CD • Quick Installation Guide • 1-U filler panel • Eight terminators In addition to the items that come with the appliance, you must provide one CO cable (virtual media, KVM, or USB) and one Cat5 patch cable for each attached target device or appliance. A Phillips - IBM 17351GX | User Guide - Page 20
6 Local Console Manager Installation and User's Guide Safety precautions Observe the following guidelines to safely operate the equipment. - IBM 17351GX | User Guide - Page 21
, and never operate the appliance in a wet environment. If the appliance gets wet, see the applicable section in the troubleshooting guide or contact the trained service provider. • Use the appliance only with approved equipment. • Allow the appliance to cool before removing covers or touching - IBM 17351GX | User Guide - Page 22
cables. • Do not modify power cables or connectors. Consult a licensed electrician or the power company for site modifications. Always follow the local guidelines • Refer to the rack installation documentation the accompanied the rack for specific caution statements and procedures. • Elevated ambient - IBM 17351GX | User Guide - Page 23
be between 50.8 cm (20.0 in.) and 57.3 cm (22.6 in.) apart. If the rack has movable side braces, refer to the rack documentation for information about relocating side braces if they are not already spaced for this installation. Figure 2.1: Appliance vertical installation Installing the appliance - IBM 17351GX | User Guide - Page 24
10 Local Console Manager Installation and User's Guide screws through the slots in the mounting bracket and the holes in the mounting rail, then into the cage nuts or clip nuts. Figure 2.2: Appliance - IBM 17351GX | User Guide - Page 25
Ethernet Power cord Configuration port ACI port Local user Chapter 2: Installation 11 ARI ports Target device Target device CO cables . Figure 2.3: Basic LCM2 appliance configuration Connecting a CO cable to each target device To connect a CO cable to a target device, complete the following - IBM 17351GX | User Guide - Page 26
and User's Guide If you are chaining multiple CO cables or target devices, see "Chaining target devices with CO cables" on page 16 for more information. Connecting local peripheral devices The LCM2 appliance provides two sets of ports for local users. To connect local peripheral devices to - IBM 17351GX | User Guide - Page 27
Chapter 2: Installation 13 device list in the OSCAR interface. However, if you are tiering an earlier-model appliance, the list of appliances in the OSCAR interface will display both the primary appliance port number and the secondary or tertiary appliance port number. See "Adding earlier-model - IBM 17351GX | User Guide - Page 28
Console Manager Installation and User's Guide Local user A Local user B LCM2 appliance (main) ARI ports Primary target devices LCM2 appliance (tiered) ACI port Secondary target devices LCM2 appliance (tiered) ACI port Tertiary target devices - IBM 17351GX | User Guide - Page 29
that are compatible with the appliance configuration. Earlier-model appliances include: • IBM NetBAYTM 1x4 Console Switch • IBM NetBAY 2x8 Console Switch • IBM NetBAY ACT Remote Console Manager • IBM NetBAY ACT Local Console Manager • IBM 1x8 Console Switch • IBM 2x16 Console Switch Local user LCM2 - IBM 17351GX | User Guide - Page 30
off and turn on the target devices to the tiered appliance according to the instructions that are included with that device. 5. Turn off and turn on the tiered appliance to enable its local port to recognize the CO cable. 6. Repeat steps 1 to 5 for all tiered appliances that you want to attach to - IBM 17351GX | User Guide - Page 31
cable to the second RJ-45 connector on the UCO cable for the first target device. 5. Attach the other end of this cable to the first RJ-45 connector of the UCO cable a terminator to the second RJ-45 connector on the last UCO cable in the chain. Setting up the LCM2 appliance With the LCM2 appliance - IBM 17351GX | User Guide - Page 32
18 Local Console Manager Installation and User's Guide - IBM 17351GX | User Guide - Page 33
devices in the switching system from the OSCAR interface from a KVM connection to either analog user port. To start the OSCAR interface these key sequences instead of pressing Print Screen in any procedure in this document. To specify which key sequences can be used to start the OSCAR interface - IBM 17351GX | User Guide - Page 34
20 Local Console Manager Installation and User's Guide The Port column indicates the ARI port to which device is tiered through another appliance. The appliance is offline or does not have power. The CO cable is being upgraded (yellow circle). When this symbol is visible, do not turn off and turn on - IBM 17351GX | User Guide - Page 35
Chapter 3: Basic operations 21 • In the Main window, double-click the target device name, eID number, or port number. • Type the port number, and press Enter. • Type the first few characters of the target device name or eID number, and press Enter. You can toggle between two selected target devices - IBM 17351GX | User Guide - Page 36
22 Local Console Manager Installation and User's Guide Table 3.2: OSCAR interface navigation basics (Continued more information about scan lists see "Scanning the switching system" on page 35. Connecting local virtual media You can connect virtual media directly to the appliance using the USB port - IBM 17351GX | User Guide - Page 37
Chapter 3: Basic operations 23 • Reserve - Select this check box to specify that the virtual media connection can be accessed only by your user name and that no other user can connect to that target device. If both Locked and Reserved are selected, the session will be reserved. • CD ROM - Select - IBM 17351GX | User Guide - Page 38
24 Local Console Manager Installation and User's Guide Table 3.3: Setup features to manage routine tasks device is turned off, you will not be able to modify the name of the applicable CO cable. To access the Names window, complete the following steps: 1. Press Print Screen to start the OSCAR - IBM 17351GX | User Guide - Page 39
The LCM2 appliance automatically discovers tiered appliances, but you must specify the number of ports on the tiered appliance through the Devices window. IBM Console Switches and other earlier-model appliances are listed in the Type category for the tiered appliance. When you select a configurable - IBM 17351GX | User Guide - Page 40
26 Local Console Manager Installation and User's Guide Figure 3.4: Device Modify window 3. Select or type the number of ports that are supported by the tiered appliance and click OK. 4. Repeat steps 1 to 3 for each port for which you want to assign a device type. 5. Click OK in the - IBM 17351GX | User Guide - Page 41
Chapter 3: Basic operations 27 • Select Port to list the target devices numerically by port number. 2. Click OK. To select a key combination to start the OSCAR interface, complete the following steps: 1. In the Invoke OSCAR section, select which key combinations you want to use to start the OSCAR - IBM 17351GX | User Guide - Page 42
Local Console Manager Installation and User's Guide cables attached to target devices and the code is applied to the target devices when they are turned on or rebooted. Codes are then stored in the CO cable. Using a keyboard code that supports a language different from that of the appliance firmware - IBM 17351GX | User Guide - Page 43
operations 29 If multiple keyboards are connected to the local port, they must be of the same type unlock the keyboard and mouse. Important: If you forget the password, you must call technical support. See "Appendix C" for contact information. To enable the screen saver, complete the following - IBM 17351GX | User Guide - Page 44
30 Local Console Manager Installation and User's Guide 2. Click Setup > Security. If a password is set, the Password window opens. Type the password and click OK. 3. Select the Enable Screen Saver check box. 4. In - IBM 17351GX | User Guide - Page 45
for scanning in the Setup window. View and disconnect users. View version information for the appliance as well as view and upgrade firmware for individual CO cables. Re-establish operation of the keyboard and mouse. To access the Commands window, complete the following steps: 1. Press Print Screen - IBM 17351GX | User Guide - Page 46
32 Local Console Manager Installation and User's Guide Displaying version information You can use the OSCAR interface to view the versions of the LCM2 appliance and the CO cable firmware. For more information, see "Appendix A" beginning on page 45. To view version information, complete the following - IBM 17351GX | User Guide - Page 47
Chapter 3: Basic operations 33 Figure 3.10: Upgrade window To upgrade firmware, complete the following steps: 1. Press Print Screen. The Main window opens. 2. Click Commands > Display Versions > Upgrade. The Upgrade window opens. 3. Click Upgrade. A Warning window opens. - IBM 17351GX | User Guide - Page 48
34 Local Console Manager Installation and User's Guide Figure 3.11: User Status window To view current user connections, click window opens. 2. Click Commands > Display Versions > CO. Select the CO cable connected to the mouse and keyboard that need to be reset from the list. 3. Click Version > - IBM 17351GX | User Guide - Page 49
Chapter 3: Basic operations 35 4. A message is displayed stating that the mouse and keyboard are reset. 5. Complete one of the following steps: • Click OK to close the message field. • Click X or press Escape to exit without sending a Reset command to the mouse and keyboard. Scanning the switching - IBM 17351GX | User Guide - Page 50
36 Local Console Manager Installation and User's Guide To remove a target device from the scan list, complete the following steps: 1. To select Diagnostics button, you will receive a warning that indicates that all users (remote and local) will be disconnected. Click OK to confirm and begin the test. - IBM 17351GX | User Guide - Page 51
divides the tested CO cables into three categories: On-line, Offline or Suspect. CO cables might be listed as offline of the tests. Table 3.6: Diagnostic test details Test Description Firmware CRCs Reports on the condition of the main board RAM. com- plete when the last test symbol is visible. - IBM 17351GX | User Guide - Page 52
Local Console Manager Installation and User's Guide that are receiving a broadcast to identically interpret keystrokes. Specifically, the Caps Lock and Num Lock modes must be . Click X or press Escape to cancel and return to the Com- mands window. 6. If broadcasting is enabled, type the information or - IBM 17351GX | User Guide - Page 53
Chapter 3: Basic operations 39 Setting the connection mode Connections between the user and target devices can be preemptive or cooperative with the other user. A preemptive connection between the user and a target device is disconnected, without warning, if the other user selects the same target - IBM 17351GX | User Guide - Page 54
40 Local Console Manager Installation and User's Guide - IBM 17351GX | User Guide - Page 55
41 CHAPTER 4 Computer terminal operations The Console menu Each appliance can be configured at the appliance level through the Console menu interface accessed through the configuration port on the rear of the appliance. All terminal commands are accessed through a terminal or computer running - IBM 17351GX | User Guide - Page 56
's Guide 3. Type 1 and press Enter to set the network speed. You should set the connection manually without following menu items: Security Configuration, Firmware Management, Enable Debug Messages, Restore only enable debug messages when instructed to do so by technical support. When you are finished - IBM 17351GX | User Guide - Page 57
Chapter 4: Computer terminal operations 43 Reset Appliance You can use this menu option to initiate a soft reset of the appliance. Exit This menu selection will return you to the ready prompt. - IBM 17351GX | User Guide - Page 58
44 Global Console Manager Installation and User's Guide - IBM 17351GX | User Guide - Page 59
port) on the target device • Serial cable that connects the appliance and the target device • Firmware update To upload a new flash file, complete the following steps: 1. Go to http://www.ibm.com/support/ and download the latest flash firmware. Save the flash upgrade file to the correct directory - IBM 17351GX | User Guide - Page 60
46 Local Console Manager Installation and User's Guide To simultaneously upgrade multiple CO cables, complete the following steps: 1. Press Print the upgrade and return to the CO Status window. To upgrade CO cable firmware individually, complete the following steps: 1. Press Print Screen. The Main - IBM 17351GX | User Guide - Page 61
. When an upgrade is initiated, any current connection to the target device through the CO cable is terminated. Repairing damaged firmware In the rare case that the firmware is damaged after a firmware upgrade (which might happen if the appliance is turned off and turned on during the upgrade - IBM 17351GX | User Guide - Page 62
media was removed. Therefore, the USB virtual device is not disconnected from the target device. The VCO cable presents the keyboard and mouse as a composite USB 2.0 device. Therefore the BIOS must support composite USB 2.0 human interface device (HID). If the BIOS of the connected computer does not - IBM 17351GX | User Guide - Page 63
drive, the BIOS is not supporting booting from a composite USB 2.0 device. Check the support Web site from the target device manufacturer to card and try booting again. • Insert a USB 1.1 Hub between the VCO cable and the target device and try booting again. • Contact the manufacturer of the target - IBM 17351GX | User Guide - Page 64
EIA/TIA 568A and B. These standards apply to installations utilizing Cat5, 5E, and 6 cable specifications. The switching system supports either of these wiring standards. Refer to the following table for details. Table C.1: UTP wiring standards Pin EIA/TIA 568A 1 white/green 2 green 3 white - IBM 17351GX | User Guide - Page 65
is a list of important safety considerations that should be reviewed prior to installing or maintaining the cables: • Keep all Cat5 runs to a maximum of 10 Always follow all local and national fire and building codes. Be sure to firestop all cables that penetrate a firewall. Use plenum rated - IBM 17351GX | User Guide - Page 66
52 Local Console Manager Installation and User's Guide Appendix D: Technical specifications Table D.1: Product specifications LCM2 appliance product specifications Target device ports Number 8 Cable types VCO, KCO, and UCO Connectors RJ-45 Sync types Separate horizontal and vertical - IBM 17351GX | User Guide - Page 67
Appendixes 53 Table D.1: Product specifications (Continued) LCM2 appliance product specifications AC-input current rating 0.5 A AC-input cable 18 AWG three-wire cable, with a three-lead IEC-320 receptacle on the power supply end and a country or region dependent connector on the power resource - IBM 17351GX | User Guide - Page 68
or Problem Determination and Service Guide on the IBM Documentation CD that comes with your system. NOTE: For some IntelliStation models, the Hardware Maintenance Manual and Troubleshooting Guide is available only from the IBM support Web site. • Go to the IBM support Web site at http://www.ibm.com - IBM 17351GX | User Guide - Page 69
://www.ibm.com/pc/us/intellistation/. You can find service information for IBM systems and optional devices at http://www.ibm.com/pc/ support/. Software service and support Through IBM Support Line, you can get telephone assistance, for a fee, with usage, configuration, and software problems with - IBM 17351GX | User Guide - Page 70
Manager Installation and User's Guide Appendix F: Notices This information was developed for products and services offered in the U.S.A. IBM may not offer the products, services, or features discussed in this document in other countries. Consult your local IBM representative for information on the - IBM 17351GX | User Guide - Page 71
and services that are ServerProven, including but not limited to the implied warranties of merchantability and fitness for a particular purpose. These products are offered and warranted solely by third parties. IBM makes no representations or warranties with respect to non-IBM products. Support (if - IBM 17351GX | User Guide - Page 72
services in several countries to assist equipment owners in recycling their IT products. Information on IBM product recycling offerings can be found on IBM's Internet site at http://www.ibm.com/ ibm if not installed and used in accordance with the instruction manual, may cause harmful interference to - IBM 17351GX | User Guide - Page 73
own expense. Properly shielded and grounded cables and connectors must be used in order to meet FCC emission limits. IBM is not responsible for any radio or of the laws of the Member States relating to electromagnetic compatibility. IBM cannot accept responsibility for any failure to satisfy the - IBM 17351GX | User Guide - Page 74
60 Local Console Manager Installation and User's Guide Taiwanese Class A warning statement Chinese Class A warning statement Japanese Voluntary Control Council for Interference (VCCI) statement - IBM 17351GX | User Guide - Page 75
enable 31 broadcasting off 38 C Cat5 patch cable 50, 51 changing password 30 CO cable upgrading 45 Commands broadcast enable 31 display versions interface menus 23 connection mode changing 39 Console menu 41 D damaged firmware 47 Device Modify window 26 Devices window 25 disconnect user 34 users - IBM 17351GX | User Guide - Page 76
62 Local Console Manager Installation and User's Guide M Menu window 26 N Names window 24 network speed 42 O 34 R rack mounting 4 horizontal installation 9 vertical installation 9 Reduce cable bulk 2 Repairing damaged firmware 47 reset appliance 43 Reset Certificates 42 reset keyboard and mouse 31 - IBM 17351GX | User Guide - Page 77
- IBM 17351GX | User Guide - Page 78
39M2884 590526501A
-
 1
1 -
 2
2 -
 3
3 -
 4
4 -
 5
5 -
 6
6 -
 7
7 -
8
-
9
-
10
-
11
-
12
-
13
-
14
-
15
-
16
-
17
-
18
-
19
-
20
-
21
-
22
-
23
-
24
-
25
-
26
-
27
-
28
-
29
-
30
-
31
-
32
-
33
-
34
-
35
-
36
-
37
-
38
-
39
-
40
-
41
-
42
-
43
-
44
-
45
-
46
-
47
-
48
-
49
-
50
-
51
-
52
-
53
-
54
-
55
-
56
-
57
-
58
-
59
-
60
-
61
-
62
-
63
-
64
-
65
-
66
-
67
-
68
-
69
-
70
-
71
-
72
-
73
-
74
-
75
-
76
-
77
-
78
 |
 |
Installation and User’s Guide
For 1735-1GX
Local 2x8 Console Manager