IBM 1735R16 User Guide - Page 19
the slots in the bracket and the holes in the mounting rail, then into the, cage nuts or clip nuts.
 |
View all IBM 1735R16 manuals
Add to My Manuals
Save this manual to your list of manuals |
Page 19 highlights
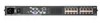
12 RCM Installer and User Guide 4. Mount the switch assembly to the rack cabinet by matching the holes in the "short side" of each bracket to an appropriate set of matching holes on your rack cabinet. Next, insert the combination hex head screws through the slots in the bracket and the holes in the mounting rail, then into the cage nuts or clip nuts. Figure 2.2: RCM Horizontal Installation
-
 1
1 -
2
-
3
-
4
-
5
-
6
-
7
-
8
-
9
-
10
-
11
-
12
-
13
-
 14
14 -
 15
15 -
 16
16 -
 17
17 -
 18
18 -
 19
19 -
 20
20 -
 21
21 -
 22
22 -
 23
23 -
 24
24 -
25
-
26
-
27
-
28
-
29
-
30
-
31
-
32
-
33
-
34
-
35
-
36
-
37
-
38
-
39
-
40
-
41
-
42
-
43
-
44
-
45
-
46
-
47
-
48
-
49
-
50
-
51
-
52
-
53
-
54
-
55
-
56
-
57
-
58
-
59
-
60
-
61
-
62
-
63
-
64
-
65
-
66
-
67
-
68
-
69
-
70
-
71
 |
 |

12
RCM Installer and User Guide
4.
Mount the switch assembly to the rack cabinet by matching the holes in
the “short side” of each bracket to an appropriate set of matching holes on
your rack cabinet. Next, insert the combination hex head screws through
the slots in the bracket and the holes in the mounting rail, then into the
cage nuts or clip nuts.
Figure 2.2: RCM Horizontal Installation