Insignia NS-32L240A13 User Manual (English) - Page 56
Waking INlink-compatible HDMI CEC, devices, Opening an INlink-compatible device's root
 |
View all Insignia NS-32L240A13 manuals
Add to My Manuals
Save this manual to your list of manuals |
Page 56 highlights
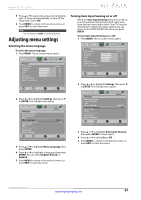
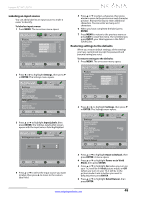
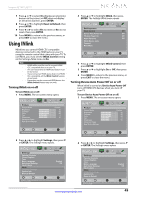
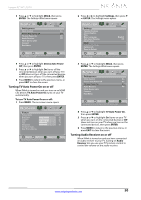
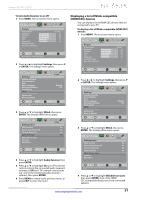
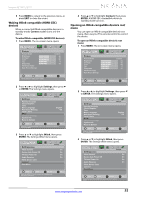
Insignia 32"/46" LCD TV 5 Press MENU to return to the previous menu, or press EXIT to close the menu. Waking INlink-compatible (HDMI CEC) devices When a connected INlink-compatible device is in standby mode, Connect wakes (turns on) the device. To wake INlink-compatible (HDMI CEC devices): 1 Press MENU. The on-screen menu opens. Picture Picture Picture Mode Brightness Contrast Color Tint Sharpness Advanced Video Reset Picture Settings Audio Channels Settings Photos Custom 60 60 60 0 50 Move OK ENTER Select MENU Previous Adjust settings to affect picture quality EXIT Exit 2 Press W or X to highlight Settings, then press T or ENTER. The Settings menu opens. Picture Settings Parental Controls Closed Caption Time Menu Language Auto Input Sensing Input Labels INlink Computer Settings System Info Reset to Default Audio Channels Settings Photos English Off Move OK ENTER Select MENU Previous EXIT Exit Allow the TV to automatically control CEC devices connected to the TV via HDMI 3 Press S or T to highlight INlink, then press ENTER. The Settings-INlink menu opens. Picture Settings-INlink INlink Control Device Auto Power Off TV Auto Power On Audio Receiver INlink Device Lists Connect Root Menu Audio Channels Settings Photos On On On On Move OK ENTER Select MENU Previous Enable the HDMI CEC device to come out of Standby mode when the TV is turned on. EXIT Exit 4 Press S or T to highlight Connect, then press ENTER. A HDMI CEC-compatible device in standby mode turns on. Opening an INlink-compatible device's root menu You can open an INlink-compatible device's root menu, then use your TV's remote control to control the device. To open an INlink-compatible device's root menu: 1 Press MENU. The on-screen menu opens. Picture Picture Picture Mode Brightness Contrast Color Tint Sharpness Advanced Video Reset Picture Settings Audio Channels Settings Photos Custom 60 60 60 0 50 Move OK ENTER Select MENU Previous Adjust settings to affect picture quality EXIT Exit 2 Press W or X to highlight Settings, then press T or ENTER. The Settings menu opens. Picture Settings Parental Controls Closed Caption Time Menu Language Auto Input Sensing Input Labels INlink Computer Settings System Info Reset to Default Audio Channels Settings Photos English Off Move OK ENTER Select MENU Previous EXIT Exit Allow the TV to automatically control CEC devices connected to the TV via HDMI 3 Press S or T to highlight INlink, then press ENTER. The Settings-INlink menu opens. Picture Settings-INlink INlink Control Device Auto Power Off TV Auto Power On Audio Receiver INlink Device Lists Connect Root Menu Audio Channels Settings Photos On On On On Move OK ENTER Select MENU Previous Control the menu of the HDMI CEC device with the TV remote control EXIT Exit www.insigniaproducts.com 52
-
 1
1 -
2
-
3
-
4
-
5
-
6
-
7
-
8
-
9
-
10
-
11
-
12
-
13
-
14
-
15
-
16
-
17
-
18
-
19
-
20
-
21
-
22
-
23
-
24
-
25
-
26
-
27
-
28
-
29
-
30
-
31
-
32
-
33
-
34
-
35
-
36
-
37
-
38
-
39
-
40
-
41
-
42
-
43
-
44
-
45
-
46
-
47
-
48
-
49
-
50
-
 51
51 -
 52
52 -
 53
53 -
 54
54 -
 55
55 -
 56
56 -
 57
57 -
 58
58 -
 59
59 -
 60
60 -
 61
61 -
62
-
63
-
64
-
65
-
66
-
67
 |
 |
