Insignia NS-M10OHD User Manual (English) - Page 6
Wiring connections - power harness
 |
View all Insignia NS-M10OHD manuals
Add to My Manuals
Save this manual to your list of manuals |
Page 6 highlights
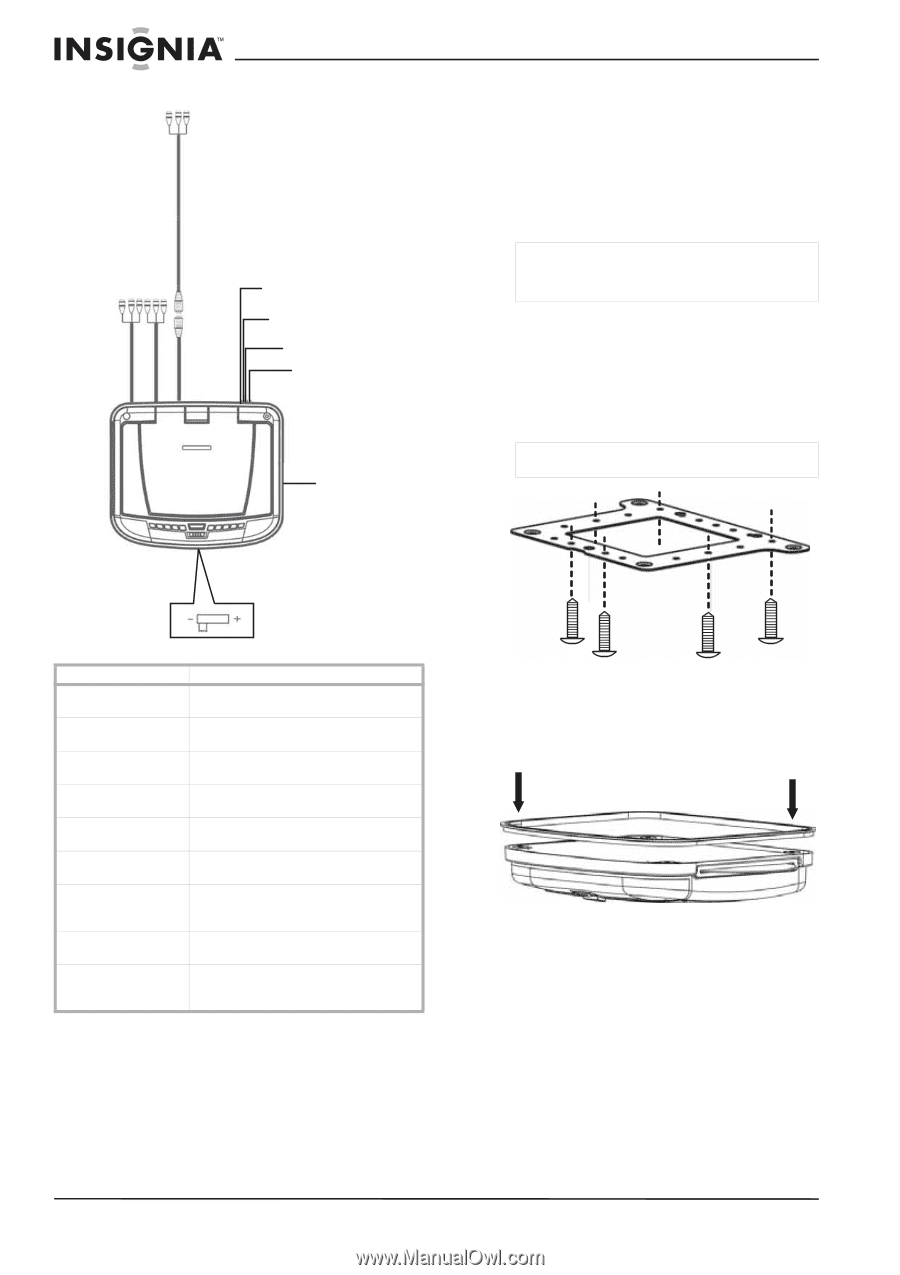
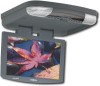
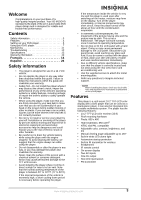
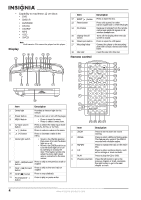
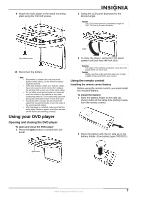
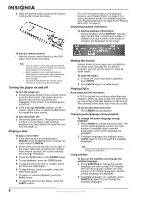
AV IN 2 AV OUT AV IN 1 Wiring connections Battery lead + (yellow) ACC lead (red) Ground lead (black) Door lead (green) FM Antenna To install the player: 1 Move the polarity switch fully to the correct polarity of your vehicle's power supply system. To determine your vehicle's polarity, see its user guide or call the dealer. • If your vehicle's power supply system is negative, set the switch to -. • If your vehicle's power supply system is positive, set the switch to +. Caution Do not move the position of the switch after installing the player, or the player may be damaged. 2 To prevent short circuits, remove the key from the ignition and disconnect the battery from the vehicle. 3 Disconnect the original dome light. 4 Attach the metal mounting plate to the roof using the ST 4.2×25.4, ST 4.2×38.1, or ST 4.2×50.8 screws. Caution Do not cover the original dome light opening. Polarity switch Item AV IN2 AV OUT AV IN1 Battery lead + ACC power lead Ground lead Door lead FM antenna wire Polarity switch Description Secondary input for external audio/video sources. Output for the player's audio/video to external displays or sound systems. Primary input for external audio/video sources. Connect this to the positive terminal lead of the car battery. Connect this to the engine accessory power lead. Connect this to a negative terminal lead of the vehicle battery. Connect this to the door sensor lead, so the player's dome light can be turned on and off by opening or closing the door. This wire sends the FM transmitter signal to an FM receiver. Slide this switch fully to the correct polarity of your car's power supply system. Six ST 4.2×25.4, ST 4.2×38.1, or ST 4.2×50.8 screws 5 Pull the original dome light power wire and power/signal cable through the original dome light opening. 6 Place the rubber gasket on the DVD player. 7 Connect the input and output cables. 8 Connect the wire harness in the following order: ground lead, battery lead, ACC lead, and door lead. 6 www.insignia-products.com
-
 1
1 -
 2
2 -
 3
3 -
 4
4 -
 5
5 -
 6
6 -
 7
7 -
 8
8 -
 9
9 -
 10
10 -
 11
11 -
 12
12 -
13
-
14
-
15
-
16
-
17
-
18
-
19
-
20
-
21
-
22
-
23
-
24
-
25
-
26
-
27
-
28
-
29
-
30
-
31
-
32
-
33
-
34
-
35
-
36
-
37
-
38
 |
 |