Insignia NS-R5100 User Manual (English) - Page 11
Using your receiver - sound only one speaker
 |
View all Insignia NS-R5100 manuals
Add to My Manuals
Save this manual to your list of manuals |
Page 11 highlights
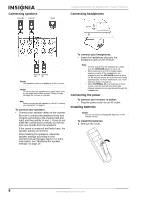
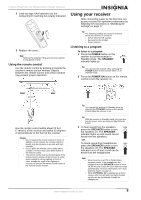
Insignia NS-R5100 AV Digital Home Theater Receiver 2 Load two type AAA batteries into the compartment matching the polarity indicated. 3 Replace the cover. Note Remove the batteries if they are not to be used for a long period of time. Using the remote control Use the remote control by pointing it towards the receiver's remote sensor window. Objects between the remote control and sensor window may prevent proper operation. Using your receiver After connecting power for the first time, set up your receiver for optimum performance by following the instructions in "Modifying the settings" on page 17. Tip The following settings are stored in memory before the receiver is turned off: • INPUT SELECTOR settings • Surround mode settings • Preset stations. Listening to a program To listen to a program: 1 Press the POWER button on the receiver to put the receiver in Standby mode. The STANDBY indicator lights up. Tip You can turn the receiver off by pressing the POWER button on the receiver while it is in Standby mode. 2 Press the POWER ON button on the remote control to turn the receiver on. 23' (7m) Use the remote control within about 23 feet (7 meters) of the receiver and within 30 degrees of perpendicular to the front of the receiver. Caution • Do not expose the remote control to shock. In addition, do not expose the remote control to liquids, and do not place in an area with high humidity. • Do not place the remote control under direct sunlight. The heat may cause deformation of the remote control. • The remote control may not work properly if the remote sensor window of the receiver is under direct sunlight or strong lighting. In such a case, change the angle of the lighting or receiver, or operate the remote control closer to the remote sensor window. PRESETS Tip You can put the receiver in Standby mode by pressing the STANDBY button on the remote control when the receiver is on. Tip With the receiver in Standby mode, you can also turn the power on by pressing an Input Selector button. 3 To hear sound from the speakers, press the SPEAKER button to turn the speakers on. The SPEAKER indicator lights up and sound can be heard from the speakers. -OR- To heard sound from headphones, press the SPEAKER button to turn the speakers off. The SPEAKER indicator turns off and sound can be heard from the headphones. Note • • When listening to a DTS or Dolby Digital program source, if the headphones are plugged in and the SPEAKER button is set to off, the receiver enters the 2CH downmix mode automatically. For more information, see "2CH downmix mode" on page 13. When EXTERNAL IN is selected as an input source, only front left and front right channel signals can be reproduced through the headphones. www.insignia-products.com 9
-
 1
1 -
2
-
3
-
4
-
5
-
 6
6 -
 7
7 -
 8
8 -
 9
9 -
 10
10 -
 11
11 -
 12
12 -
 13
13 -
 14
14 -
 15
15 -
 16
16 -
17
-
18
-
19
-
20
-
21
-
22
-
23
-
24
-
25
-
26
-
27
-
28
-
29
-
30
-
31
-
32
-
33
-
34
-
35
-
36
-
37
-
38
-
39
-
40
-
41
-
42
-
43
-
44
-
45
-
46
-
47
-
48
-
49
-
50
-
51
-
52
-
53
-
54
-
55
-
56
-
57
-
58
-
59
-
60
-
61
-
62
-
63
-
64
-
65
-
66
-
67
-
68
-
69
-
70
-
71
-
72
-
73
-
74
-
75
-
76
 |
 |
