Insignia NS-R5100 User Manual (English) - Page 19
Modifying the settings
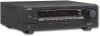 |
View all Insignia NS-R5100 manuals
Add to My Manuals
Save this manual to your list of manuals |
Page 19 highlights
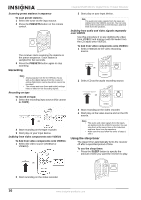
Insignia NS-R5100 AV Digital Home Theater Receiver Each time this button is pressed, the time changes as follows: • 10 minutes • 20 minutes • 30 minutes 90 minutes • OFF Note While operating the sleep timer, the lights up. Adjusting the display brightness To adjust the display brightness: • Press the DIMMER button to specify the brightness of the display. Modifying the settings The setup menu is displayed on the fluorescent display and allows you to perform the setup procedures. In most situations, you will only need to set this once during the installation and layout of your home theater, and it rarely needs to be changed later. The setup menu consists of five main menus: system, input, speaker setup, CH level, and parameter. These menus are then divided into various sub-menus. Navigating through the setup menu The explanations here assume you are using the buttons on the remote control when performing the setup menu operation. However, you can use the buttons on the front panel as well. The buttons on the front panel correspond to those on the remote control as shown. Button on the remote control Button on the front panel Each time this button is pressed, the brightness changes as follows: • ON • dimmer • OFF Note If the display is off, pressing any button turns the display on. Displaying the receiver status To display the receiver status: • Press the DISPLAY button during playback to view the receiver status. Each time this button is pressed, the display mode changes as follows: • Surround Mode • Volume • Input source Note If the input source is EXTERNAL IN, the surround mode is not displayed. To use the setup menu: 1 Press the SETUP button to open the setup menu. 2 Press the select or buttons to select the menu. 3 Press the MEMORY/ENTER button to confirm your selection. Note During setup menu operation, only the STANDBY(/POWER ON) button and the buttons required for system setup will function. Receiver setup menu Menu SYSTEM INPUT Submenu • SW • TONE • BASS • TRBL • VID 1 CFG • D.IN • AUTO • VID 2 CFG • D.IN • AUTO • CD CFG • D.IN • AUTO www.insignia-products.com 17
-
 1
1 -
2
-
3
-
4
-
5
-
6
-
7
-
8
-
9
-
10
-
11
-
12
-
13
-
 14
14 -
 15
15 -
 16
16 -
 17
17 -
 18
18 -
 19
19 -
 20
20 -
 21
21 -
 22
22 -
 23
23 -
 24
24 -
25
-
26
-
27
-
28
-
29
-
30
-
31
-
32
-
33
-
34
-
35
-
36
-
37
-
38
-
39
-
40
-
41
-
42
-
43
-
44
-
45
-
46
-
47
-
48
-
49
-
50
-
51
-
52
-
53
-
54
-
55
-
56
-
57
-
58
-
59
-
60
-
61
-
62
-
63
-
64
-
65
-
66
-
67
-
68
-
69
-
70
-
71
-
72
-
73
-
74
-
75
-
76
 |
 |
