Intel SE7210TP1-E User Guide - Page 22
Intel Server Board SE7210TP1-E User Guide, Server Installations and Upgrades
 |
UPC - 810884006803
View all Intel SE7210TP1-E manuals
Add to My Manuals
Save this manual to your list of manuals |
Page 22 highlights
Server Installations and Upgrades 5. If there is no thermal interface material on the bottom of the heat sink, use the enclosed syringe and apply the thermal interface material to the top of the processor. 6. Place the fan heat sink on top of the processor. TP00520 Figure 8. Attaching the Heat Sink to the Processor 7. Fully open the levers at the top of the heat sink, as shown by letter "A" in Figure 9. 8. With the levers in their fully opened position, push down firmly to secure the retention mechanism clips, represented by letter "B" in Figure 9. B B B B A A C TP00521 Figure 9. Attaching the Fan Heat Sink Clips to the Processor Socket 22 Intel Server Board SE7210TP1-E User Guide
-
 1
1 -
2
-
3
-
4
-
5
-
6
-
7
-
8
-
9
-
10
-
11
-
12
-
13
-
14
-
15
-
16
-
 17
17 -
 18
18 -
 19
19 -
 20
20 -
 21
21 -
 22
22 -
 23
23 -
 24
24 -
 25
25 -
 26
26 -
 27
27 -
28
-
29
-
30
-
31
-
32
-
33
-
34
-
35
-
36
-
37
-
38
-
39
-
40
-
41
-
42
-
43
-
44
-
45
-
46
-
47
-
48
-
49
-
50
-
51
 |
 |

Server Installations and Upgrades
22
Intel Server Board SE7210TP1-E User Guide
5.
If there is no thermal interface material on the bottom of the heat sink, use the enclosed syringe
and apply the thermal interface material to the top of the processor.
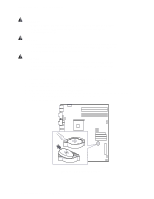
6.
Place the fan heat sink on top of the processor.
TP00520
Figure 8.
Attaching the Heat Sink to the Processor
7.
Fully open the levers at the top of the heat sink, as shown by letter “A” in Figure 9.
8.
With the levers in their fully opened position, push down firmly to secure the retention
mechanism clips, represented by letter “B” in Figure 9.
TP00521
A
B
A
B
B
B
C
Figure 9. Attaching the Fan Heat Sink Clips to the Processor Socket