Intel SE7210TP1-E User Guide - Page 29
Creating a Bootable Diskette, Creating the BIOS Upgrade Diskette, Upgrading the BIOS - download
 |
UPC - 810884006803
View all Intel SE7210TP1-E manuals
Add to My Manuals
Save this manual to your list of manuals |
Page 29 highlights
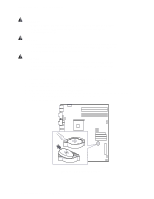
Server Utilities Creating a Bootable Diskette Use a DOS system to create the diskette as follows: 1. Insert a diskette in diskette drive A. 2. At the C:\ prompt, for an unformatted diskette, type: format a:/s or, for a diskette that is already formatted, type: sys a: 4. Press . Creating the BIOS Upgrade Diskette The BIOS upgrade file is a compressed self-extracting archive that contains the files you need to upgrade the BIOS. 1. Insert the bootable diskette into the diskette drive. 2. While in the directory into which you downloaded the upgrade file(s), type [filename] a: where "[filename]" is the name of the file that you downloaded. This command extracts the update files and places them onto the bootable diskette Upgrading the BIOS 1. Place the bootable diskette containing the BIOS update files into the diskette drive of your system. Boot the system with the diskette in the drive. 2. A menu will appear with two options. Use option 1 to automatically update the system BIOS. Use option 2 to manually update the system BIOS and the User Binary. 3. If you selected option 1, to automatically update the system BIOS: The system will execute the AfuDOS update utility to update the BIOS. When the update is complete, the utility will display a green box with a message that says "Completed Successfully." The system will then reboot. 4. If you selected option 2, to manually update the BIOS or to update the flash memory, you can either select "Update Flash Memory From a File" or "Update System BIOS": ƒ Update Flash Memory From a File: When prompted for a file name, type BIOS.wph and press Enter. ƒ Update System BIOS: The system will warn you that the BIOS will be updated. Verify the BIOS version is correct and press Enter to continue. When the update is complete, the utility will display a green box with a message that says "Completed Successfully." The system will then reboot. 5. Wait while the BIOS files are updated. Do not power down the system during the BIOS update process! The system will reset automatically when the BIOS update process is completed. Remove the diskette from the diskette drive. 6. Check to make sure the BIOS version displayed during POST is the new version as the system reboots. 7. Enter Setup by pressing the F2 key during boot. 8. In Setup, press the F9 and to set the parameters back to default values. 9. Re-enter the values you wrote down at the beginning of this process. Press F10 and to exit BIOS Setup and Save Changes. Intel Server Board SE7210TP1-E User Guide 29
-
 1
1 -
2
-
3
-
4
-
5
-
6
-
7
-
8
-
9
-
10
-
11
-
12
-
13
-
14
-
15
-
16
-
17
-
18
-
19
-
20
-
21
-
22
-
23
-
 24
24 -
 25
25 -
 26
26 -
 27
27 -
 28
28 -
 29
29 -
 30
30 -
 31
31 -
 32
32 -
 33
33 -
 34
34 -
35
-
36
-
37
-
38
-
39
-
40
-
41
-
42
-
43
-
44
-
45
-
46
-
47
-
48
-
49
-
50
-
51
 |
 |
