JVC DR MV79B Instructions - Page 178
DR-MV79B Quick Guide FAQ's, JVC Customer Care Center
 |
UPC - 046838034138
View all JVC DR MV79B manuals
Add to My Manuals
Save this manual to your list of manuals |
Page 178 highlights
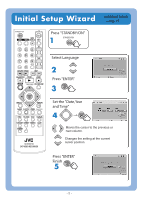
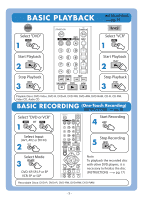
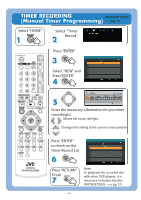
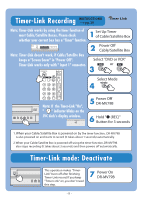
JVC Customer Care Center 1-800-252-5722 DR-MV79B Quick Guide FAQ's Thank you for your purchase of the JVC DR-MV79B DVD Video Recorder. If you have any questions regarding the hookup or operation of your DR-MV79B, please contact our Customer Care Center at 1-800-252-5722. Please Note: Be sure to connect the AC power plug into the power outlet after all other connections are completed. What DVDs can I use to record on my DR-MV79B? c DVD-R, DVD+R, DVD-RW, DVD+RW and DVD-RAM can be used to record on your DR-MV79B. For recommended recordable DVD discs, please refer to page 3 in your owner's manual. My DR-MV79B is showing no picture. There is no signal output from COMPONENT OUT when HDMI is connected and 720p/1080i/1080p is selected at OUTPUT STATUS. c Press OUTPUT STATUS button and select either 480i or 480p in order to watch the video signal from COMPONENT OUT. When I turn on my DR-MV79B, it flashes "Hello" and all the buttons on the remote control and the front panel will not respond for 10 - 15 seconds. Is this normal? When your DR-MV79B is first turned on, it will flash "Hello" as the internal EPROM chip is updated with information. c Please wait until "Hello" stops flashing before you attempt to use the remote control or front panel buttons. It takes 25-30 seconds until the set can be operated when a disc is on the tray. My DR-MV79B is showing a distorted picture. Your DR-MV79B has a progressive scan feature. This feature only works with a TV that accepts a progressive scan signal. c If the picture is distorted, press OUTPUT STATUS button and select 480i. When the resolution is set to 1080p in VCR playback, the picture can be distorted. c If the picture is distorted, press OUTPUT STATUS repeatedly until the picture appears normally to change the resolution setting. My newly recorded DVD plays in my DR-MV79B but does not play in other DVD players. c You must "Finalize" the DVD before it can play in another DVD player. Please see page 17 in your owner's manual. During the Initial Set Up, I am being asked to set the Clock. Does this model have Auto Clock Set? c This unit doesn't have an Auto Clock Setting. You will need to manually set your clock as shown on page 13 of your owner's manual under the Initial Setup Wizard. You can also look on page 14 of your owner's manual and follow the directions for Clock Set. How can I record TV program? How can I use Timer-Link function? As this model has a new Tuner-Free design, you need to connect an external tuner such as Cable/Satellite box. If your Cable/Satellite box has a programmable ON/OFF timer function, the recording will start/stop at the programmed time (Timer-Link function). See page 30 of your owner's manual for instructions on how to use Timer-Link. For additional troubleshooting tips please refer to pages 43-45 in your owners manual. LVT1902-001A 0308SKMLGEEGL
-
 1
1 -
2
-
3
-
4
-
5
-
6
-
7
-
8
-
9
-
10
-
11
-
12
-
13
-
14
-
15
-
16
-
17
-
18
-
19
-
20
-
21
-
22
-
23
-
24
-
25
-
26
-
27
-
28
-
29
-
30
-
31
-
32
-
33
-
34
-
35
-
36
-
37
-
38
-
39
-
40
-
41
-
42
-
43
-
44
-
45
-
46
-
47
-
48
-
49
-
50
-
51
-
52
-
53
-
54
-
55
-
56
-
57
-
58
-
59
-
60
-
61
-
62
-
63
-
64
-
65
-
66
-
67
-
68
-
69
-
70
-
71
-
72
-
73
-
74
-
75
-
76
-
77
-
78
-
79
-
80
-
81
-
82
-
83
-
84
-
85
-
86
-
87
-
88
-
89
-
90
-
91
-
92
-
93
-
94
-
95
-
96
-
97
-
98
-
99
-
100
-
101
-
102
-
103
-
104
-
105
-
106
-
107
-
108
-
109
-
110
-
111
-
112
-
113
-
114
-
115
-
116
-
117
-
118
-
119
-
120
-
121
-
122
-
123
-
124
-
125
-
126
-
127
-
128
-
129
-
130
-
131
-
132
-
133
-
134
-
135
-
136
-
137
-
138
-
139
-
140
-
141
-
142
-
143
-
144
-
145
-
146
-
147
-
148
-
149
-
150
-
151
-
152
-
153
-
154
-
155
-
156
-
157
-
158
-
159
-
160
-
161
-
162
-
163
-
164
-
165
-
166
-
167
-
168
-
169
-
170
-
171
-
172
-
 173
173 -
 174
174 -
 175
175 -
 176
176 -
 177
177 -
 178
178 -
 179
179 -
 180
180 -
 181
181 -
 182
182 -
 183
183 -
184
-
185
-
186
-
187
-
188
-
189
-
190
-
191
-
192
-
193
-
194
-
195
-
196
-
197
-
198
-
199
-
200
-
201
-
202
-
203
-
204
-
205
-
206
-
207
-
208
-
209
-
210
-
211
-
212
-
213
-
214
-
215
-
216
-
217
-
218
-
219
-
220
-
221
-
222
-
223
-
224
-
225
-
226
-
227
-
228
-
229
-
230
-
231
-
232
-
233
-
234
-
235
-
236
-
237
-
238
-
239
-
240
-
241
-
242
-
243
-
244
-
245
-
246
-
247
-
248
-
249
-
250
-
251
-
252
-
253
-
254
-
255
-
256
-
257
-
258
-
259
-
260
-
261
-
262
-
263
-
264
-
265
-
266
-
267
-
268
-
269
-
270
-
271
-
272
-
273
-
274
-
275
-
276
-
277
-
278
-
279
-
280
-
281
-
282
-
283
-
284
-
285
-
286
-
287
-
288
-
289
-
290
-
291
-
292
-
293
-
294
-
295
-
296
-
297
-
298
-
299
-
300
-
301
-
302
-
303
-
304
-
305
-
306
 |
 |