JVC GM-F420S Instruction Manual - Page 5
Parts Identification - manual
 |
View all JVC GM-F420S manuals
Add to My Manuals
Save this manual to your list of manuals |
Page 5 highlights
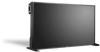
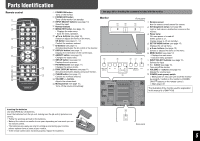
Parts Identification Remote control 1 2 3 4 5 6 7 8 9 p q w 1 POWER ON button • See page 29 for checking the accessory included with the monitor. Turns on the monitor. 2 POWER OFF button Turns off the monitor (on standby). Monitor Front panel 3 INPUT SELECT buttons (see page 10) Select the input. 12 3 1 Remote sensor Aim the remote control toward the sensor. 4 Number buttons 2 Self-diagnostic lamps (see page 28) 5 MENU/EXIT button (see page 12) Light or flash when a malfunction occurs on the • Displays the main menu. monitor. • Exits the menu operation. 3 Power lamp 6 5∞2 3 buttons (see page 12) Off: main power is turned off. Selects or adjusts the items on the menu. Green: power is on. OK button (see pages 11, 17) Orange: power is off (on standby). Confirm the numbers entered. 4 SET-UP MENU button (see page 15) 7 ID buttons (see page 11) e Activates/deactivates the ID control of the monitor. Displays the set-up menu. 5 5∞2 3 buttons (see page 12) 8 DISPLAY button (see page 11) Selects or adjusts the items on the menu. Displays the information of the current input. 6 MENU button (see page 12) 9 ASPECT button (see page 10) • Displays the main menu. Changes the aspect ratio. p SET-UP button (see page 12) 4 5 67 8 • Exits the menu operation. 7 INPUT SELECT buttons (see page 10) Displays the set-up menu. Selects the input. q PICTURE button (see page 11) 8 button (see page 10) r Changes the picture mode. w DUAL DISPLAY buttons (see page 11) Turns on/off the monitor. 9 VOLUME +/- buttons (see page 10) Activates/deactivates display using dual-monitor. Adjusts the volume level. t e CLEAR button (see page 17) Cancels the numbers entered. 9 p POWER (main power) switch | : Main power on (You can turn on/off the monitor r VOLUME +/- buttons by using button on the monitor or POWER Adjusts the volume level. ON/OFF buttons on the remote control.) t Muting button (see page 10) ‡: Main power off Turns off the volume immediately. The illustration of the monitor used for explanation in this manual is of GM-F470S. Inserting the batteries Use two AA/R6 dry cell batteries. Insert the batteries from the · end, making sure the ª and · polarities are correct. • Follow the warnings printed on the batteries. • Battery life is about six months to one year, depending on how much you use the remote control. • The batteries we supply are only for setting up and testing your monitor, please replace them as soon as you need to. • If the remote control does not work properly, replace the batteries. p Rear panel 5
-
 1
1 -
 2
2 -
 3
3 -
 4
4 -
 5
5 -
 6
6 -
 7
7 -
 8
8 -
 9
9 -
 10
10 -
 11
11 -
12
-
13
-
14
-
15
-
16
-
17
-
18
-
19
-
20
-
21
-
22
-
23
-
24
-
25
-
26
-
27
-
28
-
29
-
30
-
31
-
32
 |
 |
