JVC GR D770 Instructions - Page 13
Power
 |
UPC - 683728163846
View all JVC GR D770 manuals
Add to My Manuals
Save this manual to your list of manuals |
Page 13 highlights
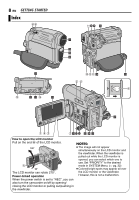
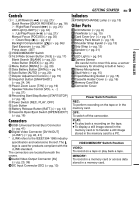
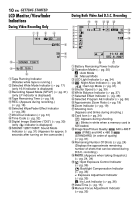
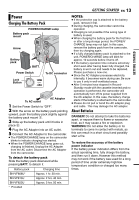
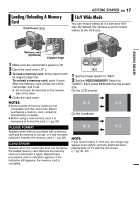
Power Charging The Battery Pack POWER/CHARGE Lamp Battery pack mount Arrow Battery pack 2 1 BATT. Power Switch To DC connector Lock Button To AC outlet AC Adapter 1 Set the Power Switch to "OFF". 2 With the arrow on the battery pack pointing upward, push the battery pack slightly against the battery pack mount 1. 3 Slide up the battery pack until it locks in place 2. 4 Plug the AC Adapter into an AC outlet. 5 Connect the AC Adapter to the camcorder. ● The POWER/CHARGE lamp on the camcorder blinks to indicate charging has started. ● When the POWER/CHARGE lamp goes out, charging is finished. Unplug the AC Adapter from the AC outlet. Disconnect the AC Adapter from the camcorder. To detach the battery pack Slide the battery pack downward while pressing BATT. to detach it. Battery pack Charging time BN-VF808U* Approx. 1 hr. 30 min. BN-VF815U Approx. 2 hrs. 40 min. BN-VF823U Approx. 3 hrs. 50 min. * Provided GETTING STARTED EN 13 NOTES: ● If the protective cap is attached to the battery pack, remove it first. ● During charging, the camcorder cannot be operated. ● Charging is not possible if the wrong type of battery is used. ● When charging the battery pack for the first time or after a long storage period, the POWER/ CHARGE lamp may not light. In this case, remove the battery pack from the camcorder, then try charging again. ● If a fully charged battery pack is attached to the unit, POWER/CHARGE lamp will blink for approx. 10 seconds before it turns off. ● If the battery operation time remains extremely short even after having been fully charged, the battery is worn out and needs to be replaced. Please purchase a new one. ● Since the AC Adapter processes electricity internally, it becomes warm during use. Be sure to use it only in well-ventilated areas. ● After 5 minutes have elapsed in RecordStandby mode with the cassette inserted and no operation is performed, the camcorder will automatically turn off its power supplied from the AC adapter. In this case, the battery charge starts if the battery is attached to the camcorder. ● Please do not pull or bend the AC adapter plug and cable. This may damage the AC adapter. About Batteries DANGER! Do not attempt to take the batteries apart, or expose them to flame or excessive heat, as it may cause a fire or explosion. WARNING! Do not allow the battery or its terminals to come in contact with metals, as this can result in a short circuit and possibly start a fire. To restore the accuracy of the battery power indicator If the battery power indication differs from the actual operating time, fully charge the battery, and then run it down. However this method may not work if the battery was used for a long period of time under extremely high/low temperature condition or charged too many times. GETTING STARTED
-
 1
1 -
2
-
3
-
4
-
5
-
6
-
7
-
 8
8 -
 9
9 -
 10
10 -
 11
11 -
 12
12 -
 13
13 -
 14
14 -
 15
15 -
 16
16 -
 17
17 -
 18
18 -
19
-
20
-
21
-
22
-
23
-
24
-
25
-
26
-
27
-
28
-
29
-
30
-
31
-
32
-
33
-
34
-
35
-
36
-
37
-
38
-
39
-
40
-
41
-
42
-
43
-
44
-
45
-
46
-
47
-
48
 |
 |
