JVC KW NX7000 Instructions - Page 108
Input, Others, Low, Mid, High - reset
 |
UPC - 046838032974
View all JVC KW NX7000 manuals
Add to My Manuals
Save this manual to your list of manuals |
Page 108 highlights
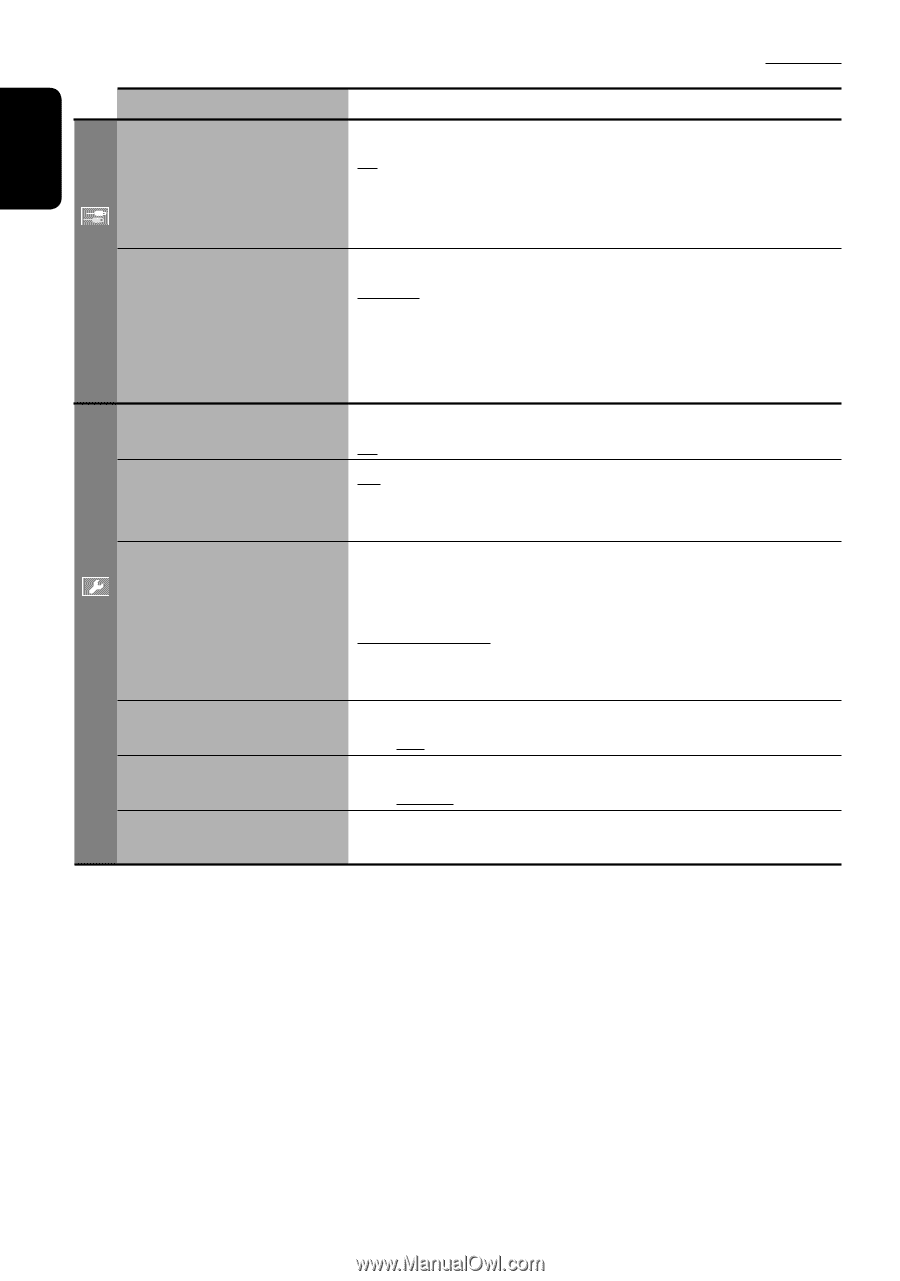
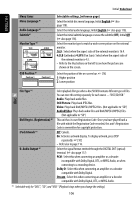
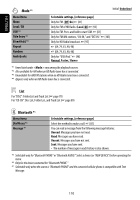
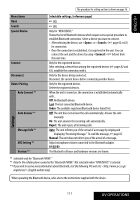
ENGLISH Input Initial: Underlined Menu items Camera Input *1 External Input *2 Beep Telephone Muting *4 Illumination Motion Sensitiv. Reverse Signal Initialize Selectable settings, [reference page] Off: Select when no rear view camera is connected to the CAMERA IN plug. On: Select when connecting the rear view camera to the CAMERA IN plug. The picture from the camera is displayed as it is taken. • While the pictures through the camera are shown on the monitor, no message will be displayed. For connecting an external component to the CD changer jack on the rear. Changer/iPod *3: CD changer or iPod. ☞ [89, 99] External: Any other than the above. ☞ [101] • For connecting the Bluetooth adapter, Satellite radio interface, and Smart Digital Adapter, this setting is not required. They are automatically detected. Off: Cancels. On: Activates the key-touch tone. Off: Cancels. Muting1, Muting2: Select either one which mutes the sounds while using the cellular phone. You can turn off the lights of the monitor panel buttons while turning on the unit. ☞ [5] Normal: Always lights. Proximity/Motion: Lights up when your finger moves closer to the touch panel. Touch Panel: Lights up when your finger touches the touch panel. Change the sensitivity of the sensor for Illumination Off mode. Low, Mid, High Select the reverse signal polarity according to the connection of your car. GND, Battery Initialize all settings you have made in . Press and hold [Enter] to initialize the settings, then reset the unit. ☞ [3] Others *1 The REVERSE GEAR SIGNAL lead connection is required. See Installation/Connection Manual. The rear view through the camera appears on the screen in aspect ratio (regardless of the aspect ratio setting) when you shift the gear to the reverse (R) position. When you press DISP, or when you shift the gear to another position other than the reverse (R) position, the rear view screen is cleared. *2 Not selectable when the component connected to the CD changer jack is selected as the source. *3 The name of the component detected through the CD changer jack is shown. *4 The TEL MUTING lead connection is required. See Installation/Connection Manual. 108
-
 1
1 -
2
-
3
-
4
-
5
-
6
-
7
-
8
-
9
-
10
-
11
-
12
-
13
-
14
-
15
-
16
-
17
-
18
-
19
-
20
-
21
-
22
-
23
-
24
-
25
-
26
-
27
-
28
-
29
-
30
-
31
-
32
-
33
-
34
-
35
-
36
-
37
-
38
-
39
-
40
-
41
-
42
-
43
-
44
-
45
-
46
-
47
-
48
-
49
-
50
-
51
-
52
-
53
-
54
-
55
-
56
-
57
-
58
-
59
-
60
-
61
-
62
-
63
-
64
-
65
-
66
-
67
-
68
-
69
-
70
-
71
-
72
-
73
-
74
-
75
-
76
-
77
-
78
-
79
-
80
-
81
-
82
-
83
-
84
-
85
-
86
-
87
-
88
-
89
-
90
-
91
-
92
-
93
-
94
-
95
-
96
-
97
-
98
-
99
-
100
-
101
-
102
-
 103
103 -
 104
104 -
 105
105 -
 106
106 -
 107
107 -
 108
108 -
 109
109 -
 110
110 -
 111
111 -
 112
112 -
 113
113 -
114
-
115
-
116
-
117
-
118
-
119
-
120
-
121
-
122
-
123
-
124
-
125
-
126
-
127
-
128
-
129
-
130
-
131
-
132
-
133
-
134
-
135
-
136
-
137
-
138
-
139
-
140
-
141
-
142
-
143
-
144
-
145
-
146
-
147
-
148
-
149
-
150
-
151
-
152
-
153
-
154
-
155
-
156
-
157
-
158
-
159
-
160
-
161
-
162
-
163
-
164
-
165
-
166
-
167
-
168
-
169
-
170
-
171
-
172
-
173
-
174
-
175
-
176
-
177
-
178
-
179
-
180
-
181
-
182
-
183
-
184
-
185
-
186
-
187
-
188
-
189
-
190
-
191
-
192
-
193
-
194
-
195
-
196
-
197
-
198
-
199
-
200
-
201
-
202
-
203
-
204
-
205
-
206
-
207
-
208
-
209
-
210
-
211
-
212
-
213
-
214
-
215
-
216
-
217
-
218
-
219
-
220
-
221
-
222
-
223
-
224
-
225
-
226
-
227
-
228
-
229
-
230
-
231
-
232
-
233
-
234
-
235
-
236
-
237
-
238
-
239
-
240
-
241
-
242
-
243
-
244
-
245
-
246
-
247
-
248
-
249
-
250
-
251
-
252
-
253
-
254
-
255
-
256
-
257
-
258
-
259
-
260
-
261
-
262
-
263
-
264
-
265
-
266
-
267
-
268
-
269
-
270
-
271
-
272
-
273
-
274
-
275
-
276
-
277
-
278
-
279
-
280
-
281
-
282
-
283
-
284
-
285
-
286
-
287
-
288
-
289
-
290
-
291
-
292
-
293
-
294
-
295
-
296
-
297
-
298
-
299
-
300
-
301
-
302
-
303
-
304
-
305
-
306
-
307
-
308
-
309
-
310
-
311
-
312
-
313
-
314
-
315
-
316
-
317
-
318
-
319
-
320
-
321
-
322
-
323
-
324
-
325
-
326
-
327
-
328
-
329
-
330
-
331
-
332
-
333
-
334
-
335
-
336
-
337
-
338
-
339
-
340
-
341
-
342
-
343
-
344
-
345
-
346
-
347
-
348
-
349
-
350
-
351
-
352
-
353
-
354
-
355
-
356
-
357
-
358
-
359
-
360
-
361
-
362
-
363
-
364
-
365
-
366
-
367
-
368
-
369
-
370
-
371
-
372
-
373
-
374
-
375
-
376
-
377
-
378
-
379
-
380
-
381
-
382
-
383
-
384
-
385
-
386
-
387
 |
 |