JVC KW-V25BT Instruction Manual America - Page 45
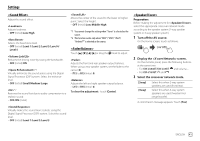
<Volume Offset>, Display settings, <Dimmer>, <User Customize>
 |
View all JVC KW-V25BT manuals
Add to My Manuals
Save this manual to your list of manuals |
Page 45 highlights
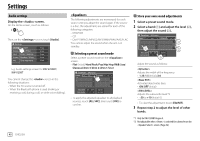
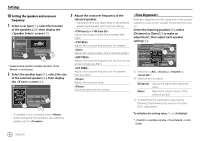
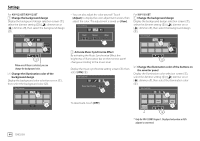
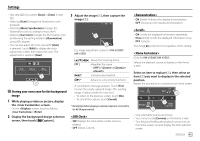
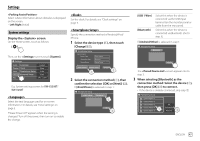
Settings Determining the value for adjustment If you specify the distance from the center of the currently set listening position to every speaker, the delay time will be automatically computed and set. 1 Determines the center of the currently set listening position as the reference point. 2 Measures the distances from the reference point to the speakers. 3 Calculates the differences between the distance of the furthest speaker and other speakers. 4 Sets the DTA value calculated in step 3 for individual speakers. 5 Adjusts gain for individual speakers. E.g. When is selected as the listening position +3.5 ft 1.4 ft 2.45 ft 4.9 ft +2.45 ft Adjust and store the auto-adjustment volume level for each source. If the source is a disc, the adjustment is stored for each of the following categories: • DVD/VCD • CD • DivX*/MPEG1/MPEG2/MP3/WMA/WAV/AAC/FLAC The volume level will automatically increase or decrease when you change the source. • -15 to +6 (Initial: 00) * Only for KW-V350BT Region 4. Display settings Display the screen. On the Home screen, touch as follows: • Auto (Initial): Dims the screen and button illumination when you turn on the headlights. - Connection to the car light control switch is required. (Page 55) • ON: Activates dimmer. • OFF: Deactivates dimmer. You can change the display design. While playing a video or picture, you can capture an image and use the captured image as a background. • You cannot capture copyrighted content and images. • When using a JPEG file as the background, make sure that the resolution is 800 x 480 pixels. • The color of the captured image may look different from that of the actual scene. Then, on the screen, touch [Display]. Settings Audio Dimmer Display User Customize Input OSD Clock System Demonstration Key Scroll Auto Enter ON OFF ON OFF ON Once OFF +0 ft E.g. Display settings screen for KW-V250BT/ KW-V25BT ENGLISH 43
-
 1
1 -
2
-
3
-
4
-
5
-
6
-
7
-
8
-
9
-
10
-
11
-
12
-
13
-
14
-
15
-
16
-
17
-
18
-
19
-
20
-
21
-
22
-
23
-
24
-
25
-
26
-
27
-
28
-
29
-
30
-
31
-
32
-
33
-
34
-
35
-
36
-
37
-
38
-
39
-
 40
40 -
 41
41 -
 42
42 -
 43
43 -
 44
44 -
 45
45 -
 46
46 -
 47
47 -
 48
48 -
 49
49 -
 50
50 -
51
-
52
-
53
-
54
-
55
-
56
-
57
-
58
-
59
-
60
-
61
-
62
-
63
-
64
-
65
-
66
-
67
-
68
 |
 |
