JVC KW-V25BT Instruction Manual America - Page 48
<Screen Adjustment>, <Video Output>, <Viewing Angle>, Input settings, <Rear Camera
 |
View all JVC KW-V25BT manuals
Add to My Manuals
Save this manual to your list of manuals |
Page 48 highlights
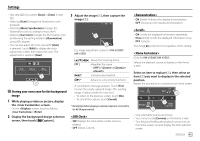
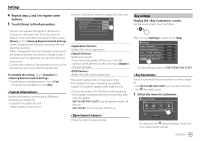
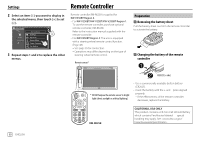
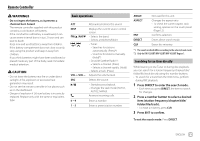
Settings Adjust the brightness and blackness of the screen. Select [DIM ON] (dimmer on) or [DIM OFF] (dimmer off), then change the following settings: Input settings Display the screen. On the Home screen, touch as follows: Adjusts brightness. • -15 to +15 (Initial: 0 for dimmer on, +15 for dimmer off) Adjusts blackness. • -10 to +10 (Initial: 0) Select the color system of the external monitor. • NTSC (Initial)/PAL "Please Power Off" appears when the setting is changed. Turn off the power, then turn on to enable the change. Select the viewing angle in relation to the monitor to make the image on the screen easier to see. • Under 0° (Initial)/5°/10°/15°/20° Then, on the screen, touch [Input]. Settings Audio Rear Camera Display Parking Assist Input System Key Enter Enter E.g. Input settings screen for KW-V250BT/ KW-V25BT Configure the rear view camera settings. • ON (Initial): Displays the picture from the rear view camera when you shift the gear to the reverse (R) position. - A caution message appears on the screen. To remove the caution message, touch the screen. • OFF: Select this when no camera is connected. • ON (Initial): Displays the parking guidelines. • OFF: Hides the parking guidelines. Adjust the parking guidelines according to the size of the car, parking space and so on. When adjusting the parking guidelines, make sure to use the parking brake to prevent the car from moving. Select the mark (1), then adjust the position of the selected mark (2). Initialize Make sure that A and B are horizontally parallel, and that C and D are the same length. • Touch and hold [Initialize ] for 2 seconds to set all the marks to the initial default position. (Only for KW-V350BT Region 1) Configure settings for using the ADS adapter. When an ADS adapter is connected, you can display information about obstacles around the car. • ON: Always displays information. • Dyn. (Initial): Displays information when the sensor detects obstacles. • OFF: Cancels. 46 ENGLISH
-
 1
1 -
2
-
3
-
4
-
5
-
6
-
7
-
8
-
9
-
10
-
11
-
12
-
13
-
14
-
15
-
16
-
17
-
18
-
19
-
20
-
21
-
22
-
23
-
24
-
25
-
26
-
27
-
28
-
29
-
30
-
31
-
32
-
33
-
34
-
35
-
36
-
37
-
38
-
39
-
40
-
41
-
42
-
 43
43 -
 44
44 -
 45
45 -
 46
46 -
 47
47 -
 48
48 -
 49
49 -
 50
50 -
 51
51 -
 52
52 -
 53
53 -
54
-
55
-
56
-
57
-
58
-
59
-
60
-
61
-
62
-
63
-
64
-
65
-
66
-
67
-
68
 |
 |
