JVC KW-V25BT Instruction Manual America - Page 7
Getting Started
 |
View all JVC KW-V25BT manuals
Add to My Manuals
Save this manual to your list of manuals |
Page 7 highlights
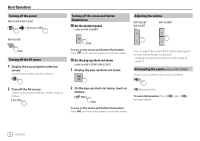
Getting Started Initial settings When you power on the unit for the first time or reset the unit, the screen appears. Perform the initial settings. Initial Settings Demonstration Language Rear Camera User Customize Viewing Angle ON OFF English Enter Enter Enter Finish • GUI Language (Local (the language selected above) (Initial)/English): Selects the language used for displaying operation keys and menu items. (Page 46) Make the settings to display the picture from the connected rear view camera. (Page 43) Change the display design. (Page 46) Select the viewing angle in relation to the monitor to make the image on the screen easier to see. • Under 0° (Initial)/5°/10°/15°/20° 2 Display the screen. On the Home screen, touch as follows: Then, on the screen, touch as follows: [System] : [Enter] • You can also display the screen by touching the clock area on the Home screen. 3 Set the clock time. Clock Synchronize Radio Data System E.g. Initial settings screen for KW-V250BT/ KW-V25BT Once completed, Home screen appears. • ON (Initial): Activates the display demonstration. • OFF: Deactivates the display demonstration. Select the text language used for on-screen information. • English (Initial)/Español/Français/Deutsch/ Italiano/Nederlands Português/Türkçe/ Čeština/Polski/Magyar/Руccĸий/ / / / / / /Bahasa Malaysia/Bahasa Indonesia/ - For external monitors, only English/Spanish/ French/German/Italian/Dutch/Russian/Portuguese are available. If another language has been selected, the text language for external monitors will be set to English. Clock settings 1 Display the Home screen. KW-V250BT KW-V25BT KW-V350BT AM10 : 28 Reset E.g. Clock settings screen for KW-V250BT/ KW-V25BT • Radio Data System (Initial): Synchronizes the clock time with FM RBDS. • Off: Sets the clock manually. Touch [J]/[K] to adjust the hour, then minute. - Touching [Reset] will set the minute to "00". ENGLISH 5
-
 1
1 -
 2
2 -
 3
3 -
 4
4 -
 5
5 -
 6
6 -
 7
7 -
 8
8 -
 9
9 -
 10
10 -
 11
11 -
 12
12 -
13
-
14
-
15
-
16
-
17
-
18
-
19
-
20
-
21
-
22
-
23
-
24
-
25
-
26
-
27
-
28
-
29
-
30
-
31
-
32
-
33
-
34
-
35
-
36
-
37
-
38
-
39
-
40
-
41
-
42
-
43
-
44
-
45
-
46
-
47
-
48
-
49
-
50
-
51
-
52
-
53
-
54
-
55
-
56
-
57
-
58
-
59
-
60
-
61
-
62
-
63
-
64
-
65
-
66
-
67
-
68
 |
 |
