JVC KW-Z1000W Instruction Manual America - Page 10
Popup menu, Turn off the screen
 |
View all JVC KW-Z1000W manuals
Add to My Manuals
Save this manual to your list of manuals |
Page 10 highlights
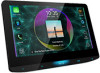
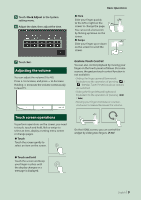
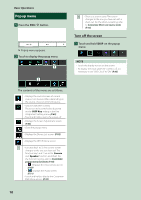
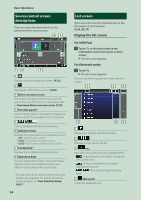
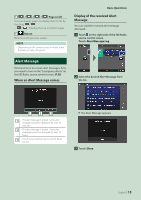
Basic Operations Popup menu 1 Press the [FNC]/[ ] button. hhPopup menu appears. 2 Touch to display the popup menu. 1 2 The contents of the menu are as follows. • Displays the control screen of current source. Icon feature differs depending on the source. This icon is for USB source. • Switches between screens. The screen to be switched to depends on the [DISP Key] setting in the Key Assignment setting menu. (P.69) • Touch and hold to turns the screen off. • Displays the Screen Adjustment screen. (P.63) • Close the popup menu. • Displays the Device List screen. (P.52) • Displays the SETUP Menu screen. 1 • Function key1 to 3: The current screen changes to the one you have set. The function key1 and 2 are set to [Camera] and [Speaker] function as default. For the function setting, refer to Customize popup menu functions (P.70). --[ ]: Displays the view camera screen. (P.47) --[ ]: Displays the Audio screen. (P.71) • Touch and hold to display the Customize FNC Menu screen. (P.70) 2 • Short-cut source icons: The source changes to the one you have set with a short-cut. For the short-cut setting, refer to Customize Short-cut source icons (P.13). Turn off the screen 1 Touch and hold [DISP] on the popup menu. NOTE • Touch the display to turn on the screen. • To display the clock while the screen is off, it is necessary to set "OSD Clock" to "ON". (P.65) 10
-
 1
1 -
2
-
3
-
4
-
 5
5 -
 6
6 -
 7
7 -
 8
8 -
 9
9 -
 10
10 -
 11
11 -
 12
12 -
 13
13 -
 14
14 -
 15
15 -
16
-
17
-
18
-
19
-
20
-
21
-
22
-
23
-
24
-
25
-
26
-
27
-
28
-
29
-
30
-
31
-
32
-
33
-
34
-
35
-
36
-
37
-
38
-
39
-
40
-
41
-
42
-
43
-
44
-
45
-
46
-
47
-
48
-
49
-
50
-
51
-
52
-
53
-
54
-
55
-
56
-
57
-
58
-
59
-
60
-
61
-
62
-
63
-
64
-
65
-
66
-
67
-
68
-
69
-
70
-
71
-
72
-
73
-
74
-
75
-
76
-
77
-
78
-
79
-
80
-
81
-
82
-
83
-
84
-
85
-
86
-
87
-
88
-
89
-
90
-
91
-
92
-
93
-
94
-
95
-
96
-
97
-
98
-
99
-
100
-
101
-
102
-
103
-
104
-
105
-
106
-
107
-
108
-
109
-
110
-
111
-
112
 |
 |
