JVC MXDVA5 Instructions - Page 10
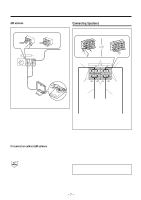
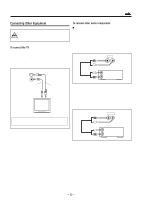
Connecting Speakers, To connect an outdoor AM antenna, AM antenna
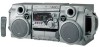 |
UPC - 046838257124
View all JVC MXDVA5 manuals
Add to My Manuals
Save this manual to your list of manuals |
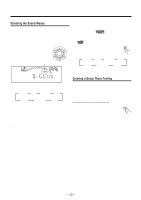
Page 10 highlights
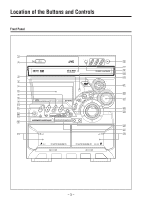
AM antenna 1 2 Connecting Speakers 1 2 ANTENNA FM [75 ] AM Vinyl-covered wire (not supplied) Speaker cord (blue/black) Black MAIN SPEAKER SUBWOOFER [ 4-8 ] [ 6-16 ] L L Speaker cord (red/black) R Blue Black R Red AM loop antenna (supplied) 1 Press and hold the clamp of the AM terminals on the rear of the unit. 2 Insert the end of the AM loop antenna cord into the terminal. 3 Release the finger from the clamp. 4 Turn the AM loop antenna until you have the best reception. To connect an outdoor AM antenna When reception is poor, connect a single vinyl-covered wire to the AM terminal and extend it horizontally. (The AM loop antenna must remain connected.) For better reception of both FM and AM • Make sure the antenna conductors do not touch any other terminals and connecting cords. • Keep the antennas away from metallic parts of the unit, connecting cords, and the AC power cord. Speaker cord (blue/black) From right main speaker terminals Speaker cord (red/black) From right subwoofer terminals From left main speaker terminals From left subwoofer terminals 1 Press and hold the clamp of the speaker terminal on the rear of the unit. 2 Insert the end of the speaker cord into the terminal. Match the polarity (colors): Blue (+) to blue (+) and black (-) to black (-); Red (+) to red (+) and black (-) to black (-). 3 Release the finger from the clamp. IMPORTANT: Use only speakers with the same speaker impedance as indicated by the speaker terminals on the rear of the unit. - 7 -
-
 1
1 -
2
-
3
-
4
-
 5
5 -
 6
6 -
 7
7 -
 8
8 -
 9
9 -
 10
10 -
 11
11 -
 12
12 -
 13
13 -
 14
14 -
 15
15 -
16
-
17
-
18
-
19
-
20
-
21
-
22
-
23
-
24
-
25
-
26
-
27
-
28
-
29
-
30
-
31
-
32
-
33
-
34
-
35
-
36
-
37
-
38
-
39
-
40
-
41
-
42
-
43
-
44
-
45
-
46
-
47
-
48
-
49
-
50
-
51
-
52
-
53
-
54
-
55
-
56
-
57
-
58
-
59
-
60
-
61
-
62
-
63
-
64
-
65
-
66
-
67
-
68
-
69
-
70
-
71
-
72
-
73
-
74
-
75
-
76
-
77
-
78
-
79
-
80
-
81
-
82
-
83
-
84
-
85
-
86
-
87
-
88
-
89
-
90
 |
 |
