JVC MXDVA5 Instructions - Page 85
How Sleep Timer actually works, To turn on or off Recording Timer after its setting is
 |
UPC - 046838257124
View all JVC MXDVA5 manuals
Add to My Manuals
Save this manual to your list of manuals |
Page 85 highlights
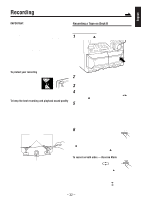
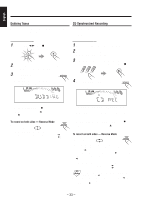
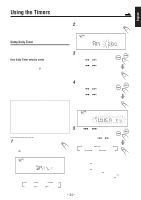
English 4 Set the on-time you want PRESET NEXT the unit to turn on. PREV. 1) Press 4 or ¢ to set the hour, then press SET. 2) Press 4 or ¢ to set the minute, then press SET. "OFF TIME" appears for 2 seconds, then SET the unit enters off-time setting mode. 5 Set the off-time you want the PRESET NEXT unit to turn off (on standby). PREV. 1) Press 4 or ¢ to set the hour, then press SET. 2) Press 4 or ¢ to set the minute, then press SET. The unit enters preset station selecting SET mode. 6 Select a preset station. 1) Press 4 or ¢ to select the PRESET NEXT band ("TUNER FM" or "TUNER PREV. AM"), then press SET. 2) Press 4 or ¢ to select a preset channel number, then press SET. The REC (recording timer) indicator stops flashing and remains lit. The SET settings you have done are shown on the display in sequence for your confirmation. 7 Press STANDBY/ON to STANDBY STANDBY/ON turn off the unit (on standby) if necessary. Using Sleep Timer With Sleep Timer, you can fall asleep to music. You can set Sleep Timer when the unit is turned on. How Sleep Timer actually works The unit automatically turns off after the specified time length passes. On the remote control ONLY: 1 Press SLEEP. The time length until the shut-off time appears and the SLEEP indicator starts flashing on the display. • Each time you press the button, the time length changes as follows: SLEEP10 SLEEP20 SLEEP30 SLEEP60 OFF SLEEP120 SLEEP90 (Canceled) 2 Wait for about 5 seconds after specifying the time length. The SLEEP indicator stops flashing and remains lit. To check the remaining time until the shut-off time, press SLEEP once so that the remaining time until the shut-off time appears for about 5 seconds. To change the shut-off time, press SLEEP repeatedly until the desired time length appears on the display. To cancel the setting, press SLEEP repeatedly until "OFF" appears on the display so that the SLEEP indicator goes off from the display. • Sleep Timer is also canceled when you turn off the unit. If you want to listen to another source while recording Press REC START/STOP or 7 to stop recording. Without stopping it, you cannot change the source. To turn on or off Recording Timer after its setting is done 1 Press CLOCK/TIMER repeatedly until CLOCK / TIMER "REC" appears on the display. 2 To turn off the Recording Timer, press CANCEL/DEMO. CANCEL /DEMO The REC (recording timer) indicator goes off from the display ("OFF" appears for a while). The Recording Timer is canceled, but the setting for the Recording Timer remains in memory. SET To turn on the Recording Timer, press SET. The REC (recording timer) indicator lights up on the display. The settings you have done are shown on the display in sequence for your confirmation. Timer Priority Since each timer can be set separately, you may wonder what happens if the setting for these timers overlaps. Here are examples. • If Recording Timer and Daily Timer has the same timer ontime, Recording Timer has priority over Daily Timer. • If Sleep Timer overlaps with another timer (either Daily Timer or Recording Timer), a timer with the earlier shut-off time has priority. AM 6:00 6:30 7:00 7:30 Sleep Timer Recording Timer canceled. When using the Recording Timer and Sleep Timer at the same time, pay special attention to the shut-off time. - 36 -
-
 1
1 -
2
-
3
-
4
-
5
-
6
-
7
-
8
-
9
-
10
-
11
-
12
-
13
-
14
-
15
-
16
-
17
-
18
-
19
-
20
-
21
-
22
-
23
-
24
-
25
-
26
-
27
-
28
-
29
-
30
-
31
-
32
-
33
-
34
-
35
-
36
-
37
-
38
-
39
-
40
-
41
-
42
-
43
-
44
-
45
-
46
-
47
-
48
-
49
-
50
-
51
-
52
-
53
-
54
-
55
-
56
-
57
-
58
-
59
-
60
-
61
-
62
-
63
-
64
-
65
-
66
-
67
-
68
-
69
-
70
-
71
-
72
-
73
-
74
-
75
-
76
-
77
-
78
-
79
-
 80
80 -
 81
81 -
 82
82 -
 83
83 -
 84
84 -
 85
85 -
 86
86 -
 87
87 -
 88
88 -
 89
89 -
 90
90
 |
 |
