Jenn-Air JGRP436HL Owners Manual - Page 11
Feature, Description/behavior, Instructions
 |
View all Jenn-Air JGRP436HL manuals
Add to My Manuals
Save this manual to your list of manuals |
Page 11 highlights
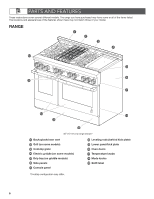
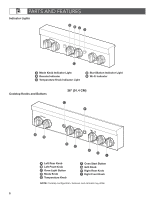
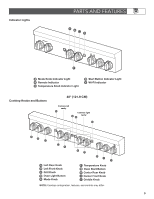
PARTS AND FEATURES FEATURE Temperature Knob Temperature Knob Indicator Light Start Button Start Button Indicator Light Oven Light Button Wi-Fi Indicator Light Remote Indicator Light Griddle Cooktop ON Light Griddle Preheat Light DESCRIPTION/BEHAVIOR ■ OFF ■ PROOF ■ KEEP WARM ■ BROIL LOW (right cavity only) ■ BROIL HIGH (right cavity only) ■ SLOW BAKE LOW (left cavity only) ■ SLOW BAKE HIGH (left cavity only) ■ Wi-Fi ■ CLEAN When a temperature or setting is selected, and the mode is valid, the Temperature and Mode indicator lights will light white. When the Start button has been pressed, the knob indicator light will continue to blink white until preheat has completed. The light will turn solid white and a tone will sound when preheat is complete. If there is no preheat for a cycle, the preheat completes immediately and the light turns solid white. NOTE: If an invalid mode and temperature combination has been selected, the knob light will blink and a tone will sound prompting the user to select a valid combination. The indicator light will continue to blink and a tone will sound every 30 seconds until the error is fixed or timeout after 2 minutes of inactivity. The temperature knob will blink red if the oven is too hot to proof or if a 100+ degree decrease in temperature is in progress. I.e. changing from Bake 450ºF to Bake 350ºF (177ºC to 232ºC). Start an oven function once a valid mode and temperature have been selected. The Start button indicator light will flash white to prompt the user to press the Start button. Turn the oven light on and off. The Wi-Fi indicator light illuminates white when the unit is Wi-Fi enabled. The Remote indicator light illuminates white when the unit is remote enabled. Right Griddle indicator light - The Griddle Cooktop On light illuminates blue when the griddle knob is powered on. Left Griddle indicator light - The griddle Preheat light flashes blue while the griddle is preheating. Once preheat temperature has been reached, the indicator light turns solid blue. INSTRUCTIONS Turn the knob to select the desired cooking temperature or setting. 1. Choose an oven function by turning the Mode Knob and Temperature Knob to desired selections. NOTE: The Start button will flash white to prompt the user to press the Start button. NOTE: When the unit is on, mode can be changed between Bake, Convect Bake, Convect Roast, and Broil/Convect Broil. Press the Start button to confirm mode change. 2. Press the Start button to begin oven function. Press the Oven Light button to toggle the light on and off. The button turns the light on and off regardless of whether the door is open. All lights will turn off in Idle mode. All lights will turn off in Idle mode. 11
-
 1
1 -
2
-
3
-
4
-
5
-
 6
6 -
 7
7 -
 8
8 -
 9
9 -
 10
10 -
 11
11 -
 12
12 -
 13
13 -
 14
14 -
 15
15 -
 16
16 -
17
-
18
-
19
-
20
-
21
-
22
-
23
-
24
-
25
-
26
-
27
-
28
-
29
-
30
-
31
-
32
-
33
-
34
-
35
-
36
-
37
-
38
-
39
-
40
-
41
-
42
-
43
-
44
-
45
-
46
-
47
-
48
-
49
-
50
-
51
-
52
-
53
-
54
-
55
-
56
-
57
-
58
-
59
-
60
-
61
-
62
-
63
-
64
-
65
-
66
-
67
-
68
-
69
-
70
-
71
-
72
 |
 |
