Kenwood DDX419BT Instruction Manual - Page 7
Getting Started
 |
View all Kenwood DDX419BT manuals
Add to My Manuals
Save this manual to your list of manuals |
Page 7 highlights
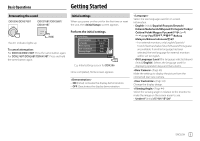
Basic Operations Getting Started Attenuating the sound DDX396/DDX376BT DDX276BT/DDX26BT/ DDX419BT Initial settings When you power on the unit for the first time or reset the unit, the screen appears. The ATT indicator lights up. (Hold) To cancel attenuation: For DDX396/DDX376BT: Press the same button again. For DDX276BT/DDX26BT/DDX419BT: Press and hold the same button again. Perform the initial settings. Initial Setup Demonstration Language Rear Camera User Customize Viewing Angle ON OFF English Enter Enter Enter Finish E.g. Initial settings screen for DDX396 Once completed, Home screen appears. • ON (Initial): Activates the display demonstration. • OFF: Deactivates the display demonstration. Select the text language used for on-screen information. • English (Initial)/Español/Français/Deutsch/ Italiano/Nederlands Português/Türkçe/ Čeština/Polski/Magyar/Руccĸий/ / / / / / /Bahasa Malaysia/Bahasa Indonesia/ - For external monitors, only English/Spanish/ French/German/Italian/Dutch/Russian/Portuguese are available. If another language has been selected, the text language for external monitors will be set to English. • GUI Language (Local (the language selected above) (Initial)/English): Selects the language used for displaying operation keys and menu items. (Page 45) Make the settings to display the picture from the connected rear view camera. (Page 43) Change the display design. (Page 44) Select the viewing angle in relation to the monitor to make the image on the screen easier to see. • Under 0° (Initial)/5°/10°/15°/20° ENGLISH 5
-
 1
1 -
 2
2 -
 3
3 -
 4
4 -
 5
5 -
 6
6 -
 7
7 -
 8
8 -
 9
9 -
 10
10 -
 11
11 -
 12
12 -
13
-
14
-
15
-
16
-
17
-
18
-
19
-
20
-
21
-
22
-
23
-
24
-
25
-
26
-
27
-
28
-
29
-
30
-
31
-
32
-
33
-
34
-
35
-
36
-
37
-
38
-
39
-
40
-
41
-
42
-
43
-
44
-
45
-
46
-
47
-
48
-
49
-
50
-
51
-
52
-
53
-
54
-
55
-
56
-
57
-
58
-
59
-
60
-
61
-
62
-
63
-
64
-
65
-
66
-
67
-
68
-
69
-
70
-
71
-
72
 |
 |
