Kenwood DDX573BH North America - Page 61

<Display> setting screen, <Input> setting screen

Page 61 highlights

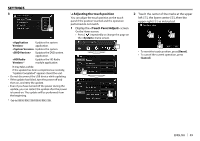
SETTINGS Select the listening position, then adjust the delay time of the speaker output to create a more suitable environment for your vehicle. (Page 54) Adjust and store the auto-adjustment volume level for each source. (For discs, the adjustment is stored for each of the following categories: DVD/VCD, CD, and DivX/MPEG1/MPEG2/WMV/MP3/WMA/WAV/ AAC.) The volume level will automatically increase or decrease when you change the source. • -15 to +6 (Initial: 00) ❏ setting screen • Auto (Initial): Dims the screen and button illumination when you turn on the headlights. - The ILLUMI lead connection is required. (Page 68) • ON: Activates dimmer. • OFF: Cancels. • NAV*1: Activates or deactivates dimmer according to the day/night display setting of the connected navigation unit. Change the display design. (Page 56) • ON: Displays the clock while a video source is playing. • OFF (Initial): Cancels. • ON (Initial): Activates the demonstration on the screen. • OFF: Cancels. • ON (Initial): Scrolls the displayed information repeatedly. • Once: Scrolls the displayed information once. • OFF: Cancels. Pressing [

  • 1
  • 2
  • 3
  • 4
  • 5
  • 6
  • 7
  • 8
  • 9
  • 10
  • 11
  • 12
  • 13
  • 14
  • 15
  • 16
  • 17
  • 18
  • 19
  • 20
  • 21
  • 22
  • 23
  • 24
  • 25
  • 26
  • 27
  • 28
  • 29
  • 30
  • 31
  • 32
  • 33
  • 34
  • 35
  • 36
  • 37
  • 38
  • 39
  • 40
  • 41
  • 42
  • 43
  • 44
  • 45
  • 46
  • 47
  • 48
  • 49
  • 50
  • 51
  • 52
  • 53
  • 54
  • 55
  • 56
  • 57
  • 58
  • 59
  • 60
  • 61
  • 62
  • 63
  • 64
  • 65
  • 66
  • 67
  • 68
  • 69
  • 70
  • 71
  • 72
  • 73
  • 74
  • 75
  • 76
  • 77
  • 78
  • 79
  • 80
  • 81
  • 82
  • 83
  • 84

ENGLISH
61
SETTINGS
SETTINGS
<Time Alignment>
Select the listening position, then adjust the delay
time of the speaker output to create a more suitable
environment for your vehicle. (Page
 
54)
<Volume Offset>
Adjust and store the auto-adjustment volume level
for each source. (For discs, the adjustment is stored
for each of the following categories: DVD/VCD, CD,
and DivX/MPEG1/MPEG2/WMV/MP3/WMA/WAV/
AAC.) The volume level will automatically increase or
decrease when you change the source.
–15
to
+6
(Initial:
00
)
<Display> setting screen
<Dimmer>
Auto
(Initial): Dims the screen and button
illumination when you turn on the headlights.
The ILLUMI lead connection is required.
(Page
 
68)
ON
: Activates dimmer.
OFF
: Cancels.
NAV
*
1
: Activates or deactivates dimmer according
to the day/night display setting of the connected
navigation unit.
<User Customize>
Change the display design. (Page
 
56)
<OSD Clock>
ON
: Displays the clock while a video source is
playing.
OFF
(Initial): Cancels.
<Demonstration>
ON
(Initial): Activates the demonstration on the
screen.
OFF
: Cancels.
<Scroll>
ON
(Initial): Scrolls the displayed information
repeatedly.
Once
: Scrolls the displayed information once.
OFF
: Cancels.
Pressing
[<
]
scrolls the text regardless of this setting.
<HOME Customize>
Change the items to display on the Home screen.
(Page
 
57)
<Screen Adjustment>
Adjust the brightness and blackness of the screen.
Press
[Enter]
to display the setting screen, select
[DIM ON]
(dimmer on)/
[DIM OFF]
(dimmer off),
then change the following settings:
Bright
: Adjusts brightness.
–15
to
+15
(Initial:
0
for dimmer on/
+15
for
dimmer off)
Black
: Adjusts blackness.
–10
to
+10
(Initial:
0
)
<Video Output>
*
2
Select the color system of the external monitor.
NTSC
(Initial)/
PAL
<Angle>
*
3
Adjust the panel angle. (Page
 
8)
*
1
Only for DDX416BT.
*
2
“Please Power Off” appears when the setting is changed. Turn off
the power, then turn on to enable the change.
*
3
Only for DDX793/DDX773BH.
<Input> setting screen
<Front Camera>
*
1
Configure the front view camera settings.
(Page
 
38)
Front Camera
: Activates or deactivates the front
view camera.
Reverse Image
: Selects whether to reverse the
picture from the front view camera or not.
<Rear Camera>
Configure the rear view camera settings.
Rear Camera Interruption
(Page
 
38):
ON
: Displays the picture from the rear view
camera when you shift the gear to the reverse
(R) position.
OFF
(Initial): Select this when no camera is
connected
Parking Guidelines
: Displays (
ON
: Initial) or hides
(
OFF
) the parking guidelines. (Page
 
40)
Guidelines Setup
: Adjusts the parking guidelines.
(Page
 
40)
<Parking Assist>
*
1
Configure settings for using the ADS adapter.
Parking Assist Display
: When an ADS adapter
is connected, you can display information about
obstacles around the car.
ON
: Always displays information.
Dyn.
(Initial): Displays information when the
sensor detects obstacles.
OFF
: Cancels.
Parking Assist Position
: Selects where
information about obstacles is displayed on the
screen
Left
/
Right
(Initial)
<Navigation>
*
2
Change the navigation settings. (Page
 
42)
*
1
Only for DDX793/DDX773BH/DDX593/DDX573BH/DDX393.
*
2
Only for DDX416BT.