Kenwood DDX573BH North America - Page 7
DDX593/DDX573BH/DDX393/DDX373BT, DDX23BT, DDX416BT
 |
View all Kenwood DDX573BH manuals
Add to My Manuals
Save this manual to your list of manuals |
Page 7 highlights
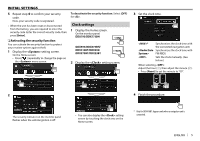
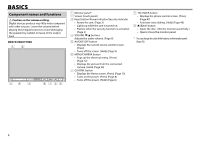
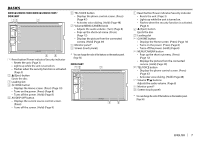
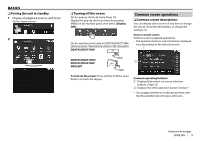
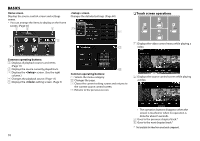
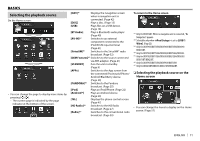
BASICS DDX593/DDX573BH/DDX393/DDX373BT/ DDX23BT 6 TEL/VOICE button • Displays the phone control screen. (Press) (Page 47) • Activates voice dialing. (Hold) (Page 48) 7 Volume/MENU/CAMERA knob • Adjusts the audio volume. (Turn) (Page 8) • Pops up the short-cut menu. (Press) (Page 12) • Displays the picture from the connected camera. (Hold) (Page 39) 8 Monitor panel* 9 Screen (touch panel) 1 Reset button/Power indicator/Security indicator • Resets the unit. (Page 3) • Lights up while the unit is turned on. • Flashes when the security function is activated. (Page 5) 2 M (Eject) button Ejects the disc. 3 Loading slot 4 B HOME button • Displays the Home screen. (Press) (Page 10) • Turns on the power. (Press) (Page 8) • Turns off the power. (Hold) (Page 8) 5 AV/DISP OFF button • Displays the current source control screen. (Press) • Turns off the screen. (Hold) (Page 9) * You can change the color of the buttons on the monitor panel. (Page 56) DDX416BT 1 Reset button/Power indicator/Security indicator • Resets the unit. (Page 3) • Lights up while the unit is turned on. • Flashes when the security function is activated. (Page 5) 2 M (Eject) button Ejects the disc. 3 Loading slot 4 B HOME button • Displays the Home screen. (Press) (Page 10) • Turns on the power. (Press) (Page 8) • Turns off the power. (Hold) (Page 8) 5 MENU/CAMERA button • Pops up the short-cut menu. (Press) (Page 12) • Displays the picture from the connected camera. (Hold) (Page 39) 6 TEL/VOICE button • Displays the phone control screen. (Press) (Page 47) • Activates voice dialing. (Hold) (Page 48) 7 Volume K/J buttons Adjusts the audio volume. (Page 8) 8 Monitor panel* 9 Screen (touch panel) * You can change the color of the buttons on the monitor panel. (Page 56) ENGLISH 7
-
 1
1 -
 2
2 -
 3
3 -
 4
4 -
 5
5 -
 6
6 -
 7
7 -
 8
8 -
 9
9 -
 10
10 -
 11
11 -
 12
12 -
13
-
14
-
15
-
16
-
17
-
18
-
19
-
20
-
21
-
22
-
23
-
24
-
25
-
26
-
27
-
28
-
29
-
30
-
31
-
32
-
33
-
34
-
35
-
36
-
37
-
38
-
39
-
40
-
41
-
42
-
43
-
44
-
45
-
46
-
47
-
48
-
49
-
50
-
51
-
52
-
53
-
54
-
55
-
56
-
57
-
58
-
59
-
60
-
61
-
62
-
63
-
64
-
65
-
66
-
67
-
68
-
69
-
70
-
71
-
72
-
73
-
74
-
75
-
76
-
77
-
78
-
79
-
80
-
81
-
82
-
83
-
84
 |
 |
