Kenwood DNX571HD User Manual 3 - Page 18
Non-Japanese cars, Japanese cars - accessories
 |
View all Kenwood DNX571HD manuals
Add to My Manuals
Save this manual to your list of manuals |
Page 18 highlights
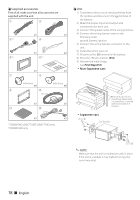
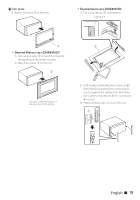
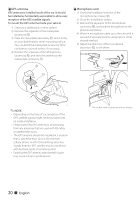
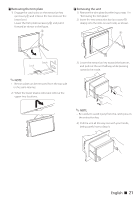
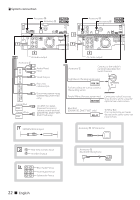
ÑÑSupplied accessories First of all, make sure that all accessories are supplied with the unit. 1 2 x1 x1 3 [1] 4 x1 x2 5 [2] 6 [2] x1 x1 7 8 ÑÑUnit 1) To prevent a short circuit, remove the key from the ignition and disconnect the ¤ terminal of the battery. 2) Make the proper input and output wire connections for each unit. 3) Connect the speaker wires of the wiring harness. 4) Connect the wiring harness wires in the following order; ground, battery, ignition. 5) Connect the wiring harness connector to the unit. 6) Install the unit in your car. 7) Reconnect the ¤ terminal of the battery. 8) Press the button. (P.4) 9) Perform the Initial Setup. See First Step (P.6). Non-Japanese cars (M5x6mm) x6 (M5x7mm) x6 9 0 (3.5 m) x1 x1 - = (3 m) x1 x1 [1] DNX891HD, DNX7710BT, DNX771HD only [2] DNX891HD only Bend the tabs of the mounting sleeve with a screwdriver or similar utensil and attach it in place. Japanese cars 7 or 8 Car Bracket 7 or 8 ✎✎NOTE • Make sure that the unit is installed securely in place. If the unit is unstable, it may malfunction (eg, the sound may skip). 18 ñ English
-
 1
1 -
2
-
3
-
4
-
5
-
6
-
7
-
8
-
9
-
10
-
11
-
12
-
 13
13 -
 14
14 -
 15
15 -
 16
16 -
 17
17 -
 18
18 -
 19
19 -
 20
20 -
 21
21 -
 22
22 -
 23
23 -
24
-
25
-
26
-
27
-
28
-
29
-
30
-
31
-
32
-
33
-
34
-
35
-
36
-
37
-
38
-
39
-
40
-
41
-
42
-
43
-
44
-
45
-
46
-
47
-
48
-
49
-
50
-
51
-
52
-
53
-
54
-
55
-
56
 |
 |
