Kenwood DRV-830 Operation Manual - Page 13
Recording
 |
View all Kenwood DRV-830 manuals
Add to My Manuals
Save this manual to your list of manuals |
Page 13 highlights
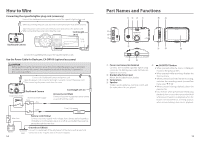
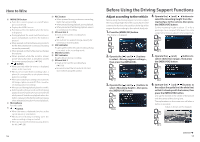
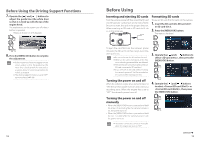
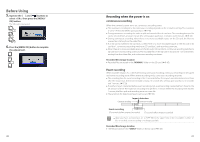
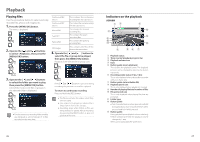
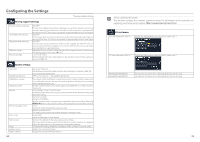
Recording Recording manually (manual recording) Videos can be recorded whenever desired and stored in the manual recording folder by pressing the [REC] button during continuous recording. 1. Press the [REC] button. Manual recording starts, and once the time set at "Manual recording time" has passed, the mode returns to continuous recording. Taking photos (still image recording) Photos (still images) can be taken at any time by pressing the [ ] button during recording. 1. Press the [ ] button. The camera icon appears in the upper left of the display, the shutter sounds and the photo is taken. z If you wish to extend the recording time, press the [REC] button again. z The recording time for manual recording is the 10 seconds before the [REC] button was pressed and the time set at "Manual recording time". (➜ P. 33) z Manual recording is not possible while folders or files are being selected or during the playback, deleting, setting or event recording operations. Returning to continuous recording Continuous recording can be started forcibly even while files are playing or a menu is displayed. 1. Press and hold the [REC] button. File playback or menu display is canceled and the mode returns to continuous recording. 24 z If you wish to take multiple photos, press the [ ] button again. z It is not possible to take photos when not recording, such as while files are playing, menu settings are being made, etc. Taking photos automatically When the [ ] button is pressed and held for over 1 second during recording, the continuous capture icon appears in the upper left of the display and photos (still images) are captured automatically at fixed intervals. 1. Press and hold the [ ] button. (over 1 second) z The number of photos taken and the interval can be set at "Automatic still image capture". (➜ P. 33) z Automatic still image capture turns off when the [ ] button is pressed and held for over 1 second or once the set number of still images has been captured. z Automatic still image capture also turns off when the menu is displayed or when the power is turned off. Indicators on the recording screen 1 23 45 ^ $ & % * 7 ! 8 9@ 6# 0 1 Recording mode Remaining recording time (remaining time 2 for manual or event recording) 3 Still image recording mode (taking photos/ taking photos continuously) This is only displayed during still image capture and continuous capture. HDR recording mode 4 5 Resolution (2560×1440, 2304×1296, 1920×1080, 1280×720) The underlined number is displayed. 6 Low frame rate display (9 fps, 3 fps) Current time 7 8 Position captured by positioning satellite This is displayed when the current position has been established by positioning satellite. Button guide (manual recording) 9 0 Button guide (audio recording switching) ! File limit reached (manual recording) This is displayed when the limit to the number of files that can be recorded with manual recording has been reached. @ File limit reached (event recording) This is displayed when the limit to the number of files that can be recorded with event recording has been reached. # File limit reached (parked recording) This is displayed when the limit to the number of files that can be recorded with parked recording has been reached. $ SD card slot 1 status SD card detected Currently recording on SD card Recording on SD card not possible % SD card slot 2 status SD card detected Currently recording on SD card Recording on SD card not possible ^ Button guide (shortcut menu/recording mode switching) Button guide (MENU) & * Button guide (still image capture) Shortcut menu This displays setting items related to recording and frequently used setting items. 1. Press the [J] button during recording. The shortcut menu appears. Resolution Recording mode Low frame rate Detecting sensitivity (event) Notification volume SD card information Sets the resolution for recording. (➜ P. 33) Sets the recording mode. (➜ P. 33) Sets the image update rate for low frame rate recording. (➜ P. 33) Sets the impact detection sensitivity for event recording. (➜ P. 33) Sets the volume of the notification sound. (➜ P. 34) Use this to check the SD card information. (➜ P. 35) z The settings are the same as the setting items with the same names on the menu. z The shortcut menu items cannot be edited. 25
-
 1
1 -
2
-
3
-
4
-
5
-
6
-
7
-
 8
8 -
 9
9 -
 10
10 -
 11
11 -
 12
12 -
 13
13 -
 14
14 -
 15
15 -
 16
16 -
 17
17 -
 18
18 -
19
-
20
-
21
-
22
-
23
-
24
-
25
 |
 |
