Kenwood DRV-A501W Operation Manual - Page 15
Record/OK Button, Record, Mode/Screen Shot Button, Screen Shot, Screen, Status LED Indicator, Red
 |
View all Kenwood DRV-A501W manuals
Add to My Manuals
Save this manual to your list of manuals |
Page 15 highlights
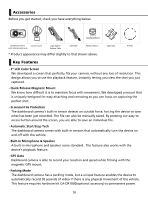
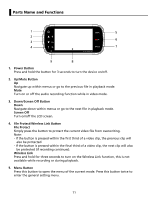
6. Record/OK Button Record In Video mode, press to start or stop recording. In Photo mode, press to take a photo. OK The confirm button used to select options in menus. 7. Mode/Screen Shot Button Mode This button allows you to navigate between video, photo and playback modes. Screen Shot While you are recording in video mode, press the button and you will be able to take a screenshot of the current frame. 8. Screen The device is equipped with a standard 3" LCD color screen to let you view. 9. Status LED Indicator Red: Power On Red (Flashing): Recording Blue: Charging 10. Connector Port Attach the magnetic connector to the connector port. 11. Speaker System sound and recorded footage sound. 10 11 14 15 12 13 16 12
-
 1
1 -
2
-
3
-
4
-
5
-
6
-
7
-
8
-
9
-
 10
10 -
 11
11 -
 12
12 -
 13
13 -
 14
14 -
 15
15 -
 16
16 -
 17
17 -
 18
18 -
 19
19 -
 20
20 -
21
-
22
-
23
-
24
-
25
-
26
-
27
-
28
-
29
-
30
-
31
-
32
-
33
-
34
-
35
-
36
-
37
-
38
-
39
-
40
-
41
-
42
-
43
-
44
-
45
-
46
-
47
-
48
-
49
-
50
-
51
-
52
-
53
-
54
-
55
-
56
-
57
-
58
-
59
-
60
-
61
-
62
-
63
 |
 |

12
10
11
14
15
16
12 13
Record/OK Button
Record
In Video mode, press to start or stop recording.
In Photo mode, press to take a photo.
OK
The confirm button used to select options in menus.
Mode/Screen Shot Button
Mode
This button allows you to navigate between video, photo and playback modes.
Screen Shot
While you are recording in video mode, press the button and you will be
able to take a screenshot of the current frame.
Screen
The device is equipped with a standard 3” LCD color screen to let you view.
Status LED Indicator
Red:
Power On
Red (Flashing):
Recording
Blue:
Charging
Connector Port
Attach the magnetic connector to the connector port.
Speaker
System sound and recorded footage sound.
6.
7.
8.
9.
10.
11.